

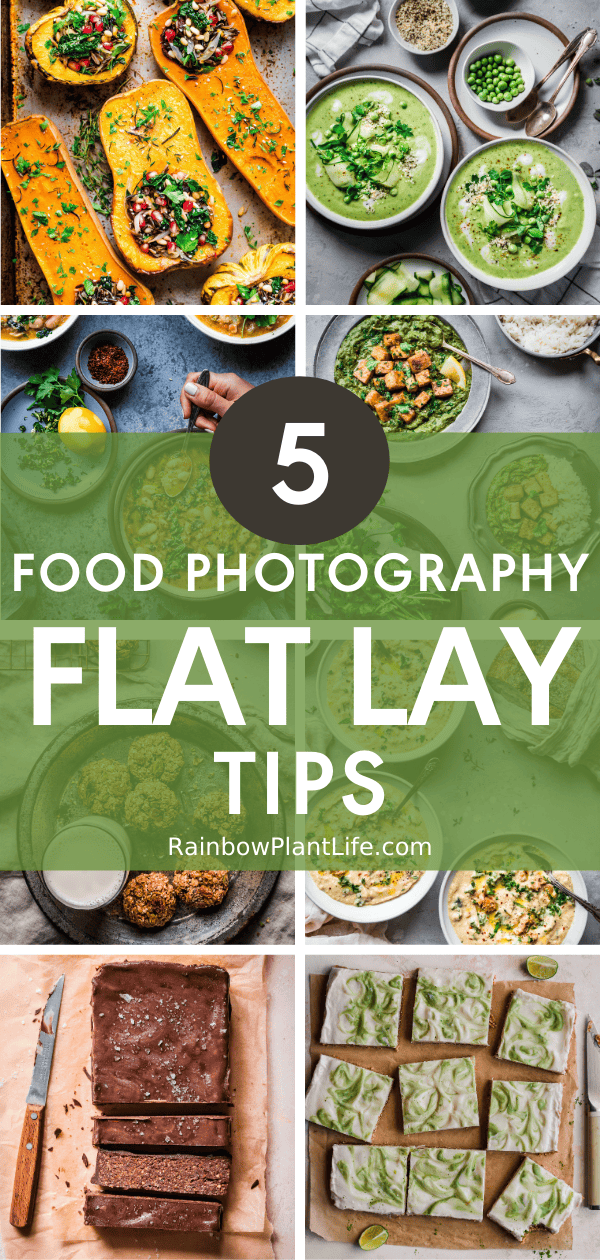
If you’ve been on the old Instagram in the last 5 years or so, you know that one of the most popular food photography styles is a flat lay (i.e., an overhead photo from a bird’s eye view). While it seems easy enough to snap a quick overhead photo of your avocado toast at brunch, taking an eye-catching, captivating flat lay photo is more difficult than it looks.
It requires thoughtfulness, advance planning, and attention to both styling and lighting. Lighting is a whole new ball game, so these tips will focus primarily on food styling, propping, and camera fundamentals that are critical in flat lay photography.
Once you have mastered the basics of food photography (and if you haven’t, be sure to check out my four-part series on Food Photography Tips for the Beginner) and have the budget to do so, feel free to start expanding your surface collection. You can try more heavily textured surfaces or surfaces in bright colors!
And if you enjoy this post or learn something new, be sure to leave a comment below with your feedback!
-
First things first, select the right surface
The surface or backdrop you use is always important in food photography, but it is especially important in flay lays. That’s because the surface is being photographed from overhead and gets a lot of play, as opposed to photos taken from head on or from a three-quarters angle.
In the latter types of photos, often only a small portion of surface is seen, or sometimes the surface is merely seen in the background and is largely blurred out. In contrast, in most flat lays, the texture and color of the surface is easier to see.
Another reason it’s important to select the right surface is that the surface in a flat lay plays a big role in determining the mood and feel of your photo. For instance, a white surface paired with white plates and a chocolate cake might convey a bright and airy scene; in contrast, a dark gray surface paired with white plates and a chocolate cake will likely convey a moodier, more dramatic scene (even moodier if paired with dark plates).
That’s why it’s important to think about the vibe you want to convey in your photo—rustic and casual, fun and summery, ethereal and light, dark and moody, etc.—and then select the most appropriate surface you have.

On the left, chocolate mousse looks girly and romantic on a light pink surface. On the right, it looks dark and moody on a dark bluish-grey surface. I recognize these aren’t flatlays (LOL) but it’s illustrative of the point about surfaces being able to control the mood of your scene.
If you are a beginner, I recommend sticking with backgrounds that have neutral tones – whites, off-whites, grays, etc. For one, they are incredibly versatile so you can use them in all kinds of photos (and you can make the same surface look quite different by using different editing styles).
Second, neutral colored surfaces don’t distract from the food itself, enabling the food to shine the brightest. Many beginners struggling with allowing the food to be the primary focus, so using a neutral surface is one way to counteract that tendency.
And if you’re not ready to drop a pretty penny on professional food photography surfaces (which generally cost in the $150-$250 range), here are some ideas for neutral surfaces that you might already have at home:
-
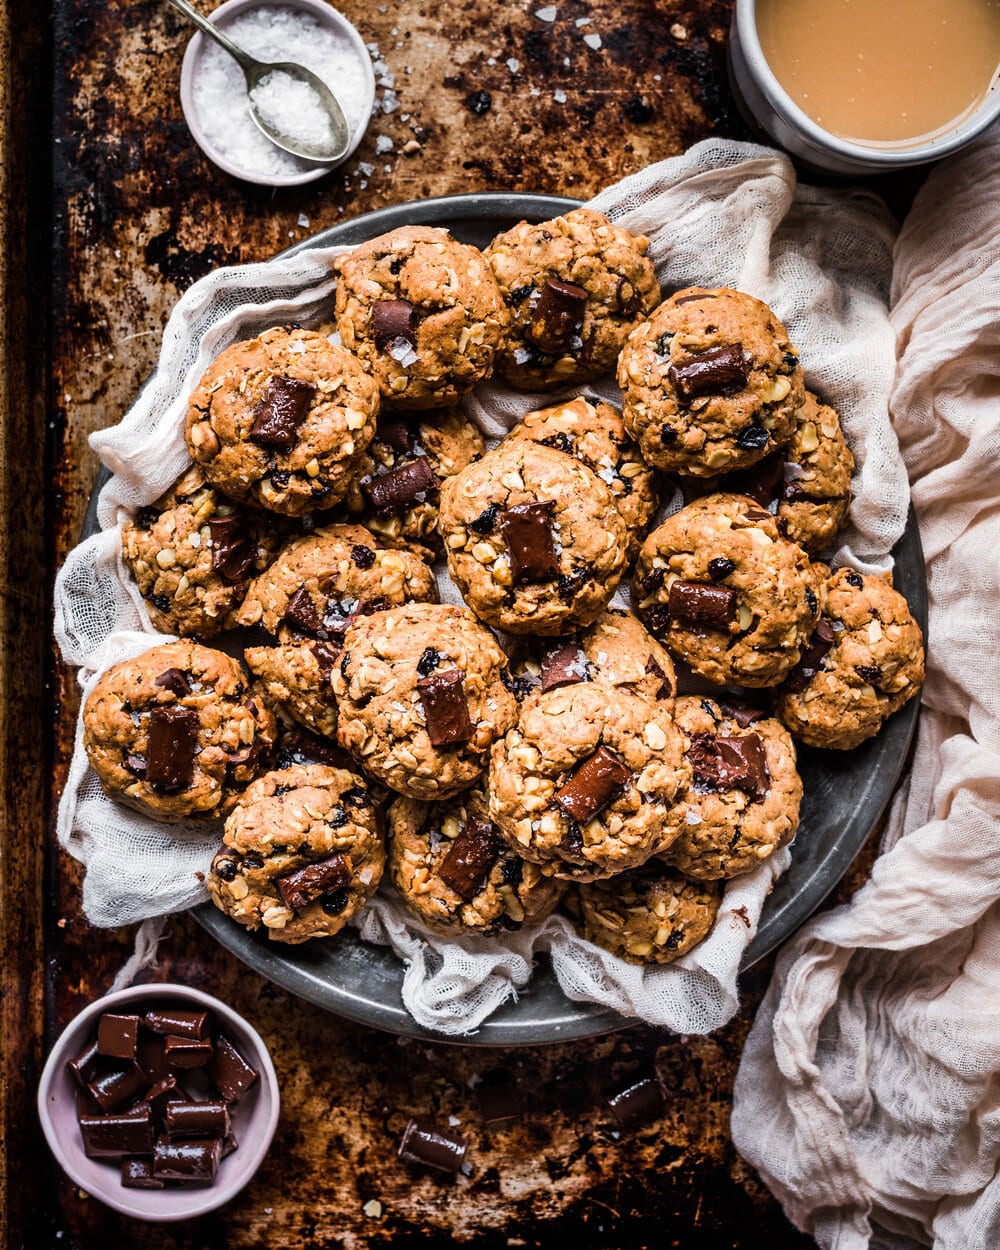
An old, worn and torn cookie sheet/baking tray (especially great for dark and moody or rustic scenes)
-
A wooden table in your house (but only if the color and texture aren’t distracting)
-
The surface of a wooden or other chair in your house (again, only if the color and texture aren’t distracting)
-
Parchment paper (crumble it up to create those natural crinkles)
-
Neutral colored linen towels (or even pillowcases)
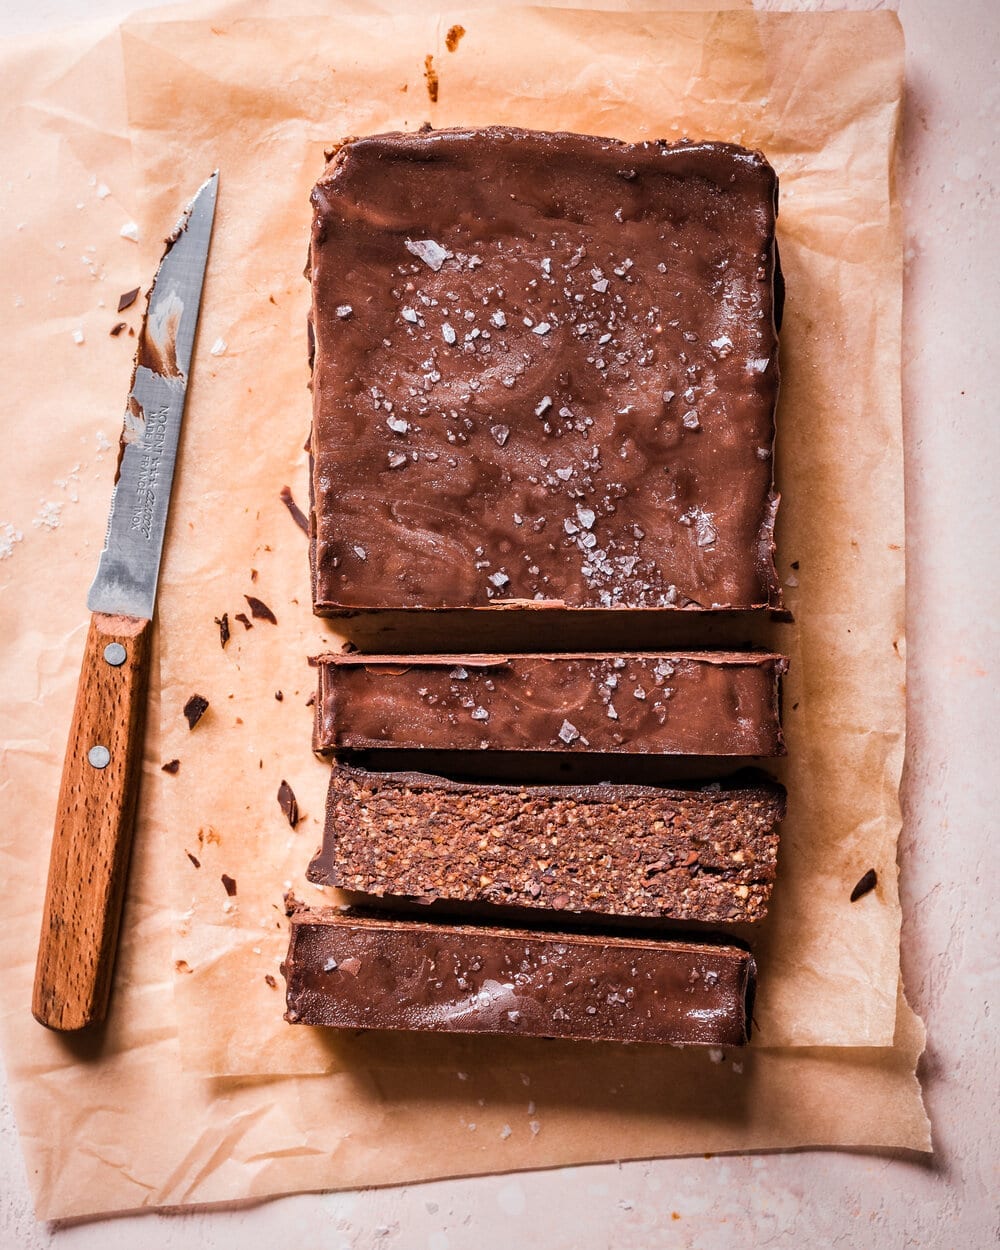
Using unbleached parchment paper (that has been slightly wrinkled is an excellent natural surface for baked goods.
A worn cookie sheet / baking tray is an easy way to create a dark, rustic mood.
Once you have mastered the basics of food photography (and if you haven’t, be sure to check out my four-part series on Food Photography Tips for the Beginner) and have the budget to do so, feel free to start expanding your surface collection. You can try more heavily textured surfaces or surfaces in bright colors!
2. Use that Tripod
Using a tripod to photograph food will almost always elevate your photography game, but this is especially true in flat lays (for more on why I always shoot with a tripod, check out this post).
To use a tripod for flat lays, you will need one of two options: (1) an overhead arm extension that you can attach to your tripod or (2) a tripod that comes with a horizontal column or articulating arm.
For the first option, check out the tripod + overhead arm extension I use over on my Shop page (it’s called a “reproduction arm”). For the second option, Manfrotto makes one of these nifty tripods.
As for the benefits of using a tripod in flat lays, there are many. First, a tripod is about 50x sturdier than a human body, so there will be very minimal camera shake. This means you can use a much lower shutter speed than if you were shooting freehand and still not experience any motion blur. And a lower shutter speed means you’re able to keep your ISO low even if you’re shooting in a low light environment.
Just keep in mind that you’re using a sturdy tripod. A flimsy, inexpensive tripod, especially when paired with a relatively heavy camera, will allow for camera shake. I use a Manfrotto tripod that is sturdy and durable yet still affordable (they make many more high-end ones than this).
Second, when you’re not worrying about holding your camera and bracing yourself and not dropping your camera, you have the freedom to focus on other things, like the composition and styling of your scene. You’ll likely be able to spot more possibilities for improvement when you’re not holding a camera in your hands.
Third, you’re likely to get a perfectly even 90° angle for your flat lay photo when using a tripod, as opposed to shooting freehand. Just be sure to read the second bonus tip coming up!
Finally, you’re also able to replicate the same view over and over with a tripod, as the camera doesn’t move. This enables you to change the arrangement of one item or alter the food in one respect and compare the otherwise identical images to see which option you like best.
BONUS #1: For even more control over your flat lay, shoot with your camera tethered to your computer. While I don’t always shoot with my camera tethered (i.e., connected) to Lightroom on my laptop, when I do, I always notice a significant improvement in my photos.
This is because you can see your photo in an editing platform and make real time adjustments based on the composition and crop you want. To see how I use tethering in my own work, check out my video on Youtube (the relevant discussion starts at 12:30!
BONUS #2: If you feel like you struggle with getting your camera and lens perfectly even at a 90° angle, then make sure you use a level! I’m linking to a fancy level on Amazon so you can see what I mean by a “level”, but you can usually find these at hardware stores for $5-10. Once your camera is attached to your tripod overhead arm, place the level directly on top of the camera and ensure that your camera is, well, leveled!
3. Create Dynamism through Creative Prop Styling
Since flat lay photos usually have just one even plane of field—in contrast to photos taken from head on or from a three-quarters angle—they can lack dynamism. But they don’t have to! Here are three creative prop styling strategies you can use to create dynamism in your flat lay food photos.
(a) Add props of different heights and sizes. If you are photographing, for instance, a dinner scene, try including a few glasses of water or wine along with your bowls and plates. The differing height of the glasses will cause the viewer to gaze longer at the photo. Better yet, try using glasses of differing heights for even more visual interest.
You can even create visual interest without using props with such varying heights. For example, if you are shooting two bowls of pasta, you can slightly prop up one of the bowls on a ramekin or other small bowl to show it off as the primary focus.
Or, if you are shooting a photo that has 5 mini tarts, you can place all of the tarts on the surface, but prop one of the tarts on top of a wire rack or cutting board so it has a different height (and is framed by a different shape).
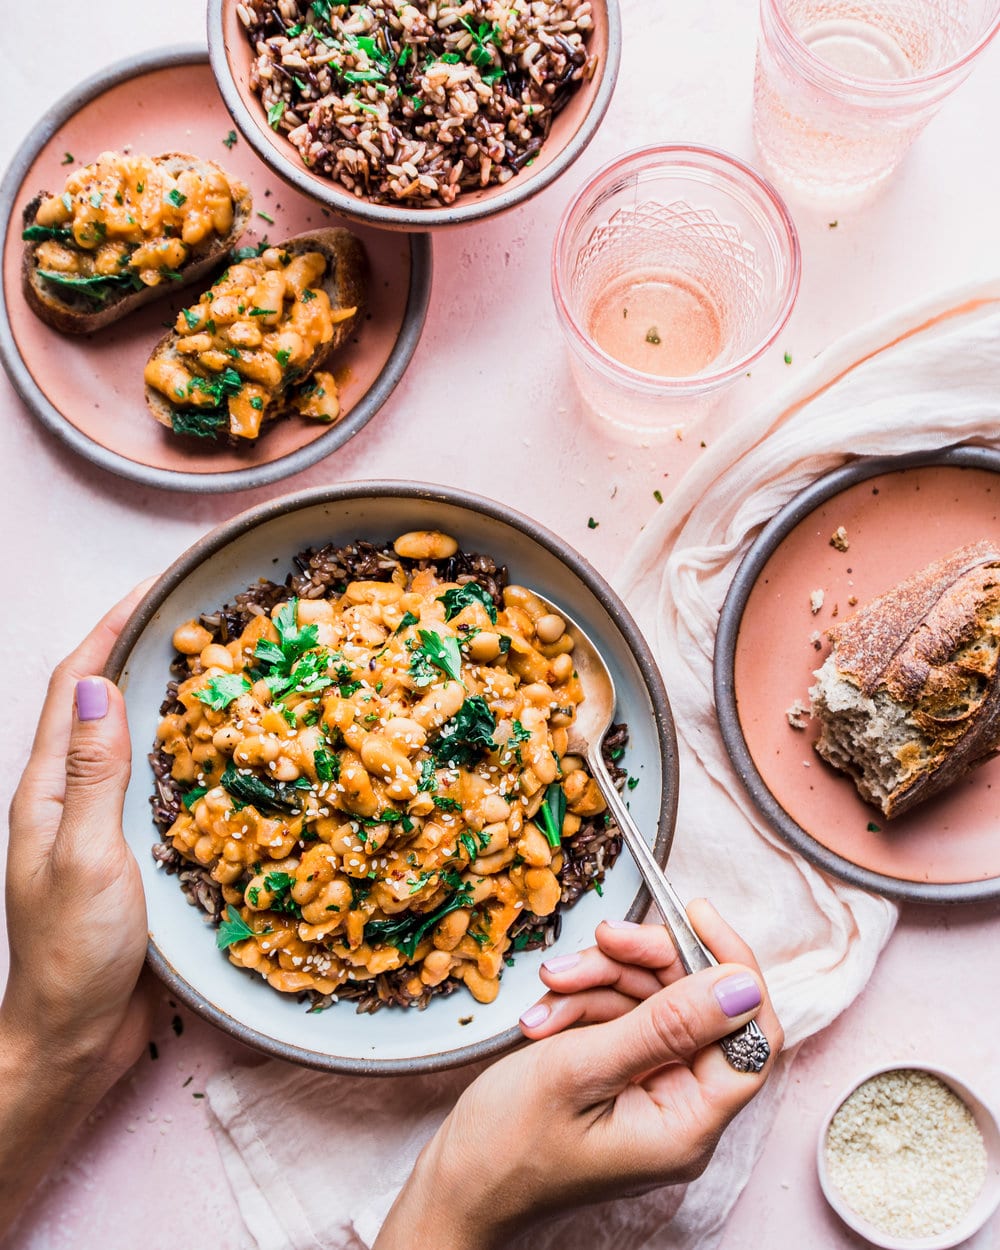
Through careful balancing, the bowl of wild rice at the top of the frame is resting on top of the plate with the toasts – the varying heights, in addition to the taller height from the glasses – work together to create visual intrigue.
(b) Arrange similar props in opposing directions. This works especially well for utensils or elements that have a linear shape. If you are photographing a cake and your cake server is pointing downward towards the foreground of the frame, then try placing a fork in the opposite direction—pointing upwards toward the background of the frame.
Alternatively, if you are shooting a dinner scene and you have multiple bowls or plates of the same dish, arrange the spoons or forks in competing directions. This creates some tension and holds the viewer’s gaze for longer.
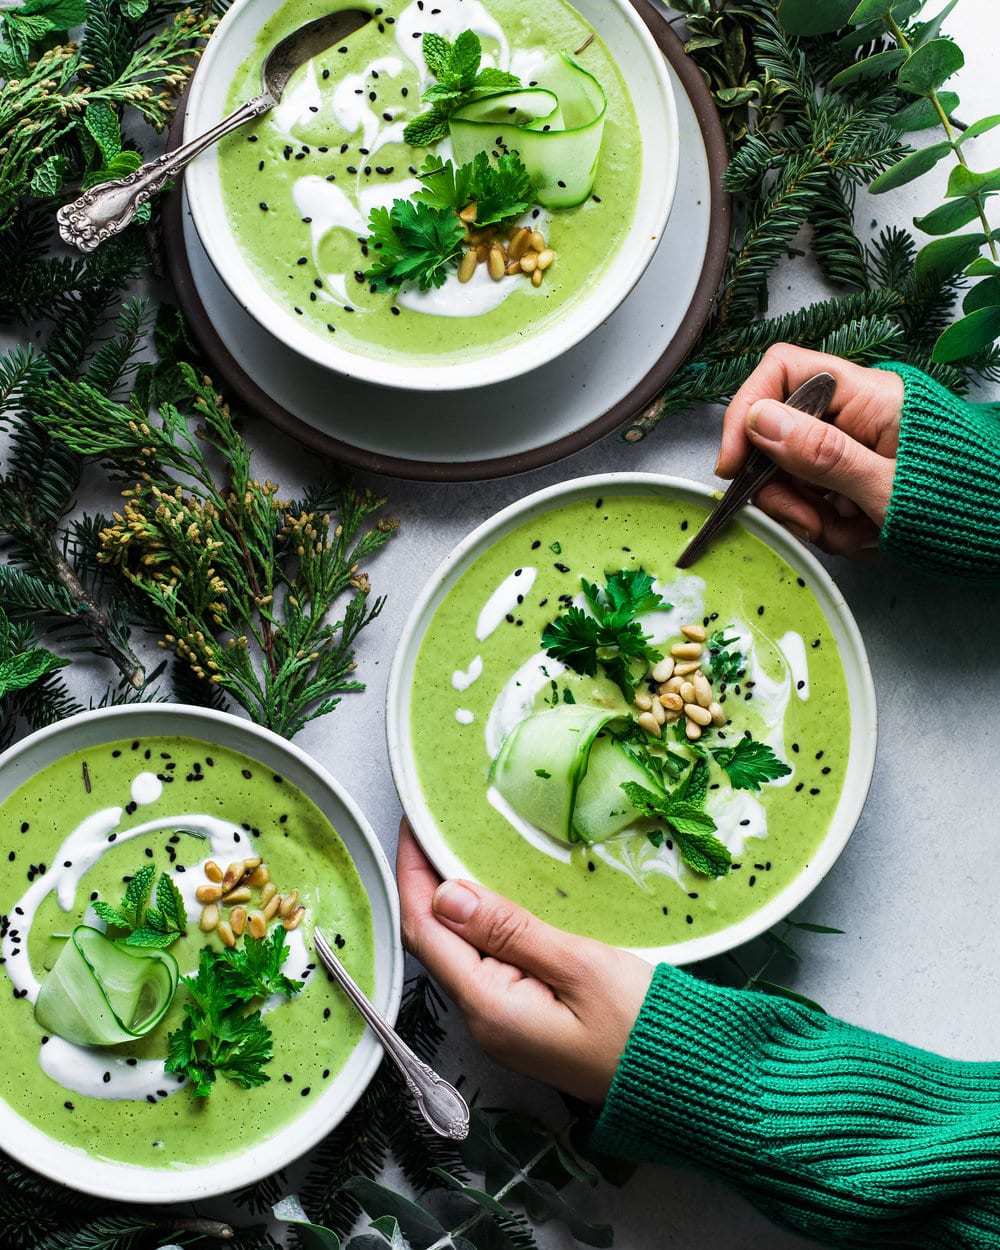
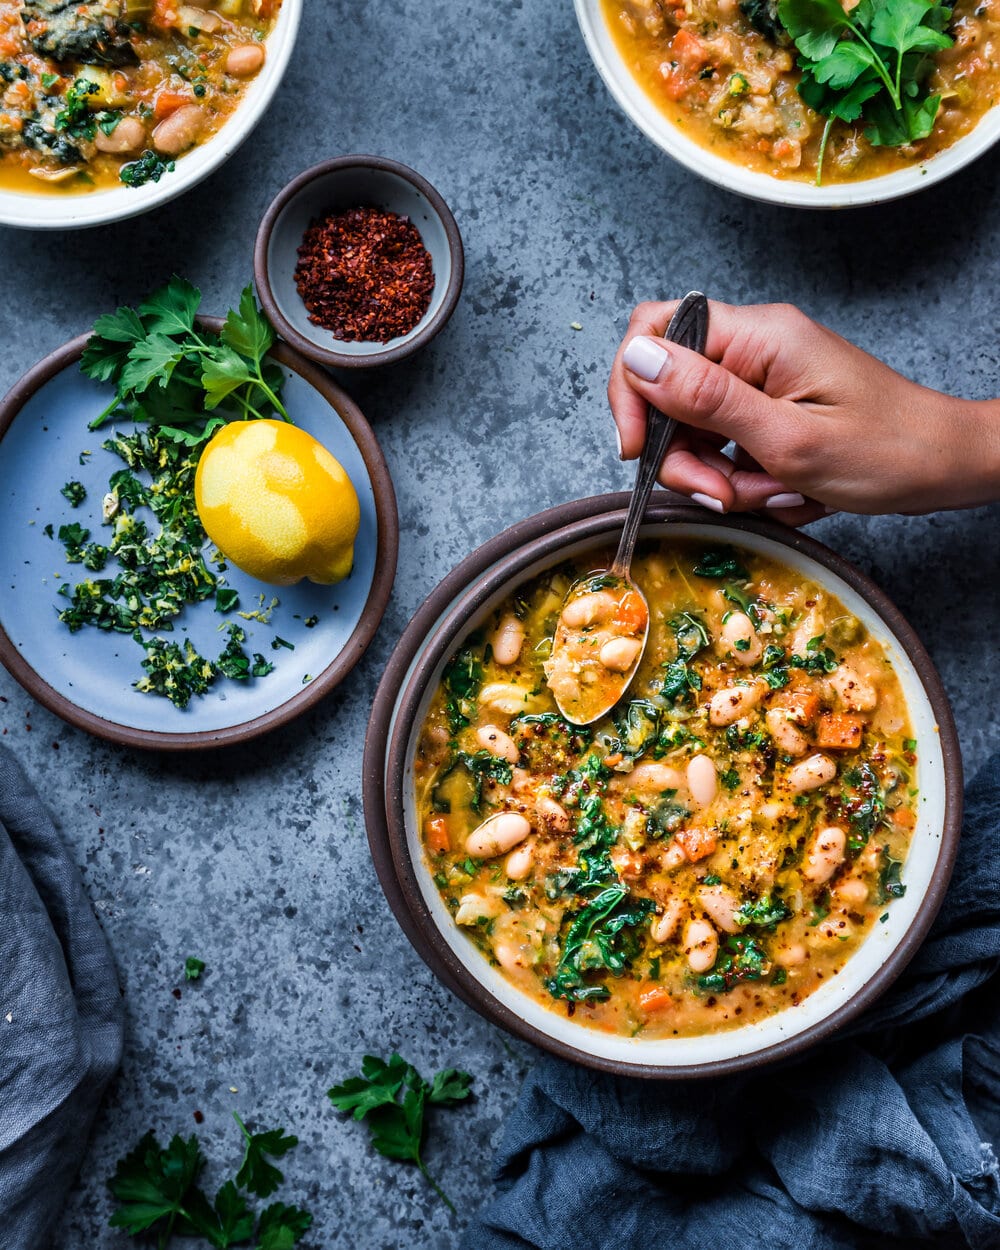
All three soup spoons going in different directions, which gives multiple opportunities to make the viewer pause.
(c) Include props that are not fully within the frame. Especially when I first started out with photography, I had a strong urge to fit every prop I used perfectly within the frame. I wanted the viewer to see the whole plate, the whole napkin, the whole fork.
But your photo will create more intrigue when you intentionally crop out parts of elements so they aren’t fully within the frame. This creates the sense that the viewer has just stumbled upon a small glimpse of a larger scene, creating a sense of wonder about what the rest of the scene holds.
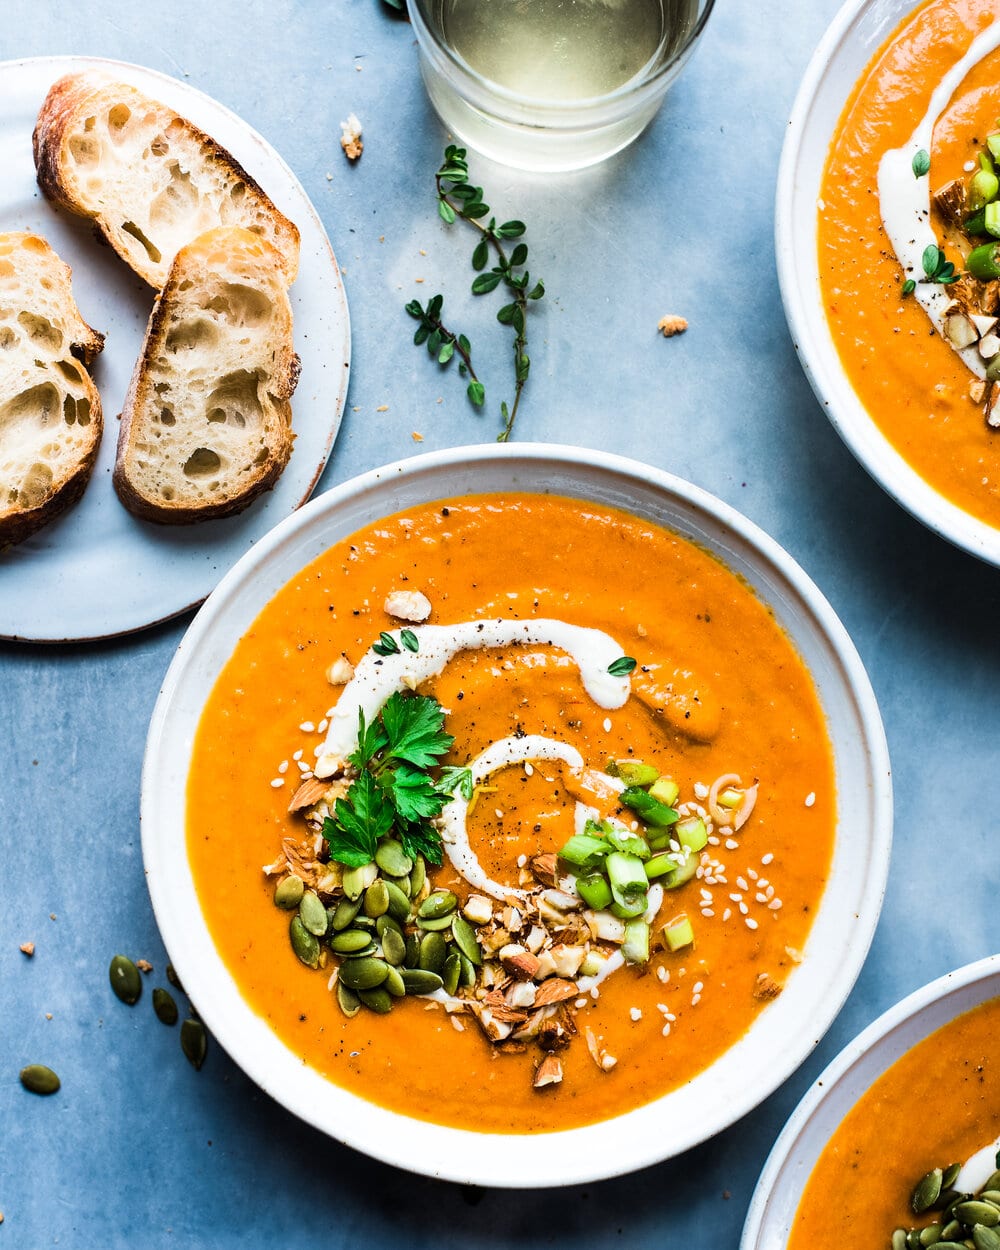
The shadow and glow from the glass of white wine at the top is much more interesting when it is only partially shown than if it were fully shown in the frame. Also, only seeing glimpses of the top and bottom soup bowls brings extra focus onto the main soup bowl (the hero).
4. Choose your aperture accordingly
One of the most common beginner mistakes I see in food photography is a lack of sharp focus. This could be due to camera shake (see tip #2), but it could also be because the aperture is too wide.
For a refresher on what aperture is and why it matters in food photography, be sure to check out this post (tip #3).
A wide aperture (i.e., a small f-stop such as f/2.8) means there is shallow depth of field and only a very small portion of the photo will be in focus. This often works well for photos that are head on or taken from three-quarter angles, but usually with flat lays, this results in photos that are appear somewhat out of focus (especially when shot by a beginner and with a not-so-great camera).
Generally speaking, when you are taking a flat lay, you have one plane of focus, and you want everything to be in even focus or relatively even focus. Hence, I typically recommend using a relatively narrow aperture for flat lays.
However, my definition of “relatively narrow”–something between f/5 and f/7.1 is just my definition. I know many food photographers who use much narrower apertures for flat lays, such as f/11 or even f/22. This is a personal preference, as I like my photos to be a bit more rustic and moody and dreamy, so not every minute detail needs to be laser focused.
In contrast, if you are taking an editorial photo that’s going to be printed out in large scale, then, yes, you should use a very narrow aperture to ensure that every detail is in crisp focus. But if you are shooting primarily for the ‘gram or even your blog, usually a mid-range aperture will look just fine.
In the example below, the photo on the left has a wider aperture (f/4.5) and the photo on the right has a narrower apereture (f/6.3). This explains why the elements on the parchment paper are more in focus in the right photo.
However, if you do have an element that is of a significantly different height than the surface and you want to create an airy or creative look, you should try experimenting using a wider aperture. For instance, if you are taking an overhead photo of a cake and the cake is on an elevated cake stand, there is significant distance between the cake and the surface, so any elements on the surface (e.g., cake server, scattered ingredients) will be largely out of focus if you are using a wide aperture.
I recommend taking the photo using a few different apertures (e.g., f/2.8, f/4, f/6.3, f/8) so you can see which option you like best.
The bowl is elevated (a smaller bowl is resting underneath it), so the cutting board and chocolate chips on the surface are somewhat out of focus but still in-focus enough to determine what they are. Shot with an aperture of f/4.5
5. Incorporate Layers
Layering elements—whether ingredients or props—on top of one another throughout the scene adds visual interest and will make your photos pop more. Here are 3 strategies to incorporate layering into your flat lays.
Use ingredients to create layers
-
Sprinkle flaky sea salt on top of a chocolate chip cookie
-
Add chopped parsley on top of a brown or white dish
-
Brush a thin layer of oil and a sprinkle of coarse sugar on top of a shiny pie crust
The sprinkle of coarse salt and pepper on the crust, before baking, brings textural interest to the baked crust.
Use Props to Create Layers
-
Stack one bowl slightly on top of another bowl
-
Place a linen underneath one plate or bowl
-
Add a piece of parchment paper underneath just one muffin
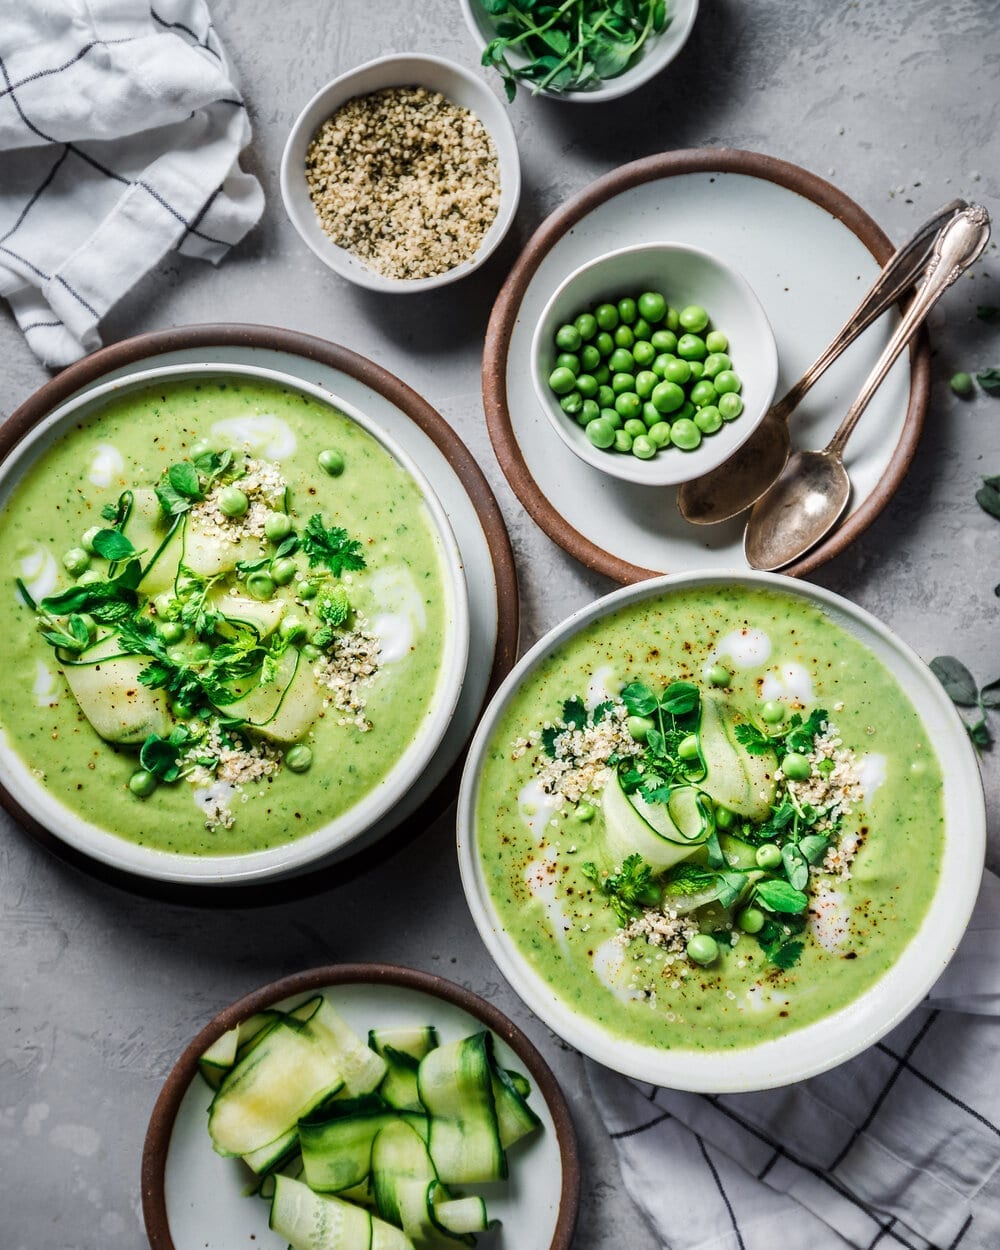
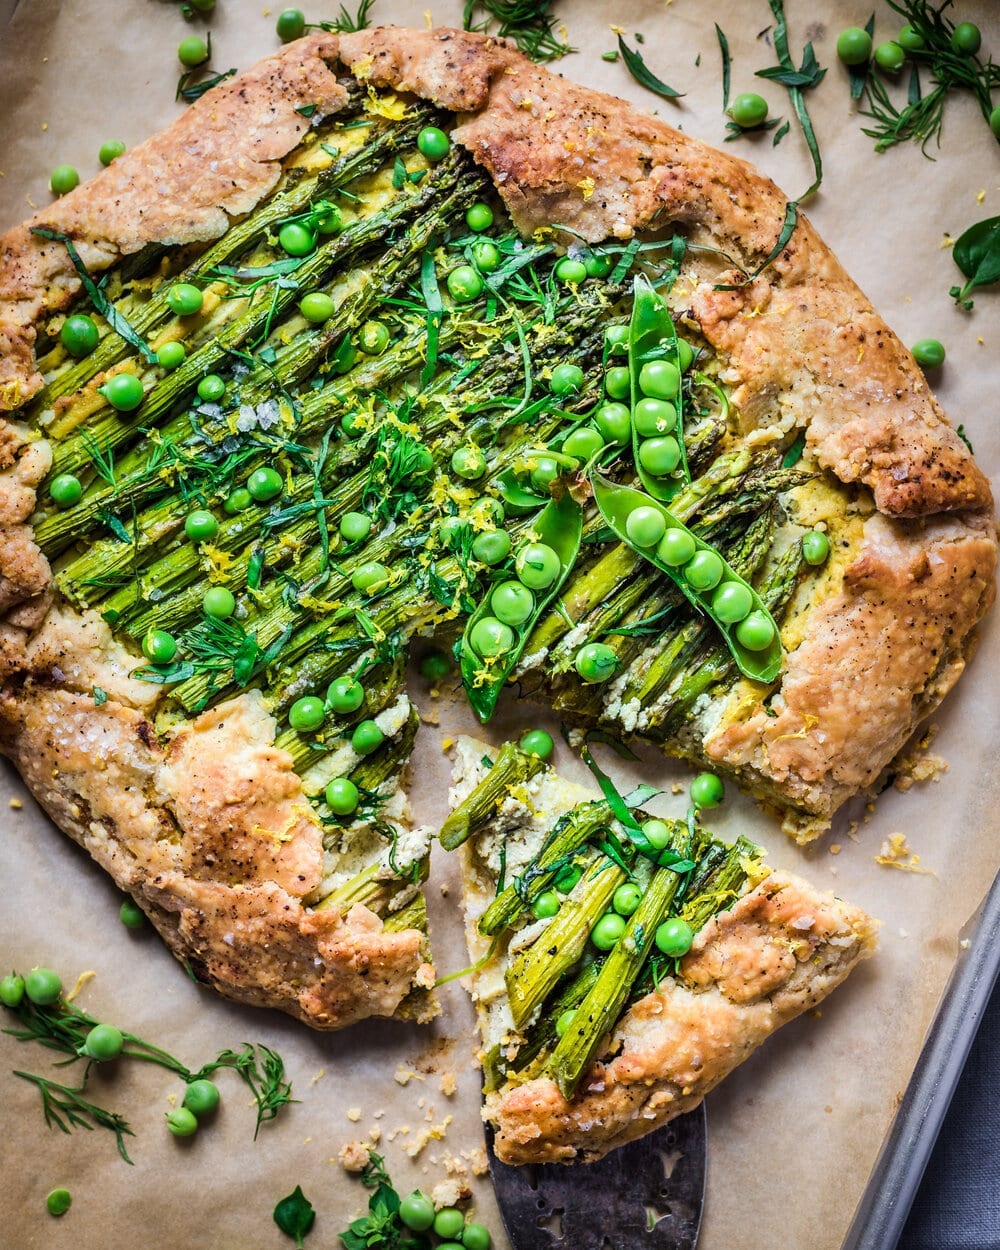
Here, there are multiple layers: the left soup bowl is on a plate, while the right bowl is elevated slightly by sitting on top of a small bowl (which is hidden). The right bowl also has a napkin tucked underneath. The bowl of peas is layered on top of another plate.
Use Human Elements
-
Insert your hands into the scene where the viewer might imagine herself. This adds layers AND more visual interest.
If you found this guide on Food Photography Tips for the Perfect Flat Lay helpful, please leave a comment below!


Beautifully explained 😊
Wow! I am not a food blogger, but I like to take pictures of food that I made or in restaurants. I have not thought about any of the elements you have mentioned before, so I have learned a lot! I know you take your art seriously – thank you for sharing these wonderful tips!
Thanks for reading, Gira!
This post was so interesting. I love that you explained well the aperture with real numbers. Very interesting!
I leave my food blog here: earthymaite.com
Wow! Just awesome and I really like these colorful shots, thanks.
Great tips, thank you. I am someone who loves to cook, and presenting it beautifully is something I am passionate about it. I have been dabbling in food photography and I find these tips super useful:-)My very amateur board is here https://pin.it/1eW9wP0 🙂