

Before getting an Instant Pot, I relied exclusively on canned beans. I always found them to be lacking in flavor, but I figured this was the tradeoff for convenience. And as a busy lawyer at the time, I had no interest or ability to babysit a pot of beans on the stove for 2 hours.
Learning to cook dried beans in the Instant Pot was a game-changer. It leveled up my meal prep and batch cooking game from slow and clunky to effortless and quick, and it’ll do the same for you!
Flavor-rich, perfectly-cooked Instant Pot beans not only have better flavor and texture than their canned counterparts, they’re also super simple to make (think: no hands-on cooking!) and super budget-friendly.
In this post:
- Cooking Beans in the Instant Pot: The Basics
- Do you need to soak beans before cooking them in the Instant Pot?
- Flavor-enhancing ideas
- Tips to elevate your bean-cooking game
- How to use Instant Pot beans
- How to Cook Beans in the Instant Pot Recipe
- Spicy Mexican Kidney Beans Recipe
- Mediterranean Chickpea Salad Recipe
Meet Your Chef
When it comes to cooking legumes in the Instant Pot, I wrote the book. Literally.
My first cookbook, The Vegan Instant Pot Cookbook has over 4,600 reviews on Amazon with an average 4.7 star rating. And it’s packed with tons of delicious, indulgent yet wholesome bean-based recipes!

With over 230K views on YouTube, my video on cooking beans in the Instant Pot was a huge hit with my audience onYouTube; I hope you find it just as useful!
Cooking Beans in the Instant Pot: The Basics
The magic of cooking beans in the Instant Pot stems from the fact that there can be as little as ZERO minutes of hands-on cooking. In other words, it’s hard to mess this up!
Beautifully tender Instant Pot beans are a product of two factors:
- The bean ⇄ water ⇄ salt ratio;
- The cook time (which varies by bean type and whether you’ve soaked the beans or not)
Let’s dive into each one.
Ratios for beans, salt, and water
Here it is, the magic ratio (drumroll please…):
- 1 pound (454g) beans +
- 5 to 6 cups (1.2 to 1.4 L) of water +
- 2 to 2 ½ teaspoons Diamond Crystal kosher salt
Notice that this is specific to Diamond Crystal kosher salt.
For table salt, use 1 to 1 ¼ teaspoons. For Morton’s kosher salt or sea salt, use 1 ¼ to 1 ½ teaspoons salt. If you don’t make these changes, your beans will be too salty!
If using vegetable broth instead of water, you’ll want to scale down on the salt.
Cook Time Chart for Common Bean Varieties
I tested cook times for both soaked and unsoaked beans for the most popular bean varieties (more on whether to soak beans below!) and put together this cheatsheet:
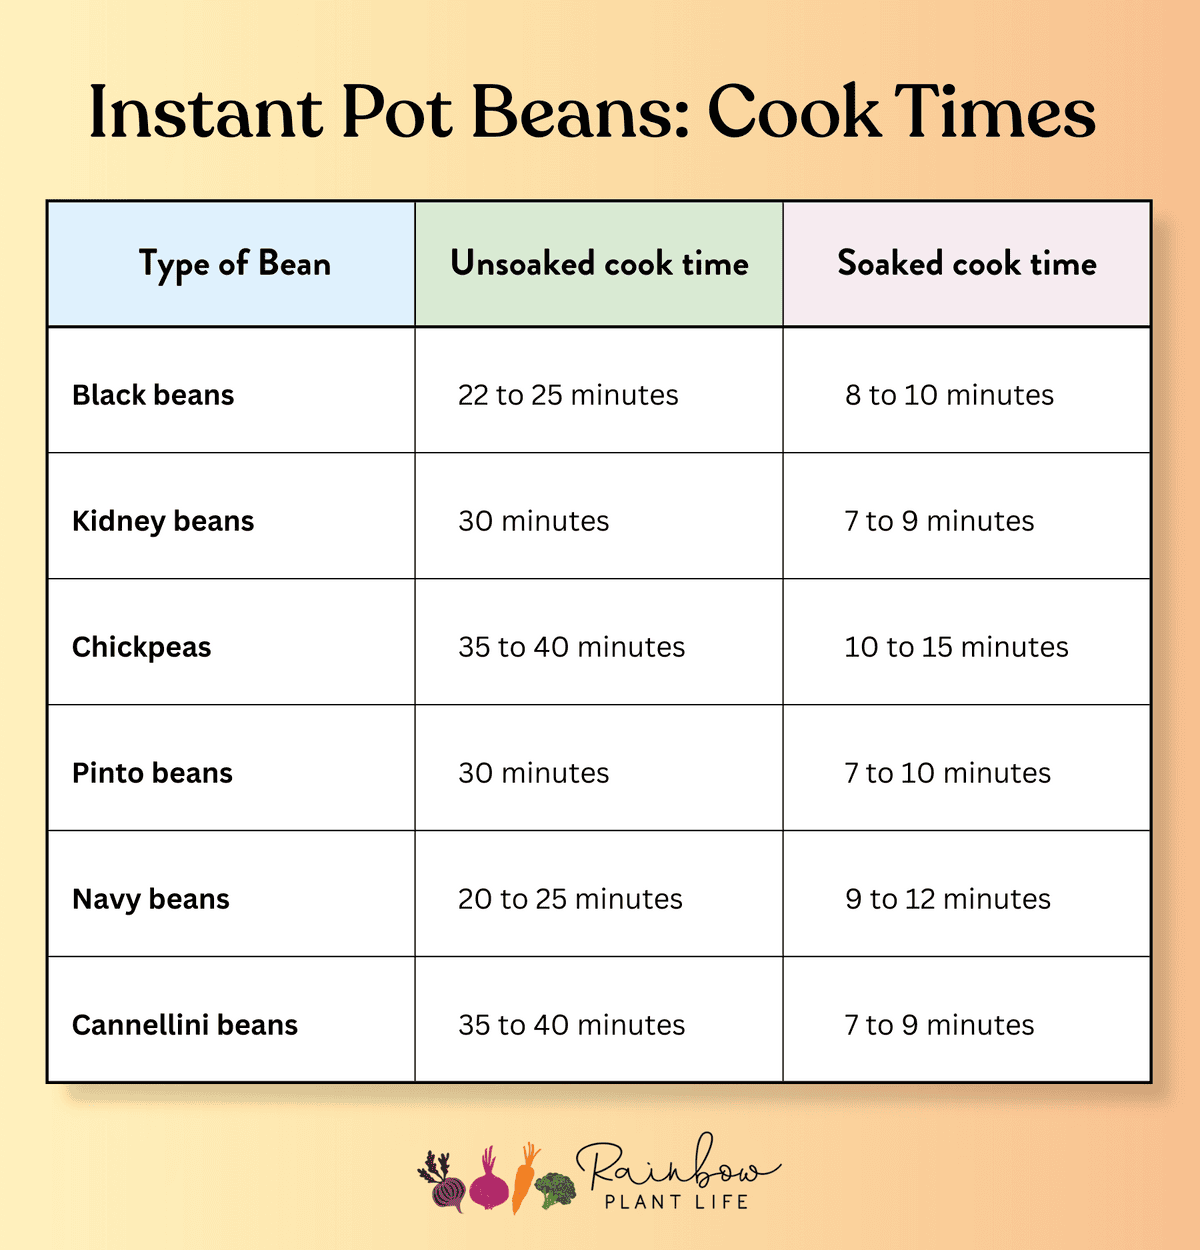
Caveat: If you are a fan of specialty beans like Rancho Gordo, these beans are a lot fresher than the ones you find at grocery stores. Accordingly, they will cook faster than the listed times. Their smaller beans, like the Alubia Blanca, typically cook in just 3 minutes after being soaked for 4 to 6 hours.
My first cookbook, The Vegan Instant Pot Cookbook, contains a chart similar to the one above. If you are a frequent maker of Instant Pot beans, I recommend grabbing a copy—not only will it be easier to repeatedly reference, but if you like making beans in the Instant Pot, I have a hunch the 90+ other recipes in the book are going to be similarly up your alley 😋
Cooking Method
- Soak the beans. This is optional and is discussed in great detail below.
- Rinse the beans.
- Add the beans and water/broth, along with salt and any other seasonings of choice (e.g., bay leaf, sprig of rosemary, halved onion, etc.) to the inner pot of the Instant Pot.
- Select “Pressure Cook” setting at “high pressure” and cook for the appropriate amount of time according to bean type.
- Allow a natural pressure release for 10 to 15 minutes, then perform a manual pressure release to vent remaining steam.
- Discard any aromatics, and enjoy your delicious beans.
…That’s it! (The first recipe card at the bottom of this blog post walks you through this method.)
Storage Tips
Store cooked beans with some of their cooking liquid in an airtight container in the fridge for up to 5 days (the cooking liquid keeps them moist and flavorful). You can also freeze beans in 1 ½ to 2 cup portions for 6 to 8 months!
Do you need to soak beans before cooking them in the Instant Pot?
This is such a rich topic, I felt it deserved its own section. Buckle up for my TED Talk on the great bean-soaking debate.
No, you don’t need to soak the beans first
This is the short answer. Unlike cooking beans on the stove, cooking beans in the Instant Pot does not require soaking. Simply rinse your beans, add them to the Instant Pot with your cooking liquid, and start pressure cooking.
…but you might want to soak them first
And here’s why.
Reason 1: Soaked beans = fewer toots
Raise your hand if beans make you toot (no shame, it’s natural!).
Soaking beans helps remove the oligosaccharides—a type of fiber found in beans that can cause digestive discomfort, bloating, and, yes, toots for some folks. These oligosaccharides leech into the soaking water, but that soaking water gets discarded when you drain and rinse the beans before cooking.
Reason 2: Soaked beans cook more evenly
Unsoaked beans sometimes end up with an uneven texture after being pressure cooked: some are soft, some firm, and some have split skins.
This matters less when you’re making beans for a chili/soup/stew than it does when you’re cooking pot beans (beans + water + salt) where the bean texture will be at the forefront.
Even a quick soak of beans (15 to 30 minutes) can yield a better texture!
Tip: Certain bean varieties are particularly bad offenders when it comes to uneven cooking (ahem, kidney beans). With other beans, such as chickpeas, I don’t notice a big difference.
Reason 3: Soaked beans cook faster
Soaking beans dramatically reduces the amount of time it takes to pressure cook them. For instance, unsoaked chickpeas take 35 to 40 minutes to cook, but soaked chickpeas can take as little as 10 minutes.
How to soak beans: different methods
Traditional method
Cover the beans with cold water and soak for 8 hours or overnight (small beans can handle a shorter soak; large beans may benefit from longer than 8 hours).
Leave the beans on your counter. If it is very warm in your kitchen, you can refrigerate them. Drain the beans and rinse with fresh water.
Quick soak method
Place the beans in the Instant Pot and cover with plenty of cold water: 6 to 8 cups / 1.4 to 2 L of water for 1 pound / 454g of beans.
Select the Pressure Cook setting at high pressure for 5 minutes. When the timer is done, allow a natural pressure release for 10 minutes, then perform a manual pressure release to vent remaining steam. Drain the beans and rinse with fresh water.
Soak in the Instant Pot
Here’s how to make use of the Instant Pot’s nifty “Delay Start” function (called the “Timer” on old models):
- Fill the Instant Pot with the amount of beans you want to cook; add the appropriate amount of water and salt.
- Select the Pressure Cook setting at high pressure and the appropriate cook time for soaked beans.
- Press the Delay Start button. Use the +/- buttons to adjust how many hours you want to soak the beans (e.g. 8 hours). Then press the Delay Start button again to adjust to how many minutes you want to cook (e.g., 7 minutes).
If you select 8 hours, your beans will soak in the salted water for 8 hours, then immediately start pressure cooking afterwards!
When I had an office job, I loved this function. I’d set the timer before leaving for work in the morning and be greeted by a pot of freshly cooked beans in the evening.
Caveat: If you have a hard time digesting beans, this method may not be the best option because the beans cook in the water in which they’ve soaked, meaning the tricky-to-digest oligosaccharides will still be present in the final product.
Flavor-enhancing ideas
If you have a little extra time, why not jazz up your beans in one of the following ways?
Cook beans in vegetable broth instead of water (or half broth, half water). This adds some more savory flavor. You may want to use less salt.
Add flavoring agents to the cooking water.
I almost always add black pepper and bay leaves. Depending on the cuisine or flavor profile I want, I add some combination of the following:
- Cumin seeds and coriander seeds (add to a sachet or cheesecloth)
- Smashed garlic cloves
- Ginger slices
- Jalapeño or serrano peppers, sliced
- Whole herb sprigs such as thyme, oregano, sage, and/or rosemary
- Vegetable bouillon cubes or Better than Bouillon (omit the salt)
- Roughly chopped vegetables such as onions, shallots, carrots, or celery
Don’t skip the salt! Salting the beans while they cook infuses each bean with flavor. In contrast, waiting until the end to salt results in beans that are either overly salty or lacking in flavor.
Next-level beans
If you want to make your beans way tastier, sauté your favorite aromatics before adding the water and beans.
Here’s an easy but tasty option for 1 pound (454g) beans
- Heat some olive oil in the inner pot using the Sauté setting.
- Once hot, add 1 diced yellow onion with a pinch of salt. Cook until golden and softened, but not browned.
- Add 3 to 4 finely chopped garlic cloves and cook for another 1 to 2 minutes. Deglaze with the water or veg broth, scrape up any browned bits, then add the beans and pressure cook as normal.
- Finish your cooked beans with a generous glug of extra virgin olive oil. It will infuse them with richness and make them irresistible. You can also finish with a splash of lemon juice or vinegar of choice to make the beans pop.
Tips to elevate your bean-cooking game
Know your quantities
One pound of dried beans, once cooked, yields ~7 cups of beans. If you’re feeding just 1 or 2 people, you might want to start with a smaller quantity.
If you have a lot of leftover beans, store them in 1 ½ to 2 cup portions in the freezer—that’s the amount of beans you’ll find in a 15-ounce can of beans, which makes it easy to swap in one container of your defrosted beans for canned beans in recipes.
Exercise caution when cooking large batches
If you’re keen on making a large pot of beans, try not to fill the Instant Pot more than halfway. Otherwise, you’ll end up with a lot of foaming. If you do cross that halfway line mark, never fill your pot past the Instant Pot’s maximum capacity line.
Especially when you are making a large pot of beans, never use the Quick Release Method. This will result in hot bean foam being sprayed all over your kitchen and face. Instead, allow the Instant Pot to naturally release pressure for 10 to 15 minutes, or even up to 20 minutes. Only then switch the valve from Sealing to Venting to release any remaining steam.
How to use Instant Pot beans
Ready to get started? Check out some of these recipes on my blog, which would be great with Instant Pot beans!
- 40 Fantastic Bean Recipes: This is a roundup of bean recipes I adore—remember, wherever you see canned beans in a recipe, you can use your home-cooked beans instead!
- Mexican Black Beans: This recipe uses canned beans, but there are instructions in the FAQ section about using dried beans and cooking them in the Instant Pot!
- Tuscan Stewed Beans: Again, this recipe is written with canned beans, but swap in your IP-cooked beans!
- Vegan Instant Pot White Bean Stew
And if you’ve got a copy of The Vegan Instant Pot Cookbook, check out these recipes:
- Restaurant-Style Hummus + Three Variations (p. 53)
- Game-Day Black Bean Dip (p. 56)
- Baked Beans on Toast (p. 99)
- Rosemary & Garlic White Beans (p. 125)
- Frijoles (p. 129)
- Gigantes Plaki with Herbed Tofu Feta (p. 131)
- Three-Bean Vegetable Chili (p. 185)
- Butternut Squash Chickpea Tagine (p. 259)
- Chana Masala (p. 270)
If you found this guide useful, please leave a comment below or on my YouTube video—if you found it really useful, consider ordering The Vegan Instant Pot Cookbook 🙂

Introducing
Big Vegan Flavor
Techniques and 150 recipes to master vegan cooking.
How to Cook Beans in the Instant Pot

Equipment
- Instant Pot
Ingredients
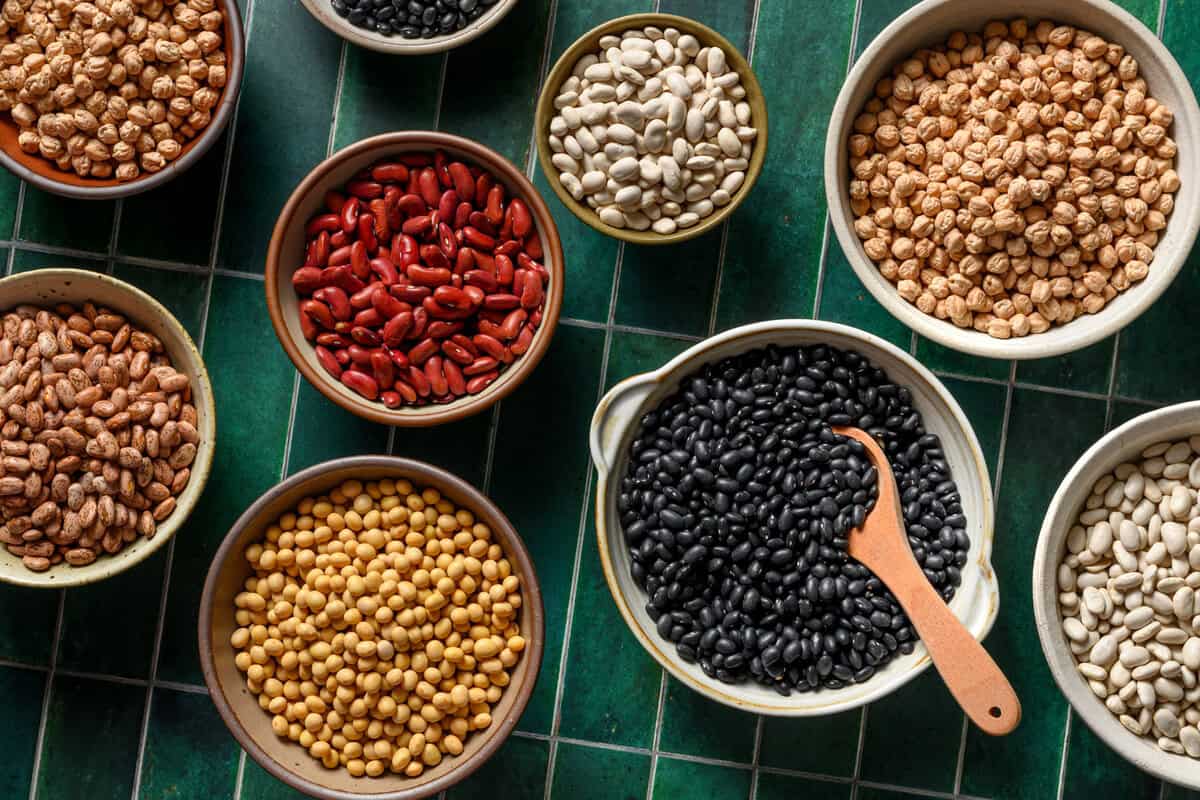
- 1 pound beans of choice (such as chickpeas, cannellini beans, pinto beans, black beans)
- 5-6 cups water or vegetable broth
- 2 – 2 1/2 teaspoons kosher salt (or 1 1/4 – 1 1/2 teaspoons sea salt)
- Other seasonings as desired (bay leaves, black pepper, fresh or dried herbs, whole spices, chopped onions, garlic cloves, etc.)
Instructions
- Optional: add the beans to a large bowl or the Instant Pot inner pot and cover with cold water (about 6 cups). Soak for 8 hours or overnight. Then drain and rinse.
- Add the beans and water or broth to the inner pot of the Instant Pot. Add salt any other seasonings of choice. Stir to combine.
- Secure the lid and select the Pressure Cook setting. For soaked beans, cook for 7-9 minutes for cooked but firm beans, or 10-12 minutes for softer beans. For unsoaked beans, cook for 30 to 40 minutes.
- When the timer beeps, allow a natural pressure release for at least 10 minutes (or 15-20 minutes). Perform a manual pressure release to vent any remaining steam. Open the pot, discard any aromatics, and transfer the beans to your glass tupperware. I like to store the beans in the cooking liquid, as it keeps them moist and is flavorful.
- Store cooked beans in an airtight container in the fridge for up to 5 days, or freeze in 1 1/2 to 2 cup increments for 6 to 8 months.
Video
Nutrition
Nutrition information is automatically calculated, so should only be used as an approximation.
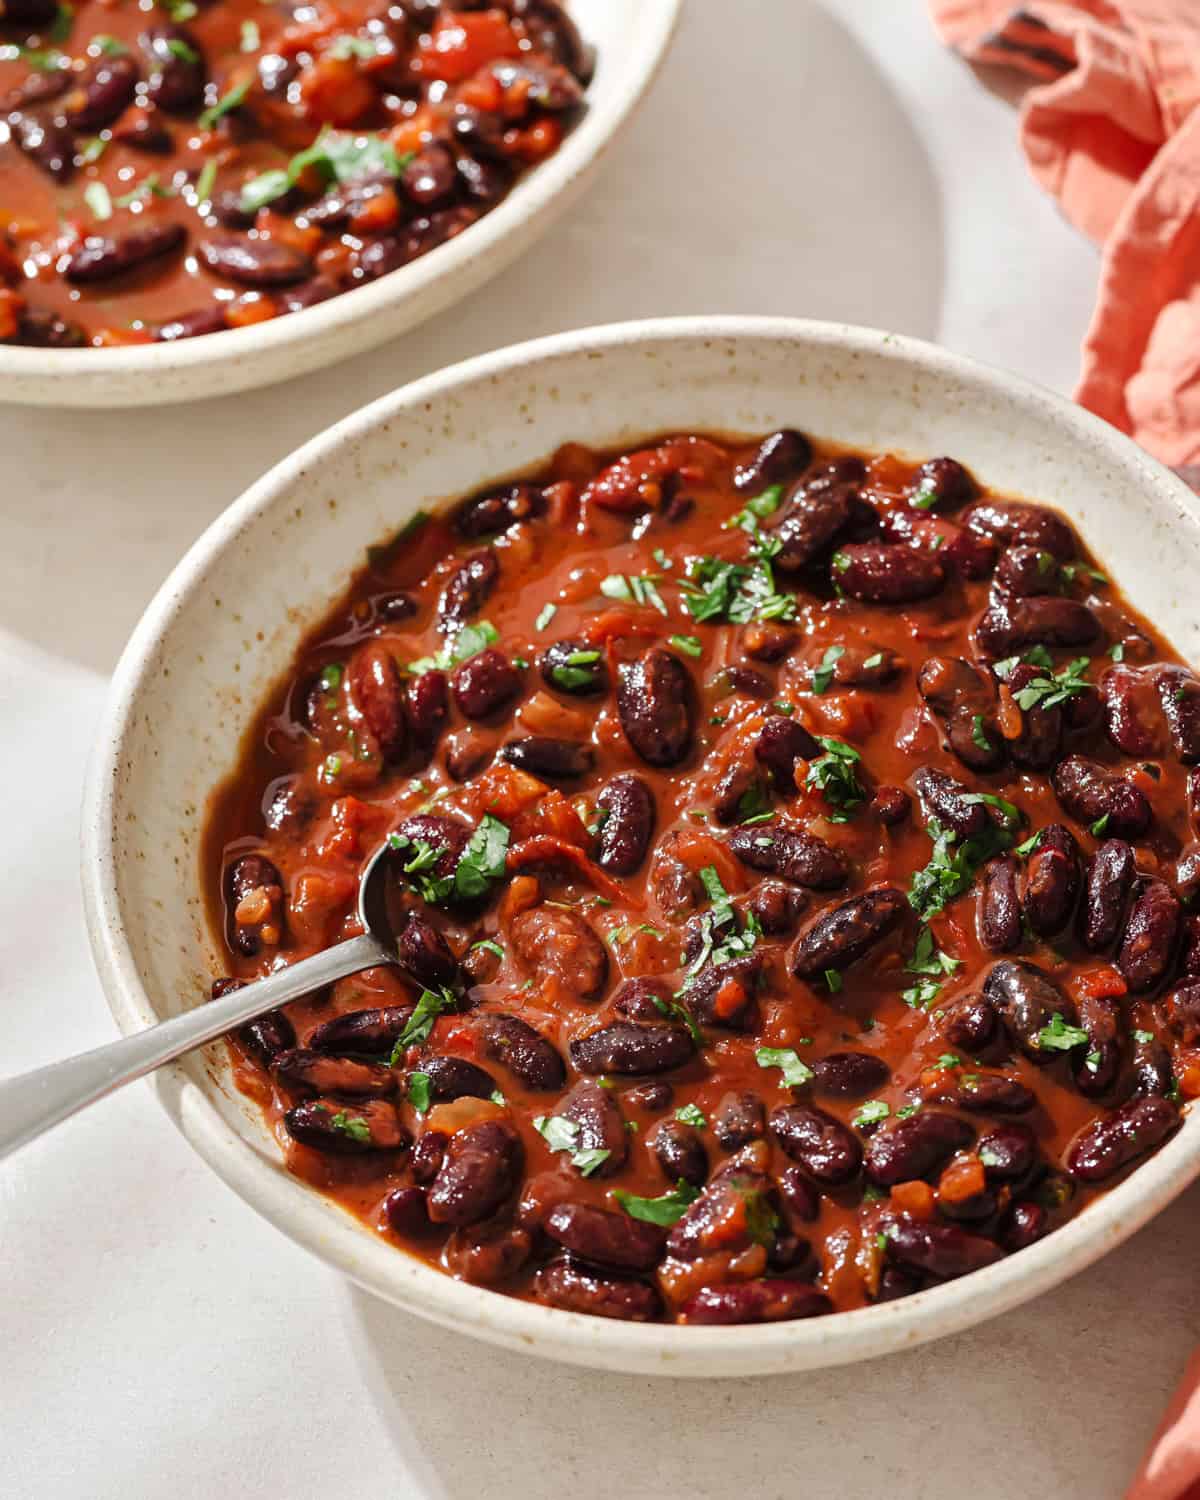
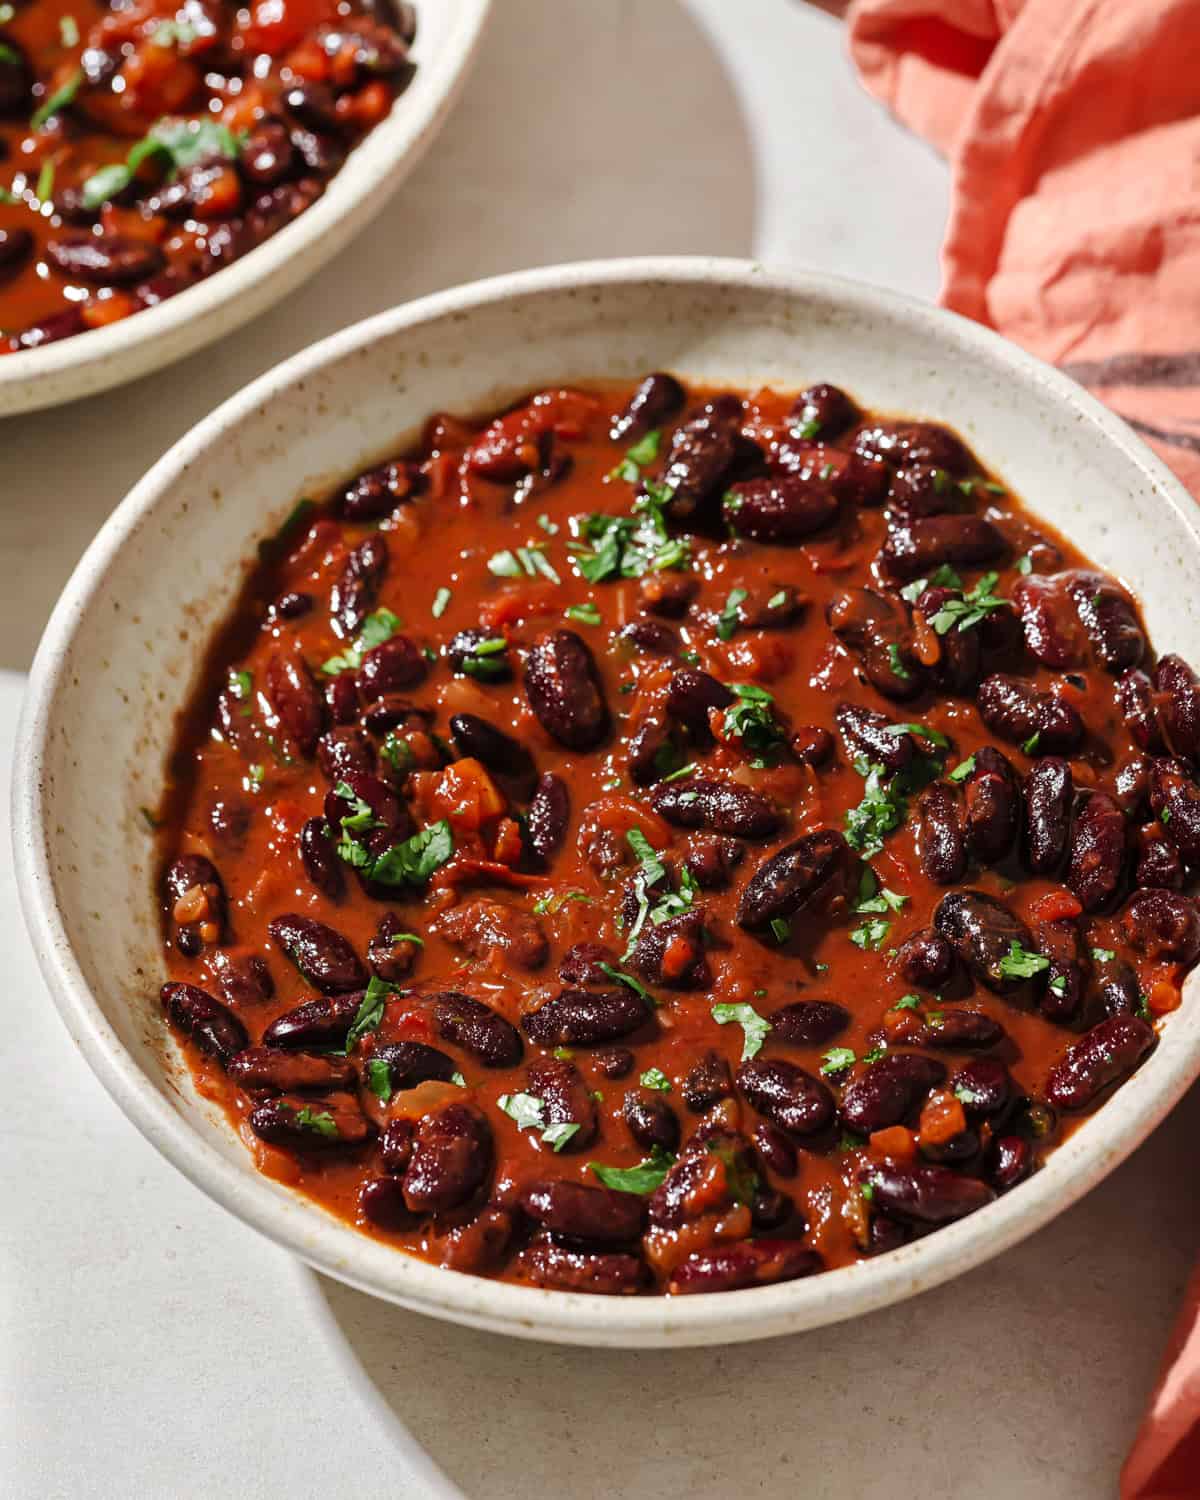
Spicy Mexican Kidney Beans

Equipment
- Instant Pot
Ingredients
- 8 ounces (227g) dried kidney beans, preferably soaked for 8 hours or overnight (See Note 1)
- 1/2 cup (75g) red onion, finely diced
- 4 cloves garlic, minced
- 1 jalapeño pepper, minced (omit the seeds & membranes for mild heat; for a spicier heat, use a serrano pepper)
- 1 teaspoon kosher salt, plus more to taste
- 1/2 tablespoon chili powder
- 1 teaspoon ground cumin
- 1 teaspoon oregano
- 1/2 teaspoon smoked paprika
- 1/4 teaspoon cayenne pepper to taste
- 1 bay leaf
- 1 (4-oz/115g) can diced green chiles (I recommend a “mild” version” unless you like very spicy food)
- 1 1/4 cups (300 mL) low-sodium vegetable broth
- 1 (16-oz/454g) jar salsa (I use salsa verde)
- 1/2 cup (10g) cilantro, chopped
Instructions
- Soak the beans in plenty of cold water to cover for 8 hours (or overnight). Drain and rinse the beans.
- Add the beans to the Instant Pot and top them with the remaining ingredients except for the cilantro: onion, garlic, jalapeño, salt, chili powder, cumin, oregano, paprika, cayenne, bay leaf, canned chiles, vegetable broth, and salsa). Stir to combine
- Select the Pressure Cook (Manual) setting at high pressure and set the cook time to 8 minutes. If you did not soak your beans, set the cook time to 30 minutes.
- Once the timer has elapsed, allow a natural pressure release for at least 10 minutes before switching the valve from Sealing to Venting to release any remaining steam. If the beans are too liquidy for your taste, drain some of the liquid off, or transfer the beans to a serving dish using a slotted spoon, leaving behind excess liquid.
- Stir in the cilantro and serve warm. Once cooled, store leftovers in the fridge for up to 5 days, or freeze for 6-8 months.
Notes
- I soak the beans for the most even texture, but if you don’t soak the beans, increase the cook time from 8 minutes to 30 minutes. And if you don’t have kidney beans, feel free to substitute pinto beans and follow the instructions as written. For a quicker soaking time, use the Quick Soak method outlined in the blog post above.
Nutrition
Nutrition information is automatically calculated, so should only be used as an approximation.
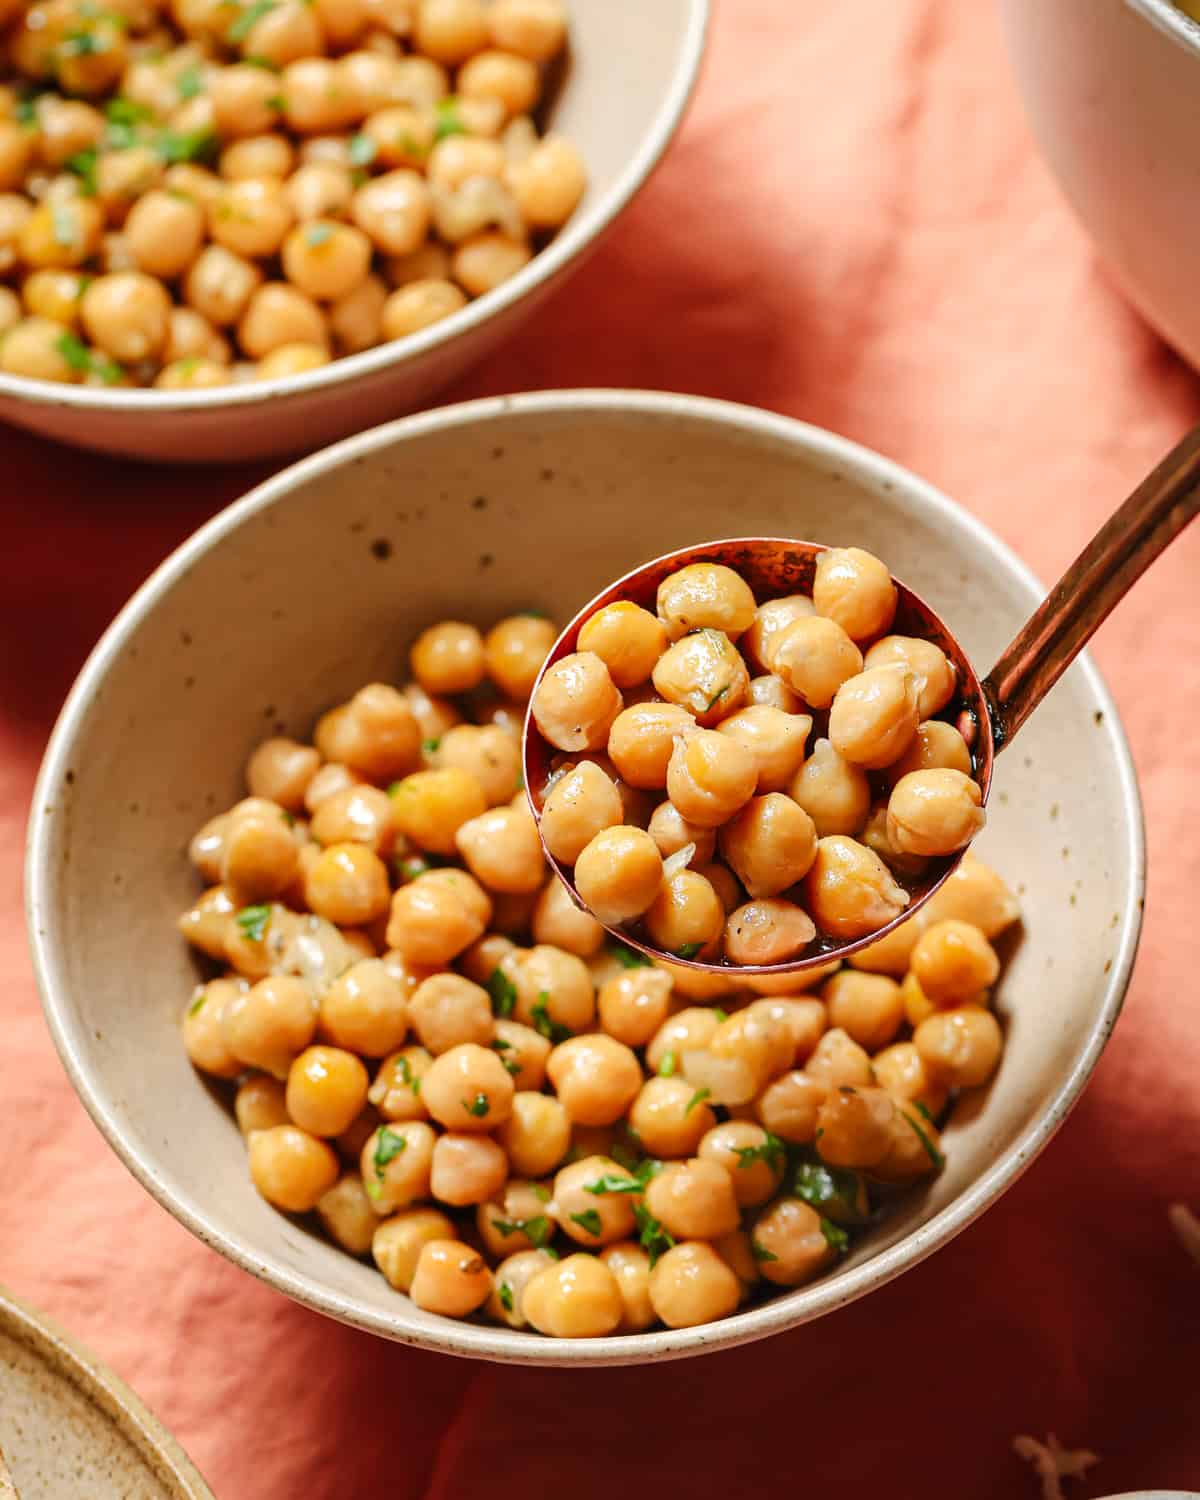
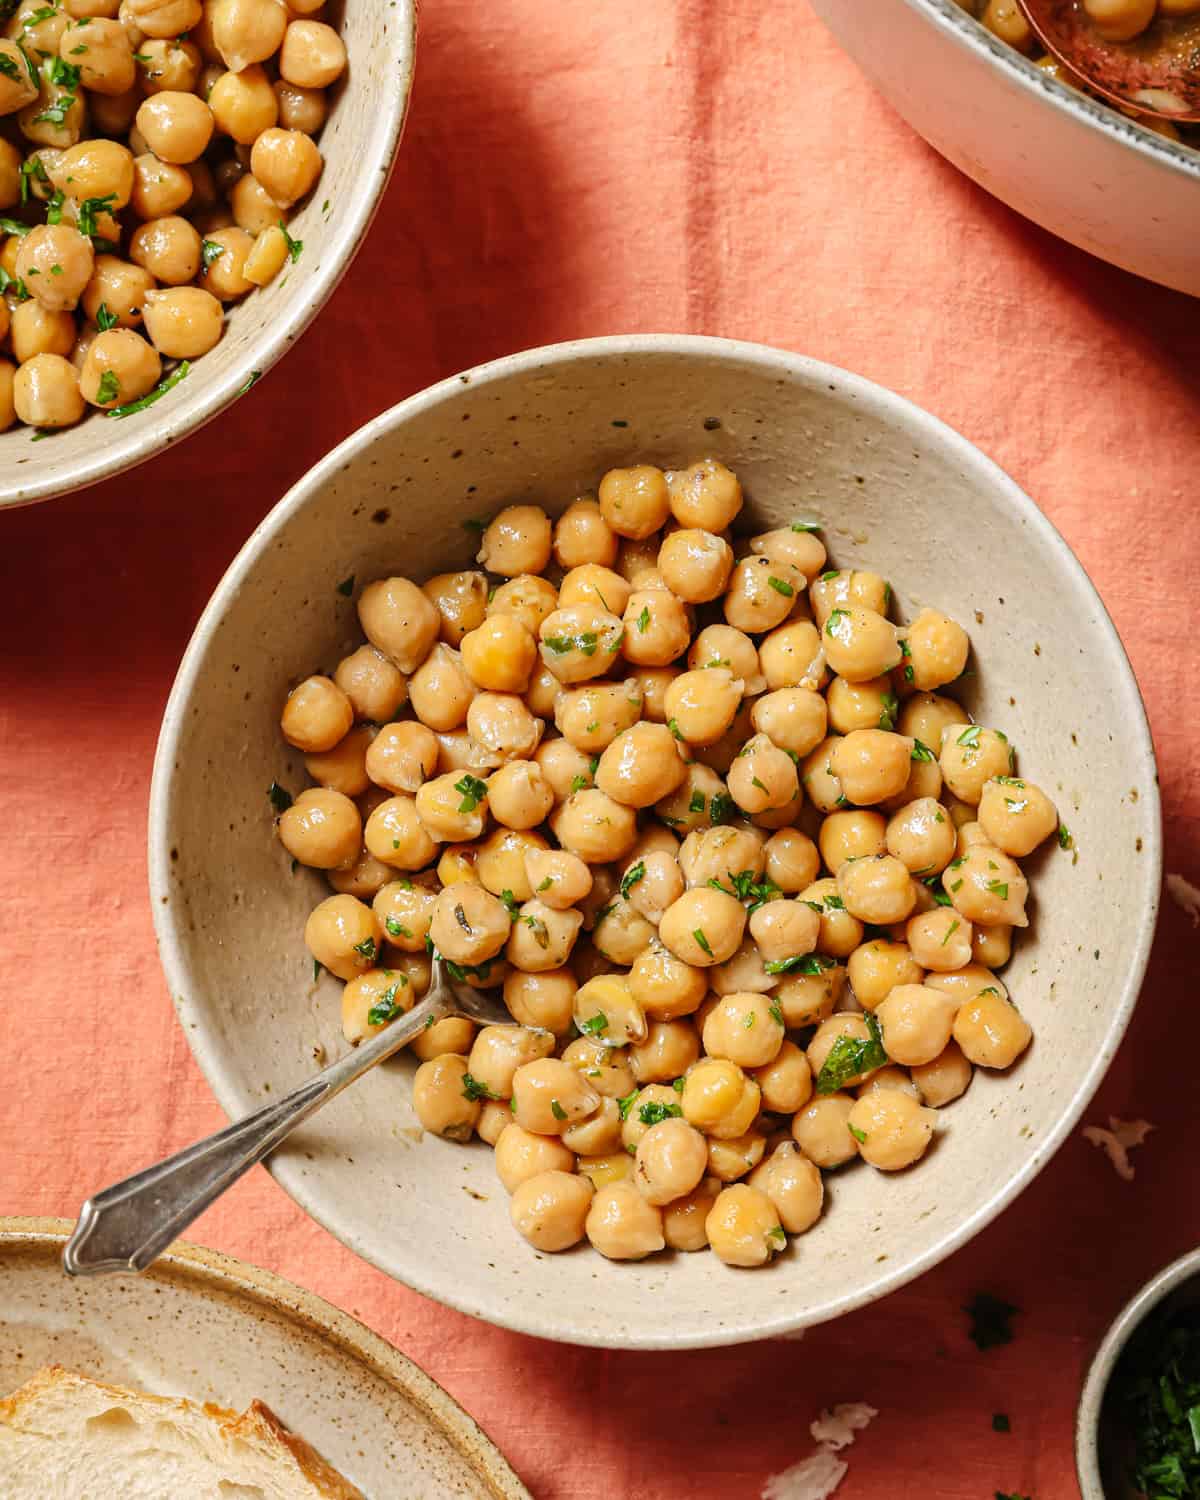
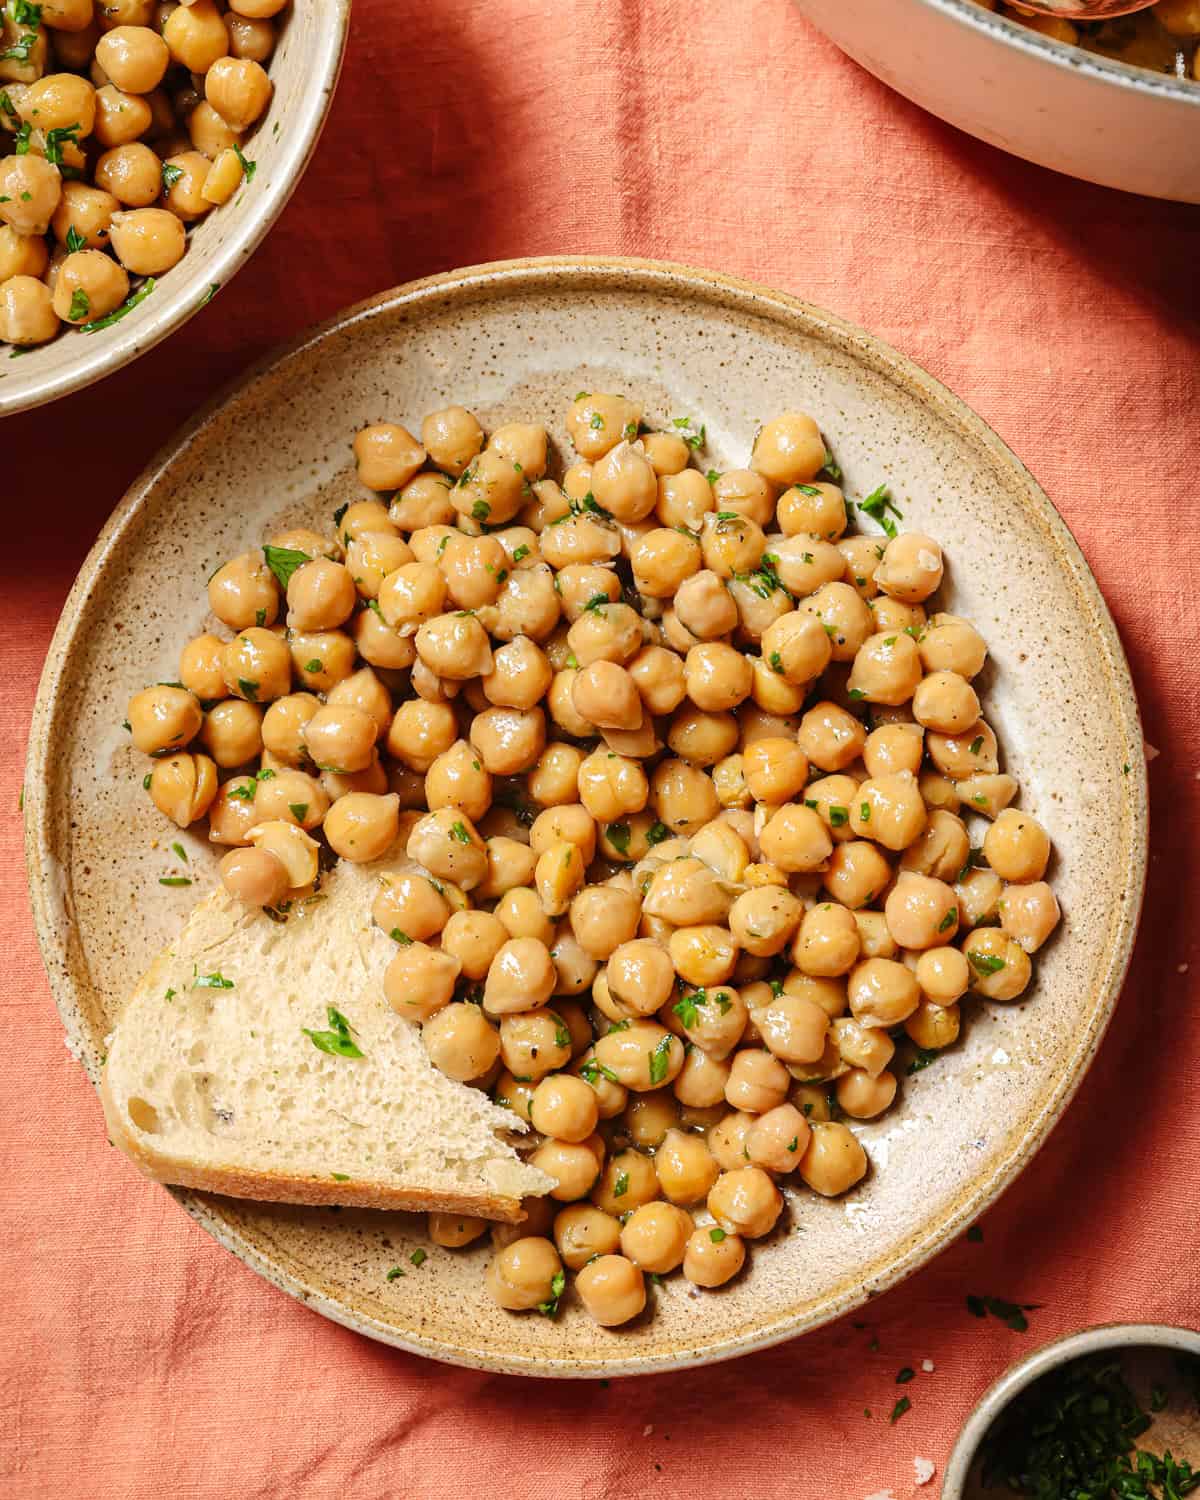
Mediterranean Chickpea Salad

Equipment
- Instant Pot
Ingredients
- 8 ounces (227g) dried chickpeas (See Note 1)
- 3 cups water or low-sodium vegetable broth
- 1 teaspoon kosher salt, plus more to taste
- 1 small handful fresh thyme sprigs
- 2 cloves garlic, minced
- 2 bay leaves
- 1 teaspoon cumin seeds
- 1 teaspoon coriander seeds (use 1/2 teaspoon for a more subtle flavor)
- 1/2 teaspoon freshly cracked black pepper (or whole black peppercorns)
- 1 tablespoon extra virgin olive oil (See Note 2)
- 1 tablespoon freshly squeezed lemon juice
- 1/2 cup (10g) flat-leaf parsley, chopped
Instructions
- Add the chickpeas, water or broth, salt, thyme, garlic, bay leaves, cumin seeds, coriander seeds, salt, and pepper to the Instant Pot and stir to combine.
- Select the Pressure Cook setting at high pressure and set the cook time to 35 minutes. If you soaked your beans for ~8 hours or overnight, set the cook time to 10 minutes.
- Once the timer has elapsed, allow a natural pressure release for at least 10 minutes before switching the valve from Sealing to Venting to release any remaining steam.
- Stir in the olive oil, lemon juice, parsley, and taste for seasonings, adding additional olive oil for more richness, more lemon juice for more acidity, or more salt and pepper to taste.
Notes
- I typically don’t soak chickpeas because they cook evenly even when unsoaked (and don’t give me digestive trouble).
- Be sure to use a high-quality extra-virgin olive oil at the end to impart a rich flavor to the beans.
Nutrition
Nutrition information is automatically calculated, so should only be used as an approximation.


If i’m only making a cup of beans (not a pound) do I still do the same amount of time in the pressure cooker? Or decrease the time?
Hi Gila, you’ll keep the cooking time exactly the same!
Whether you’re making one cup or a whole pound, the time doesn’t change (though of course the amount of water and salt/seasonings will change).
Think of it like boiling a potato: the heat still has to travel all the way to the center of each individual bean to soften the fibers. If you decrease the time for a smaller batch, you’ll likely end up with beans that are still crunchy in the middle.
How to adjust the ingredients:
Reduce the salt and any seasonings proportionally. For the amount of water, I’d use 2 ½ to 3 cups water. This should be enough water to come to pressure on a six-quart model, but if you’re using an eight-quart model, err on the side of 3 cups.
Enjoy!
I would like to cook some soybeans in order to make some old school hippie veggie burgers. Though your instant pot cookbook is very helpful, it doesn’t include soybeans in the bean cooking times chart. Online suggestions for soybeans vary like crazy. Do you have a suggested time for them? Thanks.
From Nisha: “Hi Dodie, unfortunately, I don’t have very much experience cooking soybeans in the Instant Pot. My general recommendation for cooking beans in the Instant Pot is to start with the lower suggested time range, then allow it to depressurize naturally for 10 minutes before releasing any remaining steam. If the beans aren’t done to your liking, you can always add more time on the pressure cook setting.”
Hello… I cook Soy Beans in the Instant Pot all the time. In my experience Soy Beans and Chickpeas are completely interchangeable so what ever timings/methods you follow for Chickpeas will apply to Soy Beans without modification. I have found this to work for both dried white soy beans and black soy beans. Hope this is useful.
Thanks for sharing, Linda! We will be sure to pass this message along to anyone who asks in the future.
Hi I want to make the Spicy Mexican Kidney Beans but am cooking for a larger group of people. Could I double the recipe for the instapot or will it not fit? Wondering why the original recipe makes such a small amount (only 3 cups total!).
Thank you so much, very excited to try this recipe!
Hi Michele, you should be good to double the recipe as long as the ingredients don’t surpass the maximum fill line! Enjoy!
Love beans! Your directions are excellent, I’m cooking some navy beans for 9 minutes.
Great to hear you found this blog post useful, Georgina!
I’m confused about your cooking times – my Instant Pot cooking manual that came with it says much shorter times for all of them. Like black beans are 20-25 min for unsoaked, 6-8 min for soaked. Also, when you say you cook the beans with whole spices like cumin seeds and coriander seeds, do you not grind them first or put them in a satchet? I don’t get how you could just mix in so many whole spices that would need to be removed before eating
From Nisha:
“Hi Kathleen,
As for your question regarding the cook time, as I mentioned I have a complete cook time chart for different types of beans in my cookbook, “The Vegan Instant Pot Cookbook”. I’m not allowed to reproduce that chart here, so I’ve just given guidelines. In general, though, smaller beans take less time than larger beans (e.g., black beans cook faster than cannellini beans). In my experience, black beans that have been soaked take around 8 minutes. But if you prefer your beans not as soft, you can always try 6 minutes. If they’re not done to your liking, you can re-seal the machine and add a couple more minutes of pressure cooking.
As for the spices, adding them to a sachet is a good idea. I grew up with Indian homecooking, and we often have whole spices left in our dishes and we just eat around them, but I know that’s not common for everyone. For the best flavor, I recommend sautéing your spices along with any other aromatics like garlic in a bit of oil (using the Sauté setting on the Instant Pot), and then adding your beans, water, etc. and pressure cooking.”
My dry beans are over 1 1/2 years old. Will they cook in an instapot?
Hi B, dried beans are typically best if used within one year of purchasing them, so we’d recommend picking up some fresh beans for optimal texture!
Question for you before I attempt this recipe. Is it necessary to rinse the beans after cooking in the ip? I always rinse canned beans, which is after they’ve been cooked, so it seems like I should, but if I soak them first, maybe it’s not necessary? I’m guessing canned beans aren’t soaked first, so maybe that’s why they need rinsing after cooking? Thank you so much!
Hi Laura! No need to rinse the beans after cooking them. Especially if you are cooking the beans with some sort of flavoring, you definitely don’t want to rinse them afterwards, as you’ll lose some of that flavor.
Probably a dumb question, but is the cooking water from dried I soaked beans safe to consume? I was thinking of adding some TVP in there and some veggies.
Hi Tim,
That’s not a dumb question at all! It’s great that you’re thinking about how to use ingredients efficiently! If you’re talking about the water you soaked the dried beans in (before cooking), we don’t recommend consuming it. That soaking water can contain some of the indigestible sugars and compounds that cause bloating or discomfort, which is why it’s usually discarded before cooking.
However, if you mean the water the beans were cooked in, that’s totally fine to consume! It’s often referred to as “pot liquor” and can actually be quite flavorful, especially with some seasonings. Adding TVP and veggies to that could make for a really hearty, protein-rich dish.
Hope that helps and happy cooking!
The soaking water is excellent fertilised water for the garden or indoor plants. Good potassium source.