

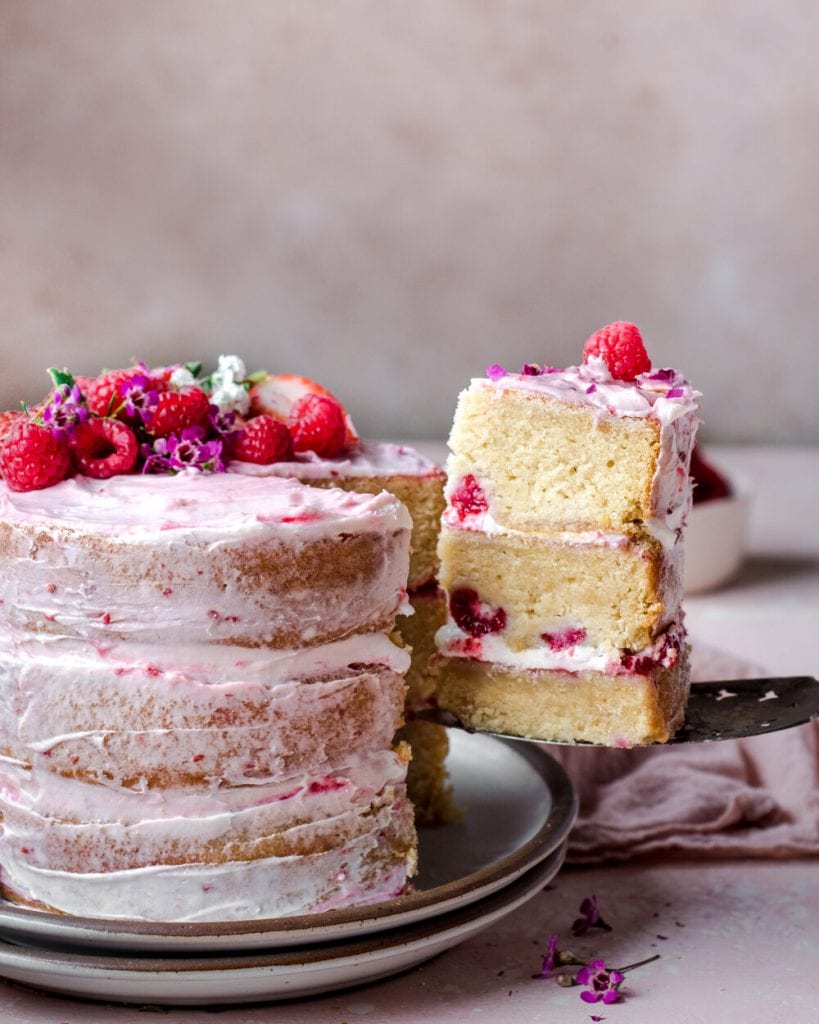
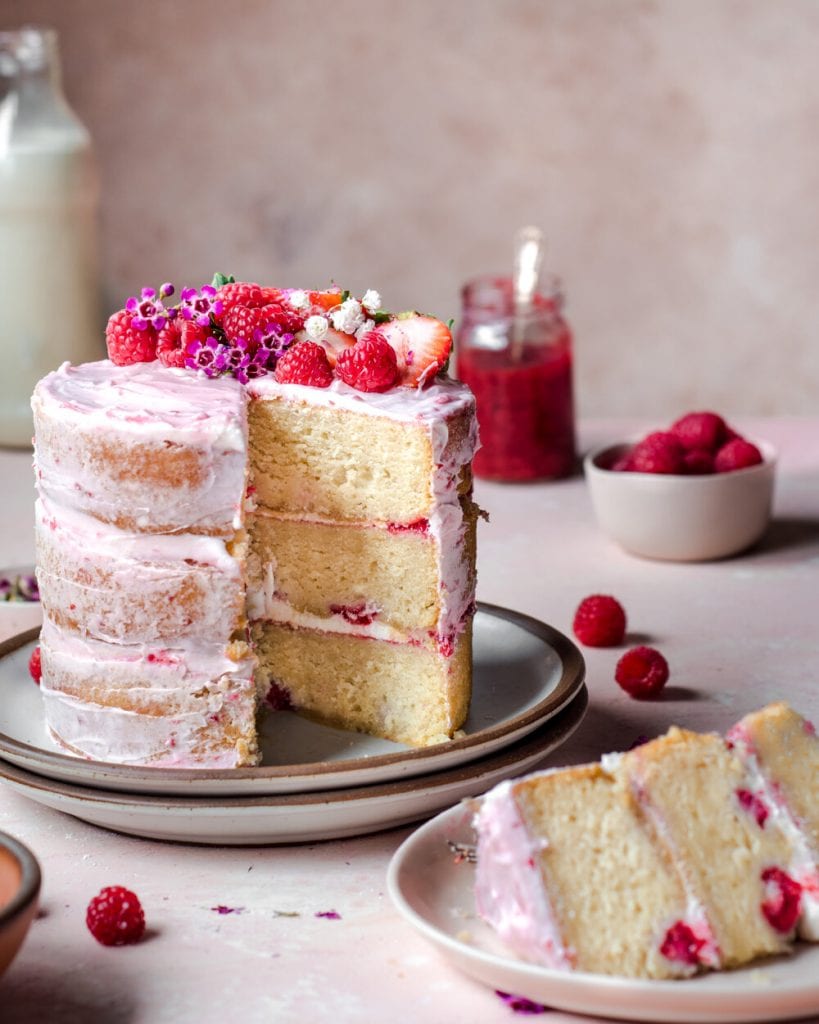
Whether you’re celebrating a birthday, special anniversary, or Valentine’s Day, this show stopping Vegan Vanilla Layer Cake with Raspberry Jam will not disappoint!
This is one of my new favorite cakes, and I am not exaggerating. The texture is moist and tender (and I didn’t even use cake flour!), the flavors are sweet yet tart and tangy so it’s not overpoweringly sweet like some cakes, and of course, it’s so pretty!
It might seem intimidating to assemble this kind of vegan layer cake, but once you’ve done it a few times, it’s actually pretty straightforward. In the event you’ve never made a layer cake, the blog contains detailed instructions and tips to help walk you through the process!
How to Bake a Vegan Layer Cake
Equipment needed for baking a vegan layer cake
Cake pans. You’ll need three 6-inch cake pans, or two 8-inch cake pans to bake this particular cake.
Parchment Paper. You’ll need some parchment paper to line the bottom of each cake pan. This ensures you can easily invert your cakes without any of the cake sticking to the pan. Not essential but highly recommended; if you don’t use parchment paper, be sure to grease the bottoms of your cake pan really well.
I use the bottom of one of the cake pans to trace a circle and then cut it out.
Digital Scale. I recommend every home baker gets a digital kitchen scale for the most precise and consistent results. Since everyone has a different set of measuring cups and there are different methods of measuring ingredients like flour and sugar, a digital kitchen scale is super helpful for baking.
This is especially the cake with layer cakes, where you are dividing the batter between different pans. Without a scale, you run the risk of one of the layers being much taller than the others, baking unevenly, etc.
Oven Thermometer. Similar to a digital scale, an oven thermometer is another basic essential for any home baker. This is because every oven is different and many home ovens are not calibrated. This means that while your oven temperature might say 450°F, the actual oven temperature might be anywhere between 350°F and 500°F.
The first time I made this cake, it didn’t bake through because my oven temperature was off. The digital display on my oven said 350°F but it was actually off by over 50°F! It was a bit under 300°F when i later checked with an external oven thermometer.
An oven thermometer is especially helpful when baking a layer cake because—depending on the size of your oven and the size of your cake pans—you might need to bake them on separate oven rack layers, and most ovens vary in temperature between top racks, middle racks, and lower racks.
Offset Spatula. This isn’t essential for baking cakes, but it is essential for beautifully frosted cakes. If you don’t care too much about the appearance of the cake, a butter knife will do. But, if you want beautiful frosting waves or want to achieve the “naked cake” look as seen in this recipe, an offset spatula is necessary. It helps smooth and level the tops of the frosting.
When I’m making a smaller cake (as in these 6-inch cakes), I find it more helpful to use a small-sized offset spatula like this.
Bench Scraper. Again, not a necessity, but it is very useful if you want to achieve the “naked cake” look in this recipe. A bench scraper perfectly smooths out the surface of the frosting, including the edges, and ensures that the frosting is evenly distributed (in a thin layer, in the case of a “naked cake”).
If you don’t have a bench scraper, a small or medium straight spatula can also work.
Ingredients in a Vegan Layer Cake
Flour
The type of flour matters. This isn’t a gluten-free cake and I’m not going to pretend I’m an expert on gluten-free cakes, but generally speaking, cakes made with gluten-containing flour are going to be lighter and less dense in texture than than gluten-free cakes.
If you have a gluten allergy, of course, I am not encouraging you to go ahead and test it. But if you can tolerate gluten, use the gluten-containing flour! I promise your taste buds will thank you. That said, if you are allergic or intolerant to gluten and want to make this cake, a 1:1 gluten-free all purpose baking flour is your best bet.
I typically love making cakes with cake flour, as it yields the lightest texture, but I ran out of cake flour and was surprised how perfectly tender this cake came out using all-purpose flour.
Butter vs. Oil
The butter vs. oil debate is a something all bakers face, not just vegan bakers! Oil usually results in more tender baked goods, while butter is more flavorful than oil.
Using an equal mix of oil and vegan butte lends a texture that is light and tender, but also incredibly rich, flavorful, and buttery. So you get the best of both worlds, texture wise. And it’s 100% vegan! I’ve had good success with Country Crock Plant Butter and Earth Balance buttery sticks.
Leaveners
The most commonly used leaveners in vegan baking are baking soda and baking powder, but this cake relies on a third leavener, commonly used in vegan cakes: vegan “buttermilk.” I simply combine plant-based milk with lemon juice and let it rest until it curdles. If you don’t have fresh lemon juice, you can use apple cider vinegar.
As for baking soda and baking powder, this recipe uses a bit of both, and here’s why.
When you use baking soda, it requires a little acid to start reacting. In this case, the acid is the vegan buttermilk (plant milk + lemon juice). It helps activate the leavening action of baking soda, enhancing the amount of rise in your cakes. And finally, the alkaline nature of baking soda (as opposed to the acidic nature of lemon juice) cancels out any sour buttermilk flavor so you don’t end up with an unwanted tangy taste.
But if you want to keep some of that tang flavor (in a subtle way, of course), you’ll want to include some baking powder as well. This is a fruity cake with notes of raspberry and orange, so a subtle tangy flavor is desired. And since using baking soda alone will completely neutralize the vegan buttermilk’s acidity/tanginess, adding baking powder allows some of that tang to remain in the batter.
Egg Substitutes
The type of vegan egg substitute you use should depend on the type of baked good you’re making and your desired texture. For instance, I like to use flax eggs in brownies because it contributes to their fudgy gooeyness.
But with a cake, I want the texture to be airy and light, so I like to rely on aquafaba, which is simply the liquid leftover from cooked chickpeas.
When you lightly whip aquafaba, as is done in this recipe, it turns foamy and light, which then helps to create a light and fluffy texture and gives a nice lift to cakes. This recipe calls for 1/2 cup of aquafaba, and a standard 15.5 ounce can of chickpeas has a little more than 1/2 cup.
Components in this layer cake
Cake. This recipe uses three 6-inch layer cakes, but you could also make two 8-inch layer cakes.
Frosting. A layer cake needs some sort of frosting or icing, and the Tangy Buttercream Frosting in this recipe is my new favorite frosting recipe. Essentially, it’s a hybrid of a buttercream frosting and a cream cheese frosting, and uses equal parts vegan butter and vegan cream cheese.
I love the subtle but noticeable tanginess that the cream cheese and lemon juice bring to this cake. Unlike many cakes, the flavor does not have a one-note sweetness. If you can’t find vegan cream cheese, substitute the vegan cream cheese with more vegan butter and make a traditional buttercream frosting.
Jam. The homemade Raspberry Jam in this recipe is optional and you can easily make this vegan vanilla layer cake without it. However, it serves three purposes.
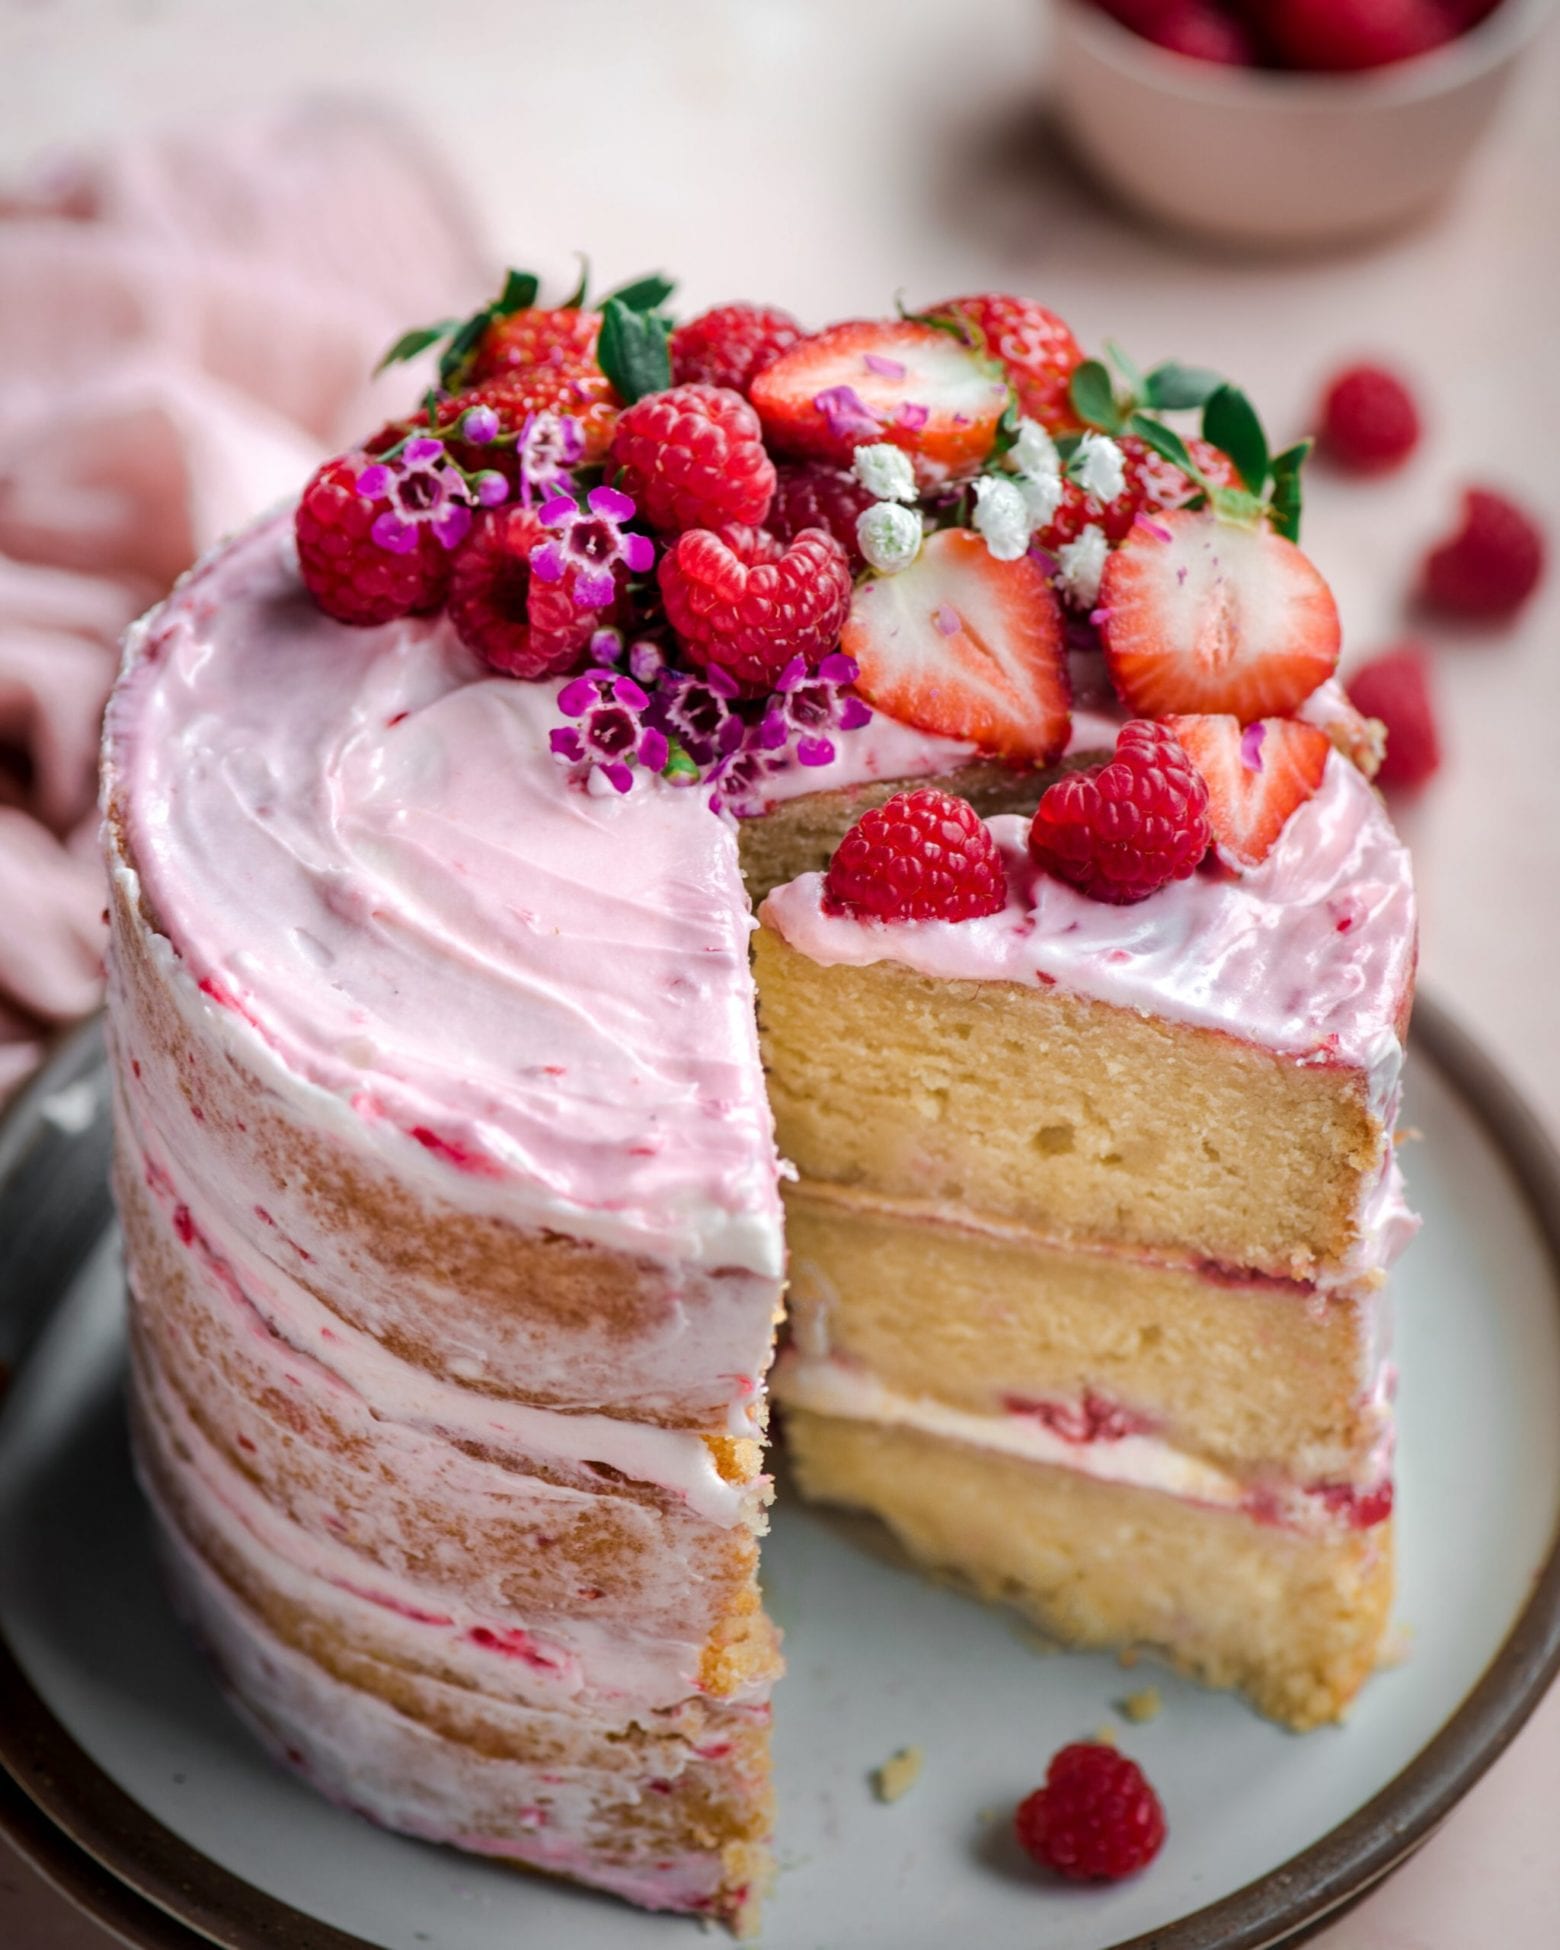
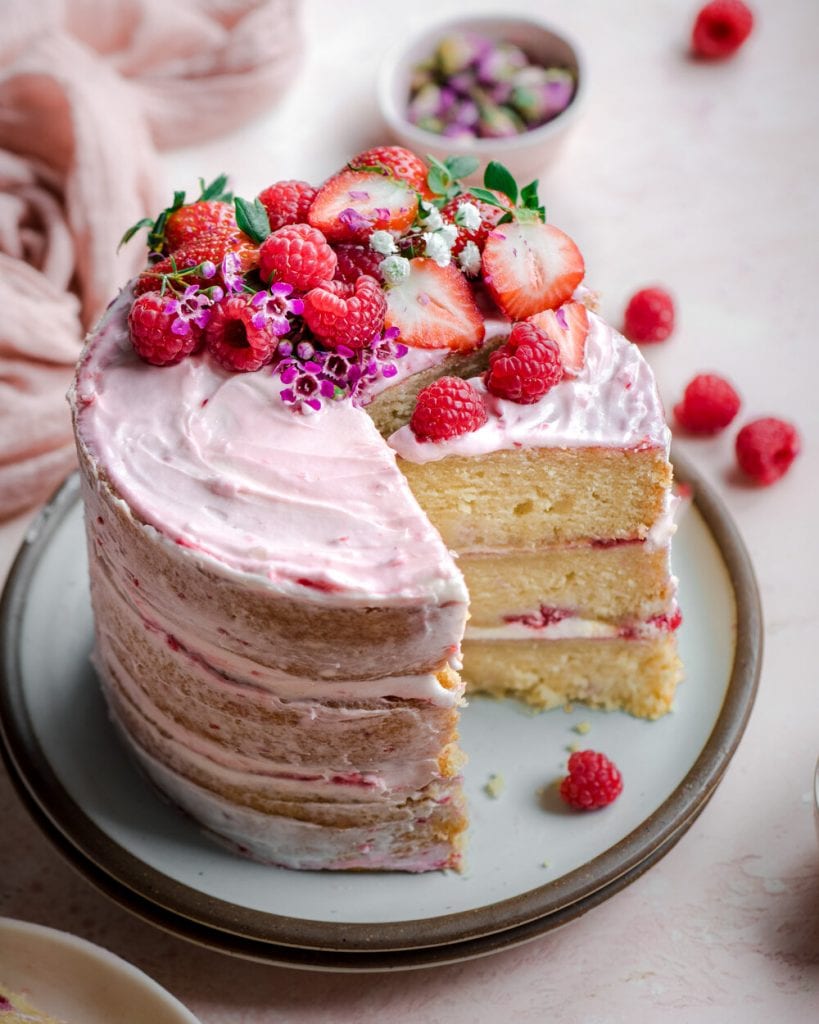
First, the jam is a tart, not-very-sweet jam, so again, it’s bringing a nice tart flavor that balances the sweetness of the cake. Two, the jam adds to the cake’s layered elements, making it more interesting texturally and visually. And three, when the jam gets swirled into the frosting, it makes for a beautifully pink cake, as seen in these photos.
How to assemble a layer cake
Refrigerate the cakes
Many bakers will recommend that you refrigerate your layer cakes before frosting, and I find this advice to be especially helpful with vegan cakes, which tend to be a bit stickier and/or delicate than non-vegan cakes.
Adding frosting to a freshly baked cake—which is tender and delicate in texture, even if it has cooled to room temperature—creates friction, making it more likely that the cake will crumble. This isn’t the end of the world, but you will have considerable crumbs in your frosting and it won’t be as pretty.
That’s why I recommend refrigerating your cooled cakes for at least 2 hours, or overnight, before frosting. Wrap them in plastic wrap to keep them moist. But if you’re avoiding plastic (a noble cause), you can put them on plates and cover them with large bowls.
While refrigerating your cakes does add time onto this recipe, it also means that you can bake the cakes in advance. Cakes wrapped in plastic will stay good in your fridge for a few days, so you can do most of the work ahead of time. Or, if you want to make them even further in advance, you can easily wrap the cakes and freeze them.
Refrigerate the frosting
If you are making the Raspberry Jam in this recipe, I recommend refrigerating the frosting for about 30 minutes. If you add a layer of jam to the cake and then dollop room temperature frosting on top, it will be quite difficult to spread the frosting out, as the frosting will want to stay in place. It is not impossible to frost room temperature frosting, but it’s much easier if you refrigerate it for a bit.
So, if you wanted to serve this cake at, say 7 pm, the ideal time to start prepping the frosting would be 5:30 pm.
First, take the vegan butter and vegan cream cheese out of the fridge to soften. This should take around 30 minutes, depending on the temperature of your kitchen. To speed the softening process up, cut both components into small pieces.
Second, make the actual frosting. It takes just 5-10 minutes.
Third, refrigerate the frosting for 30 minutes before assembling the cake.
If you make the frosting well ahead of time, you’ll want to refrigerate it anyways since it’s made with perishable items (vegan butter and cream cheese).
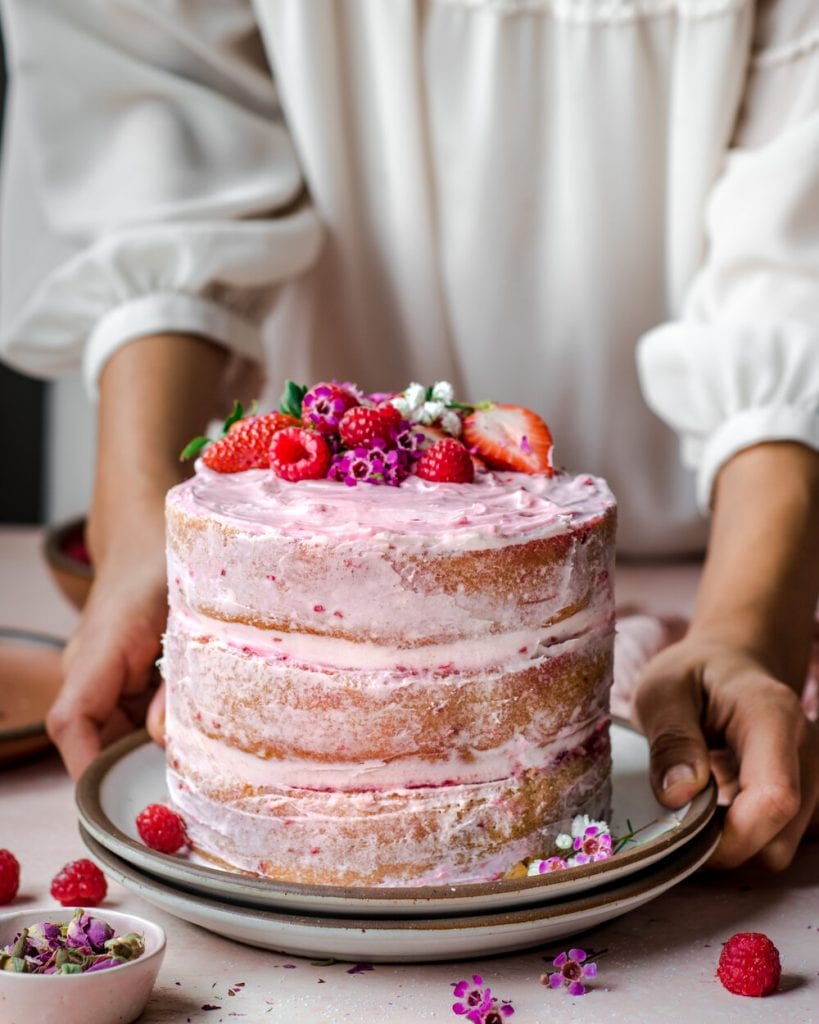
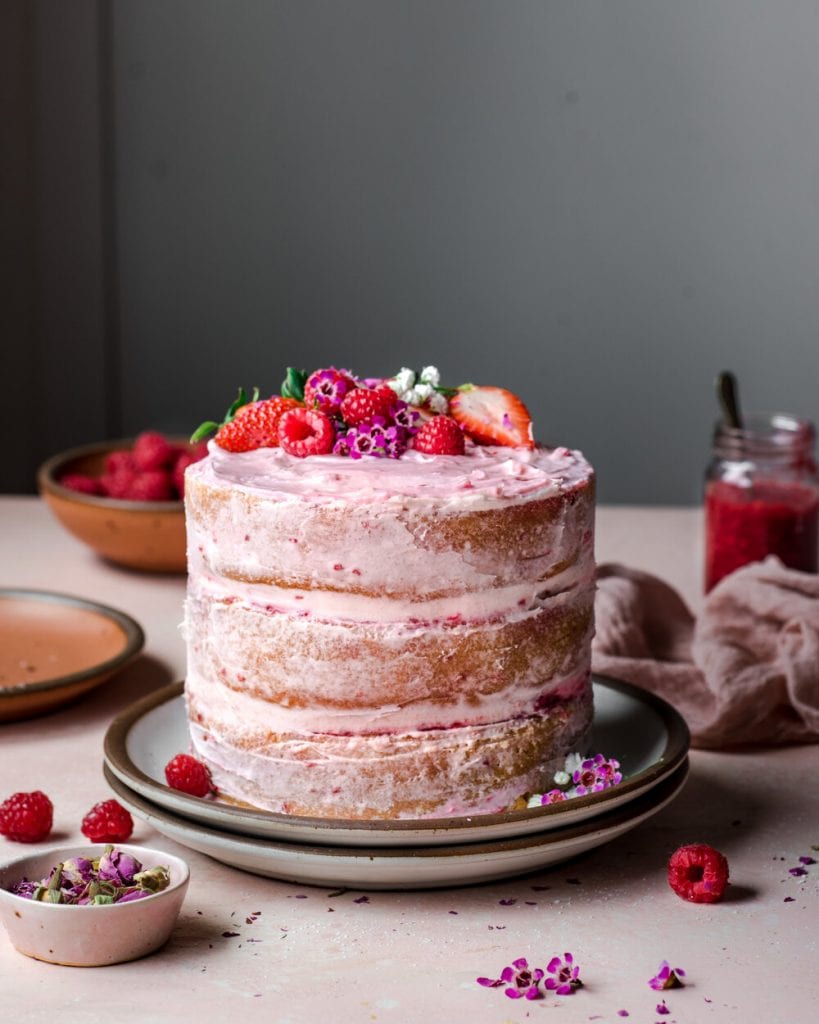
Assemble the “Naked “Cake”
Once your layer cakes have been cooled and your frosting and jam are ready, it’s time to actually assemble the cake! As you’ll see in these photos, I decided to go the naked cake route. A naked cake has a minimal outer layer of frosting, which shows off the cake’s layers and filling.
But this is totally optional. You can frost the cake however you want.
Step 1: Place one layer cake on a cake platter or your serving plate. Spread a thin layer of the Raspberry Jam on top. Then add 1/4 of the Tangy Buttercream Frosting and smooth with an offset spatula.
Step 2: Top with the layer cake #2, and repeat the process, adding more jam and frosting. Finish with layer cake #3, adding jam and frosting on top.
Step 3: Using the offset spatula, apply the remaining buttercream frosting to the sides of each cake layer, starting at the bottom, working your way up to the top. For a naked cake look, you just want a thin layer of frosting.
Step 4: When the sides are covered, use a bench scraper or straight spatula to smooth the sides and to achieve the naked cake look. If you’re not going for the naked cake look, skip this step.
Step 5: Using the offset spatula, smooth out the top layer of frosting until it’s level. You can serve now, or refrigerate for at least 1 hour to set.
Tips for Baking this Vegan Layer Cake
Whisk the dry ingredients thoroughly
Be sure to whisk the dry ingredients properly before adding them to the wet. This ensures that the baking powder and baking soda are distributed evenly, which will help your cake rise evenly. This is particularly important with layer cakes, where you’re dividing the batter between at least two pans.
Unevenly distributed leaveners can result in cakes that rise unevenly.
Weigh the ingredients
I mentioned this in the “Equipment” section above, but I strongly suggest weighing your ingredients instead of relying on measuring cups. It will yield a more accurate result.
Allow a full “preheat” and use an oven thermometer
Also mentioned above in the “Equipment” section. Before you add your cakes to the oven, be sure that your oven temperature actually reads 350°F according to an oven thermometer. Unless you’ve had your oven calibrated, it’s virtually impossible to tell if the stated temperature on your oven is the actual temperature in the oven.
And if you can, don’t bake the cakes as soon as your oven says it’s done preheating. Many ovens actually take longer to reach the desired temperature than the preheat function says. I like to have my oven on for 30 minutes before baking something as sensitive as a cake.
Cake Pan Conversion: Size and Baking Time
Don’t have three 6-inch pans or two 8-inch pans, but still want to make this cake?
There’s a lot of math here, but to keep things short, if all you have is a 9-inch (23 x 5 cm) round cake pan, your best option is to multiply all the cake ingredients by a factor of 1.5 and use two 9-inch cake pans.
According to this cake pan size guide from Food 52
- a 6 x 2 inch (15 x 5 cm) round cake pan = area of 29 square inches;
- a 9 x 2 inch (23 x 5 cm) round cake pan = area of 64 square inches.
Since we’re making three 6-inch layer cakes, multiple 3 x area of 29 inches = 87 inches.
If you multiply the recipe by a factor of 1.5, it would create enough cake batter for 1.5 x 3 x 29 inches = 130.5 inches. And since two 9-inch round cake pans would hold 2 x 64 inches = 128 inches, it’s almost the exact same amount. Voila!
As for baking time, since a 9-inch pan is bigger and will make the batter more shallow, the center can dry out more quickly. So try increasing the temperature by 25°F to 375°F and decreasing the baking time, to about 25 minutes.
This isn’t a foolproof method so you’ll want to monitor the cake for the typical signs of doneness. In other words, the cake is done when it starts to pull away from the sides of the pan and a toothpick comes out with just a few moist crumbs.
Okay, my brain hurst from all the conversions, so let’s end it here. I hope you enjoy this Vegan Vanilla Layer Cake with Raspberry Jam! If you make it be sure to leave a rating and review below and tag me on Instagram!

Introducing
Big Vegan Flavor
Techniques and 150 recipes to master vegan cooking.
Vegan Vanilla Layer Cake with Raspberry Jam

Ingredients
- 1/2 cup (1 stick / 112g) vegan butter, softened at room temperature
- 1 1/4 cups + 2 tablespoons (330 mL) unsweetened plant-based milk (I used this oat milk)
- 1 tablespoon (15 mL) lemon juice
- 1/2 cup (120 mL) aquafaba (the liquid from a can of chickpeas)
- 3 1/2 cups (420g) all-purpose flour
- 1/2 teaspoon baking soda
- 2 teaspoon baking powder
- 1/2 teaspoon fine sea salt
- 1/2 cup (112g) sunflower oil, or melted coconut oil*
- 1 1/4 cups (240g) organic cane sugar
- 1 tablespoon pure vanilla extract
- 2 tablespoons freshly squeezed orange juice (optional)**
- 1 tablespoon orange zest (optional)
- 2 cups (240g) fresh raspberries***
- 1 batch Raspberry Jam (recipe below)
- 1 batch Tangy Buttercream Frosting (recipe below)
Instructions
- Take the vegan butter out of the fridge to soften.
- Make the vegan buttermilk. Combine the plant based milk and lemon juice and stir. Set aside to curdle.
- Preheat the oven to 350°F/175°C. Make three parchment paper rounds for three 6×2-inch (15 x 5 cm) round cake pans and line each pan. Alternatively, you can use two 8-inch (20 x 5 cxm) round pans. Ensure your oven is calibrated or that you’re using an oven thermometer (see notes above in the “equipment needed for baking a vegan layer cake” section).
- Prepare the aquafaba. Pour 1/2 cup of the liquid from a can of chickpeas into a small bowl. With a handheld electric mixer (or stand mixer), beat the aquafaba on medium speed until it‘s foamy throughout, about 60 seconds.
- Whisk together the dry ingredients. Add the flour, salt, baking soda, and baking powder to a medium bowl and whisk well to ensure the leaveners will be evenly distributed throughout the cake.
- Cream the wet ingredients. Add the softened butter, oil, and cane sugar to a large bowl. Using the mixer, beat until the ingredients are well incorporated and starting to get fluffy, 60 seconds or so. Add in the whipped aquafaba, vanilla extract, orange juice (if using), and orange zest (if using). Mix until just combined, 15-20 seconds.
- Add half of the flour mixture into the butter-sugar mixture, beating on low speed until just combined, taking care to not over beat. Then add the vegan buttermilk and beat until just combined. Finally, add in the remaining flour mixture until you have a mostly smooth batter, but do not overmix. It’s okay if there are a few flour pockets remaining. Overbeating can cause the cake to become dense or dry. The batter should be fairly light and fluffy at this point.
- Divide the batter equally in the prepared pans, using a digital scale to measure each pan so each cake is equal in size. The batter in each of my three 6-inch pans ended up weighing 440 grams each. Scatter the raspberries evenly over the top of each cake, but do not press them down.
- Bake 6 x 2 inch (15 x 5 cm) cakes for 30 minutes, or until the center is set and the cake has puffed up a bit and just started to pull away from the pan, and a toothpick inserted comes out with only a few moist crumbs. If you are using two 8 x 2 inch (20 x 5 cm) cakes, bake for 30-35 minutes.Note: I recommend checking 5 minutes before the time is up, as every oven is different and it might be done sooner.
- Cool the cakes in their pans for at least 30 minutes, then carefully invert them onto a cooling rack. Cool completely before adding assembling the cakes.
- Assemble the cakes: If you have the time, I recommend refrigerating the cakes and frosting (see the section above called “Assembly”).a. Place one layer cake on a cake platter or plate. Spread a thin layer of the Raspberry Jam on top. Then add 1/4 of the Tangy Buttercream Frosting and smooth with an offset spatula. Top with the next layer cake. And repeat the process, adding more jam and frosting. Finish with the final layer cake, adding jam and frosting on top.b. Using the offset spatula, apply the remaining buttercream to the sides of each cake layer, starting at the bottom, working your way up to the top. For a naked cake look, you just want a thin layer.c. When the sides are covered, use a bench scraper to smooth the sides and to achieve the naked cake look.d. Using the offset spatula, smooth out the top layer of frosting until it’s level. You can serve now, or refrigerate for 1-2 hours to set the cake.
- Store leftovers in an airtight container in the fridge for a few days.
Notes
Nutrition
Nutrition information is automatically calculated, so should only be used as an approximation.
Raspberry Jam
Ingredients
- 1 1/2 cups fresh raspberries 180g or frozen raspberries (200g)
- 2 1/2 teaspoons cornstarch or arrowroot powder
- 1 1/2 tablespoons cold water
- 1 tablespoon pure maple syrup
- 1 tablespoon freshly squeezed lemon juice
Instructions
- Add the raspberries to a saucepan over medium heat. If using frozen raspberries, stir occasionally until they’re thawed. Mash down the raspberries with a fork.
- Meanwhile, dissolve the cornstarch or arrowroot powder with the cold water to create a slurry.
- Add the slurry, maple syrup, and lemon juice to the pan. Bring to a simmer, stirring constantly, until the jam has thickened. Take off the heat, and once cool, refrigerate. It will thicken even more as it rests in the fridge.
Notes
Nutrition
Nutrition information is automatically calculated, so should only be used as an approximation.
Tangy Buttercream Frosting
Ingredients
- 1/2 cup (1 stick / 112g) vegan butter, softened at room temperature
- 4 ounces (113g) vegan cream cheese, softened at room temperature*
- 2 1/4 cups (~ 265g) organic powdered sugar, sifted
- 1 teaspoon pure vanilla extract
- Pinch of sea salt
- 1 tablespoon fresh lemon juice
Instructions
- To a large mixing bowl, add the softened vegan butter. Beat on low speed with an electric handheld mixer (or stand mixer) until smooth and fluffy. Add the vegan cream cheese and beat until creamy and smooth and well incorporated.
- Gradually add the sifted powdered sugar in four turns, and mix on low speed until well combined and fluffy, scraping down the sides. Add the vanilla, salt, and lemon juice and beat until smooth. If the frosting is too thick, add a tablespoon of plant milk until you reach your desired consistency. Refrigerate for at least 30 minutes to make it easier to frost the cake.
Notes
Nutrition
Nutrition information is automatically calculated, so should only be used as an approximation.


I made this for a birthday gathering that I hosted and it was absolutely delicious and a hit with everyone! I baked 2 – 8 inch round cakes ahead of time, froze them and took them out the night before, and made the jam and frosting a couple of days ahead. I also doubled the frosting recipe (I opted for the cream cheese and highly recommend!) and turned it into a more traditional looking cake versus the naked cake. Whether you’re vegan or not you will love this cake, the flavours are outstanding. I’ll most definitely be making this again soon! Thank you for the recipe!
Loved it
My family’s favorite vanilla cake
Aw, that’s amazing to hear, Justine! 🙂
Hello! Do you have any recommendations for making the cake in advance and freezing it?
Thank you 🙂
Hi Jordyn! Here are some options for frosting it in advance and storing it:
If you have a cake stand or tall cake dome; that would be ideal, as you’ll prevent the cake from drying out without disturbing the frosting.
If you don’t have one, I would frost the cake, then refrigerate uncovered for an hour to let the frosting firm up. Once the frosting is cold and set, you can loosely tent it with foil or an inverted large bowl.
If none of those options work, you can just store the cake uncovered in the fridge, and it shouldn’t dry out very much after one day (Just be sure there aren’t any strong odors in your fridge that could affect the flavor of the cake.). For the best results, let the cake sit at room temperature for a bit before serving, as room temperature cake will taste more flavorful than cold cake.
I have baked this cake for the last 6 years and it’s an all-around BIG WINNER. Everyone who has tried it says it’s the best cake they’ve ever had. So moist, with the perfect balance of flavor. I will continue to make this every year probably until I pass the recipe on to my grandchildren! It’s that good!
That’s so sweet to hear, Eden! Thank you so much for continuing to make and share this cake with loved ones 🙂
I made it in two 20 cm round tins and sliced both in two so ended up with four layers but one was so thin i discarded it and just used three. Used my own blackcurrant jam instead of raspberry but otherwise followed the recipe to the letter. Made it for my vegan daughter’s forty eighth birthday and everybody – most importantly she- loved it. Will be trying your other recipes!
It’s so lovely to hear you made this recipe for your daughter’s birthday celebration, Ewa 🙂 Thank you so much for sharing!
Made this delicious cake for my daughter’s small wedding. I didn’t add enough powdered sugar to the frosting as it was thin, even after refrigerating. I should have weighed the ingredients as recommended. I needed to finish at that point so wasn’t able to add more. I couldn’t do a naked cake but it was still pretty. Jam & buttercream frosting is amazing. I will definitely make again. Thank you!
It’s so lovely to hear this cake was a part of your daughter’s special day, Judy! What a lovely mom you are for making it for her. My mom made me this cake for my birthday in the past and it was such a sweet gesture 🙂
What flowers r on the top of this cake ?
Make this recipe for my sisters birthday every year or whenever she wants! Literally best cake in the world.
Thanks for the stellar review, Ambz! And happy belated to your sister 🙂