


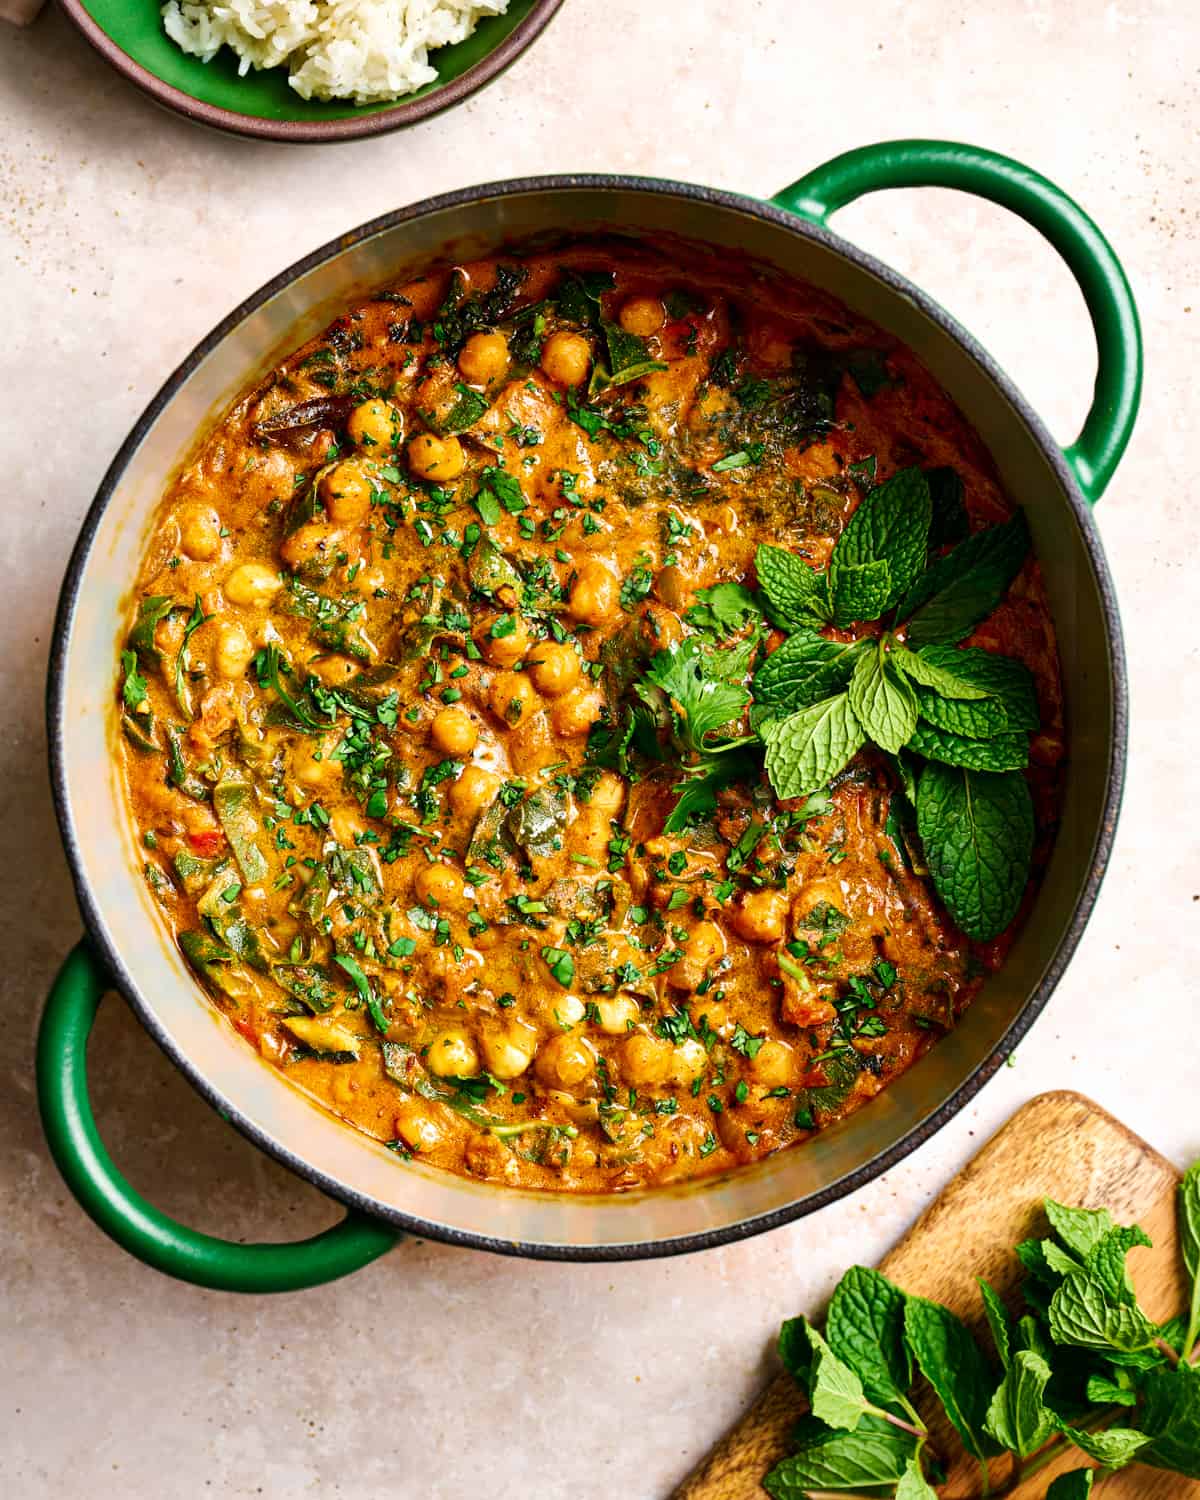
Craving an Indian restaurant-style curry without tons of extra work? Then you’ll love this Chickpea Curry! It’s a creamy, generously-spiced one-pot meal with gourmet flavors that comes together in under 1 hour.
You can think of this as a creamier spin on chana masala—while this dish still centers chickpeas, we riff a little to achieve a creamier consistency and add a few greens for a complete meal.
In this post:
VIDEO: Watch me make this Chickpea Curry
My lessons in the Indian home kitchen started when I was just a little kiddo standing by my mom’s side as she blitzed buckets of garlic-ginger paste and toasted jars upon jars of homemade spice blends.
This Chickpea Curry combines lessons from traditional Indian cooking with a few modern spins. The result is a one-pot meal that’s somehow both classically Indian and totally unique.

The YouTube video I made to accompany this recipe was a smash hit with over 2 million views on my channel. Check it out to watch me make this recipe.

Ingredient notes

A few of these ingredients might send you to an Indian grocery store or online, but I promise it’s worth it. And for anything you can’t find, I’ve got substitutes.
- Chickpeas. Plain ol’ canned chickpeas will do just fine and add both plant protein and fiber. Of course, if you cook your beans from scratch, this curry will be even better.
- Onions, ginger, garlic, and green chiles. Or, as I call them, the Indian holy quaternity — the base of so many flavorful Indian recipes.
- Whole and ground spices. You can certainly make this recipe using only ground spices (and I’ve included substitutes in the recipe card) but I’d encourage you to try using some whole spices as well (coriander, cumin seeds, curry leaves) for the best flavor!
- Tomatoes. Diced Roma tomatoes and tomato paste form a tag team that provide this Indian curry with its necessary tang.
- Coconut milk. Brings the richness you’d expect from a restaurant-style Indian curry and tempers the heat from the chiles. “Lite” coconut milk or cashew milk can also work, but the texture will be less creamy and the spice less tempered. Or, sub with homemade cashew cream; see FAQ section below.
- Tahini. While it’s not a traditional Indian ingredient, tahini adds a subtle decadence and lovely mouthfeel to this curry without adding a distinct flavor, similar to what almond butter does in my fan favorite lentil curry.
- Fresh herbs. Cilantro and mint offer balance and brightness among the rich and creamy bites. Mint, in particular, brings a lovely cooling accent to the warm spices.
Step-by-step guide
Toast the whole spices. Heat the oil in a skillet over medium-high heat, then add the cumin and coriander seeds. Toss frequently until toasty and darker in color, but don’t burn.
Next, add the curry leaves. If using fresh leaves, immediately cover the pan with a lid to prevent the oil from splattering.


Sauté the aromatics. Add the onions and cook until they begin to develop some color. Pour in a splash of water to prevent browning, then add the garlic, ginger, and chile peppers for 1 to 2 minutes.


Add the ground spices and tomato paste and stir vigorously for about 90 seconds.


Add the tomatoes and their juices to the pan. Let the tomatoes simmer for a few minutes or until they start to break down.


Next, add the chickpeas, followed by the coconut milk, water, and tahini. Bring the mixture back up to a simmer, then cover the pan.


Stir the chopped greens into the curry when it’s done simmering. Add the garam masala when the leaves have wilted.


Off of the heat, add the lemon juice, cilantro, and mint. Give it a taste and adjust the flavors as needed. Serve with basmati rice or homemade naan, then enjoy!

Tips for making this recipe
Prep in advance
Get the curry on the table even faster by dicing the onion, dicing the tomatoes, and prepping the aromatics (garlic, ginger, chiles) 1 or 2 days ahead of time. Store them in separate containers in the fridge.
In addition, mix the ground spices together and store the mixture in a ziploc bag or jar on your counter. With the prep out of the way, dinner will be ready in 35ish minutes.
Always multitask
Rinse and slice the greens while you wait for the chickpea curry to simmer. Once they’re added in, chop the cilantro and mint. And while the onions cook, measure out your ground spices.
Shortcuts (if you need ’em)
This is a flexible dinner recipe with a few shortcut options:
- Buy pre-washed baby spinach or baby kale instead of the Swiss chard or kale. Cook for 1 to 2 minutes until wilted;
- Use half of a 14-ounce can of diced tomatoes instead of dicing fresh tomatoes by hand.
- Use pre-ground coriander and cumin instead of whole spices (see recipe card Note 1).

Chop the greens finely
There’s nothing worse than an unusually large, hard-to-manage piece of kale or Swiss chard among an otherwise easy-to-eat curry. To avoid this, slice the greens into very fine pieces. I slice them like I chiffonade basil: roll the leaves up, then slice into thin strips.
PS: If your bunch of greens is large, you will need to add more salt, as dark leafy greens absorb a lot of flavor!
Seek out curry leaves
This recipe is extraordinary with fresh curry leaves, so if you have an Indian grocery store, please seek these out. You can freeze leftover curry leaves for another time.
If you don’t have access, try to get some dried curry leaves online. They don’t have as much flavor, but are still delicious.
When added to hot oil, fresh curry leaves bubble up rapidly. To prevent oil splattering, stand back when you add them and immediately cover the pan.
Cook for just 20 seconds, then remove the lid (they will be sizzling less by now) and add your onions.
Frequently Asked Questions
Yes, cashew cream makes for a lovely substitute here. To make the cashew cream:
1. Soak ½ cup (70g) of raw, unsalted cashews in water overnight, or do a quick soak by adding them to a saucepan, covering with water, and boiling for 15 minutes. Drain the cashews and rinse well.
2. Add 6 tablespoons (90 mL) of water to a small-capacity high-powered blender (small blender jug, 32 oz / 1L or smaller). Add the cashews, 1 TBSP of freshly squeezed lemon juice, and ½ tsp kosher salt.
3. Blend for about 2 minutes, starting on low and gradually moving up to high speed. Scrape down the sides as you go and blend until it’s completely smooth and no cashew bits remain.
Note: If you only have a large-capacity high-powered blender, you’ll need to double the cashew cream, as there isn’t enough liquid here to blend in a large container. A food processor is a great alternative, but the texture won’t be as silky smooth. Blend the ingredients for approximately 4 minutes.
You can use any tahini brand that isn’t bitter in flavor. However, since the tahini isn’t a main flavor component here like it is in hummus, you’re welcome to be flexible in the brand you use.
In the RPL kitchen, we often use Al Kanater, Beirut sesame paste, and Al Arz.
It’s fairly mild, but it can be as spicy or as mild as you want it to be.
For very mild heat, use 1 serrano pepper (or jalapeño). While these peppers are quite spicy on their own, the coconut milk tempers the heat very well.
If you enjoy heat, use 2 to 3 peppers (3 is my preference for spicy!).
Remember: the white membranes inside peppers have most of the heat. So if you’re uncertain about how spicy it will be, remove some of them to moderate the heat.
The leftovers stay fresh for up to 5 days when stored in an airtight container in the fridge. It also freezes well in about 3 months. I recommend freezing the curry in single-serve portions using Souper Cubes to speed up the defrost.
The leftovers thicken considerably in the fridge. But once you reheat it in a saucepan, it loosens up. If needed, add a splash of water or veggie broth to loosen it more.
Scoop the curry into bowls with cooked white basmati rice (the classic), or brown rice or a whole grain like farro or quinoa. If you have extra time, take every serving over the top with some vegan naan (it’s perfect for sopping up the delicious gravy!).
If you love this vegan Chickpea Curry, please be sure to leave a rating and review below! It’s always much appreciated 🙂 And tag me on Instagram – I love hearing your feedback.

Introducing
Big Vegan Flavor
Techniques and 150 recipes to master vegan cooking.
Chickpea Curry

Ingredients
- 2 tablespoons avocado oil or neutral-flavored oil of choice
- 2 teaspoons coriander seeds (Note 1)
- 1 heaping teaspoon cumin seeds (Note 1)
- 15 to 20 fresh curry leaves, or 30 dried curry leaves (optional but recommended, Note 2)
- 1 large yellow or red onion, finely diced
- 6 garlic cloves, minced
- 2- inch piece fresh ginger, minced or grated
- 1 to 3 serrano peppers, diced (1 adds mild heat; 3 for spicy!!)
- 2 tablespoons tomato paste
- ½ pound (227g) Roma tomatoes (2 roma tomatoes), diced
- 2 teaspoons Diamond Crystal kosher salt (Note 3)
- 1 (13.5 oz /400 mL) can full-fat coconut milk (Note 4)
- ½ cup (120 mL) water (Note 5)
- 2 (15 oz /425g) cans chickpeas, drained and rinsed
- 3 tablespoons tahini, well-stirred
- 1/2 teaspoon organic cane sugar, brown sugar, or coconut sugar
- 1 small head of Swiss chard or lacinato kale (Note 6)
- 2 teaspoons garam masala
- Freshly squeezed lemon or lime juice, ½ to 1 tablespoon, to taste
- 1 big handful of cilantro leaves and tender stems, chopped
- 1 big handful of fresh mint leaves, chopped
Ground Spices
- 1 ½ teaspoons curry powder
- 1 teaspoon ground coriander
- ½ teaspoon ground cinnamon
- 1/2 teaspoon freshly grated nutmeg
- ¼ teaspoon ground turmeric
- Lots of freshly ground black pepper
Instructions
- Keep a small bowl of water nearby for deglazing. Heat the oil in a 12-inch heavy-bottomed sauté pan or medium Dutch oven over medium-high heat. Once hot, add the cumin and coriander seeds for about 1 minute, tossing frequently, or until aromatic and darker by a few shades but don’t let them burn!Add the curry leaves: if using fresh leaves, cover the pan immediately and stand back to prevent oil splatter. Cook for just 20 seconds to prevent burning. For dry leaves, cook a little longer.
- Add the onions with a big pinch of salt and cook for 5 minutes, until starting to get some color. If the spices start to darken, lower the heat to medium. Add a splash of water as needed to prevent onions from browning. Add garlic, ginger, serrano peppers, and cook for 1 to 2 minutes, stirring frequently.
- Add Ground Spices and tomato paste and stir frequently for 90 seconds. If it dries out, add a splash of water. Add tomatoes + 2 teaspoons kosher salt. Use tomato juices to scrape up browned bits. Cook for 5 minutes, or until tomatoes are soft and the oil starts to release from them.
- Pour in chickpeas, coconut milk, water, tahini, and sugar. Stir well and bring to a simmer. Cover and simmer for 15 to 20 minutes, opening the pot to stir occasionally.
- Meanwhile, rinse Swiss chard (or kale) and cilantro and mint. For the greens, remove the center ribs and discard. Roll the leaves and up slice the leaves very thinly. Chop the cilantro and mint.
- After the simmer time, add the greens. Simmer until tender and wilted, 4 to 5 minutes. Stir in the garam masala to combine.
- Off the heat, squeeze in a little lemon or lime juice, cilantro, and mint. Season to taste with salt (about ½ teaspoon kosher salt). Rest for 5 to 15 minutes to allow flavors to meld. Serve with cooked rice or flatbread.
Notes
- I like the subtle crunch of whole spices. If you don’t, grind your spices first or roughly crush with the back of a sturdy mug, cast iron pan, or heavy knife. No whole spices? Use 1 ½ tsp ground coriander + heaping ½ tsp ground cumin with the other ground spices.
- If you have an Indian grocery store, seek out fresh curry leaves, which add incredible flavor. Or order dried curry leaves online. The amount of leaves depends on size. If your curry leaves are large, use the smaller range.
- Since this is a fair amount of salt, I’ve specified the salt I use. For sea salt or Morton’s kosher salt, use less salt, about 1 ¼ tsp. If using table salt, use 1 tsp.
- If you can’t have coconut products, check the FAQ section in the blog post for how to use cashew cream as a substitute.
- if you prefer a looser consistency in curries, use ¾ to 1 cup (180 to 240 mL) water.
- This weighs 7 to 8 oz / 200-230g (stems included). If using more greens, you need to add more salt. You can sub with bagged baby spinach or baby kale (I like to roughly chop before adding it to the curry); it’ll cook in 1-2 minutes.
Nutrition
Nutrition information is automatically calculated, so should only be used as an approximation.
 Love this? Leave a rating below!
Recipe: Nisha Vora / Rainbow Plant Life | Photography: Megan Morello








I’ve made this curry a few times now. I’ll add to the substitutions list – you can freeze curry leaves (I didn’t, thank you internet!) and use in this recipe. I went with the dried amount as freezing dims the flavour slightly (and mine were dark from 5 months in the freezer lol). I also had 4 medium tomatoes that refused to ripen after a month? As they were red (not orange), I figured why not throw them into a curry. I increased the recipe by 1 3/4 to accommodate the extra tomato (but kept the chickpeas amount the same – less heavy on the stomach), and lo and behold, sensational cream curry emerged! As I increased the recipe, I used a can of coconut milk and 300ml (1 1/4 cups) frozen cashew cream. Oh and instead of spinach, I used frozen peas. Thank you so much Nisha! I’ve always loved curries, but you’re really are the best out there!
Forgot to add, I took a note from lentil curry and added 250g grated sweet potato (1 large) to this too. And my cashew cream included coconut yoghurt – I think I got that idea from your queso dip to make it taste more like sour cream.
I’m really looking forward to trying this recipe tonight! I am using dried chickpeas using the instant pot, and wanted to ask if I can cook this all together before pre-cooking the chickpeas, and increase the 15-20 minute simmering process, or would you recommend pre-cooking the chickpeas?
Hi Jo, thanks for reaching out. I’m guessing you may have already figured it out if you were planning to make it a few days ago! We’d suggest having the chickpeas pre-cooked and ready to go. As the chickpeas only simmer with other ingredients for 15-20 minutes, we think a higher and longer simmer with dried chickpeas would be too long. Most importantly, you’d need way more liquid than called for in the recipe to cook the dried chickpeas. We hope you make it (with cooked chickpeas!), we know you’ll love it!
I’m not sure I quite understand your question so I’ll share both answers to both options. If you’re asking if you can cook the sauce separately (or reheat it) while the chickpeas are cooking then the answer is yes. If you’re asking if you can cook soaked dried chickpeas in the sauce than the answer is no (not a hard no but really not worth the effort or stress!). Chickpeas (and beans, split peas, lentils for that matter) need unsalted water to soften completely. Acid in tomato, and salt prevents them from softening fully – they always stay firm, “al dente” texture, like eating old chickpeas/beans etc. They’re perfectly edible (says I who’s eaten a ton of old pulses recently because I hate waste). Hope that helps 🙂
Adding mint to the greens is such a refreshing way to eat chickpeas, and this dish is so well spiced! I was nervous about adding tahini to the curry since it’s not my favourite flavour but it blended in well and was not overpowering at all. This will be my go-to chickpea curry from now on!
We’re so happy that the curry turned out well for you, Sindhura. Thank you for taking the time to leave a comment and for trying out the recipe!
Lovely, thank you so much! I love all you do. Thank you xx
Hi Emma, thank you so much for your kind review!
This is one of the tastiest recipes I’ve ever made! Super easy too! My grocery was out of tahini so I used peanut butter and it was delicious! My non vegan boyfriend loved it too. Will definitely add this to my weekly dinner rotation.
We’re so happy you and your boyfriend enjoyed the curry, Steph! I agree it’s quite a delicious recipe! Have you tried the Red Lentil Curry recipe yet? That’s one of my favorites!
amazing!
We’re delighted you think so, Shanece!
Absolutely gorgeous curry. Now this will be my go to recipe 😋
Hi Yvonne, thank you so much for your kind review!
Hi, will you be reposting the turmeric curry with Mango again as it has been a while since it has been removed?
Hi Dee, we’ve emailed you about this!
Thank you for the e-mail.
You’re welcome, Dee!
My typical MO is to make a new recipe verbatim first go ’round, then make adjustments as I see fit. I wouldn’t change a dang thing about this one. Now, I didn’t have cumin seeds so I subbed fennel seeds and I never look back. This recipe is just outstanding. I cannot thank you enough for sharing this, Nisha.
Your review made our day, Danny! Thank you for taking the time to share your thoughts and for trying out the recipe.
OMG, so good! Even with a few minor changes…no seeds, curry leaves or cilantro on hand so did without. I have baby mouth so left out the peppers altogether. We pretty much love all Nisha’s recipes from the “Vegan Instant Pot CookBook” to her free online recipes. Thank you Nisha for taking vegan cooking from OK to fabulous!
Thanks for sharing, Bridget! We’re so happy you’re such a fan of the recipes. Thank you for being a part of the Rainbow Plant Life community!
Love it! Will make again and again!
One of my new favorite meals.
The only suggestion I have is a more comprehensive nutrition facts. I’m unsure if it’s per 100g, per portion, with rice, without rice. It’s important for people tracking macros.
Hi Jovana, thanks for the feedback! Happy to hear you enjoyed the curry.
The nutrition facts are for the full yield of this curry pot divided by 6 (if you’re eating rice with it – rice isn’t included in the nutrition facts), if you were just eating the curry on it’s own, it may only serve about 4.
Our nutrition facts are just a rough estimate, so if you’re really tracking your macros we suggest putting the ingredients of the recipe into an app like myfitnesspal for the most accurate results.
This was excellent ! I used dried curry leaves so picked them out as I was eating as they were a bit hard to chew but the flavor from them ! Highly recommend this recipe if you like Indian food as I do .
We’re over the moon to hear you enjoyed the recipe, Niamh. Thanks for your kind words! 🙂
Excellent dish, very flavorful and delicious!
Hi Urvashi, we’re so happy you enjoyed it! Thanks for leaving a review 🙂
I don’t have some of the more niche and fancy ingredients, but this still turned out super super good. I think it has dethroned your red lentil curry honestly. Very inexpensive to make and really powerful flavors. Goes a long way when you pair it with rice.
Thank you for your lovely comment, Taylor! It makes us happy to know that you enjoyed the recipe.
Amazing!!! My partner is from Mumbai and is notoriously discerning when it comes to Indian flavors, but this managed to get a thumbs up from him. The recipe and video are well laid out and easy to follow. Cook time was actually about 1 hour, even though I’m not a fast cook. I used Chinese sesame paste instead of tahini and omitted the curry leaves and fresh herbs because I didn’t have any on hand and it still tasted great, so don’t let that stop you from making this even if you’re missing an ingredient or two.
Thanks for sharing your experience, Yuki! So great to hear your partner gave the curry a thumbs up 🙂
Hiii Nisha!
I love love love all of your recipes! Gonna try this one next!
Should I use Raw Tahini or Roasted Tahini?
Can’t wait!!!
Hi Tracy, we’re thrilled you do! And definitely roasted tahini- in any of the Rainbow Plant Life recipes!
I thought I was eating a restaurant meal. This recipe is a winner!
Hi Stella, we’re thrilled to hear you enjoyed this recipe! Next time, would you mind leaving a rating alongside your review? Star ratings are big help to readers who are thinking of making the recipe. Thanks!
This recipe tastes like pure love. I still get intimidated making Indian food because there are so many ingredients and steps. This is clearly written and isn’t hard when you line it all up on your counter. I planned to make it as a meal prep and here I am eating a full bowl at 9:15 pm. Thanks Nisha. You’re a goddess.
Awe, what a kind comment, Lara! We are truly honored to create recipes for people like yourself 🙂 Thanks for trying the curry!
I think this recipe has replaced the tumeric curry one, I really loved that recipe it was my go to for when I needed something with lots of veg and good healing spices. This recipe looks nice too but please repost the old one! 🙁
Hi Robyn, sorry about that! We will email you about this!
This was amazing. SO flavorful and not hard to make.
That’s so great to hear, Natasha! Next time, would you mind leaving a rating alongside your review? Star ratings are big help to readers who are thinking of making the recipe. Thanks!