

Looking for a knock-your-socks-off holiday main with serious wow-factor and enough savory oomph to impress meat-eaters? Look no further than this genuinely meaty and downright gorgeous Vegan Wellington.
Holiday feasts call for showstoppers—and this Vegan Mushroom Wellington, with its robustly savory (secretly wholesome!) lentil-and-mushroom filling and buttery—is just that.
In this post:
Reinventing a British classic
My partner Max’s dad is British, and for Christmas dinners, he typically makes a classic English wellington. It always feels so fancy and festive, and I knew I had to come up with a veganized version so I too could make my holiday guests feel fancy and festive.
To nail the meatiness without the meat, I lean hard on ingredients that naturally pack an umami punch: mushrooms, walnuts, nutritional yeast, tomato paste, and miso.
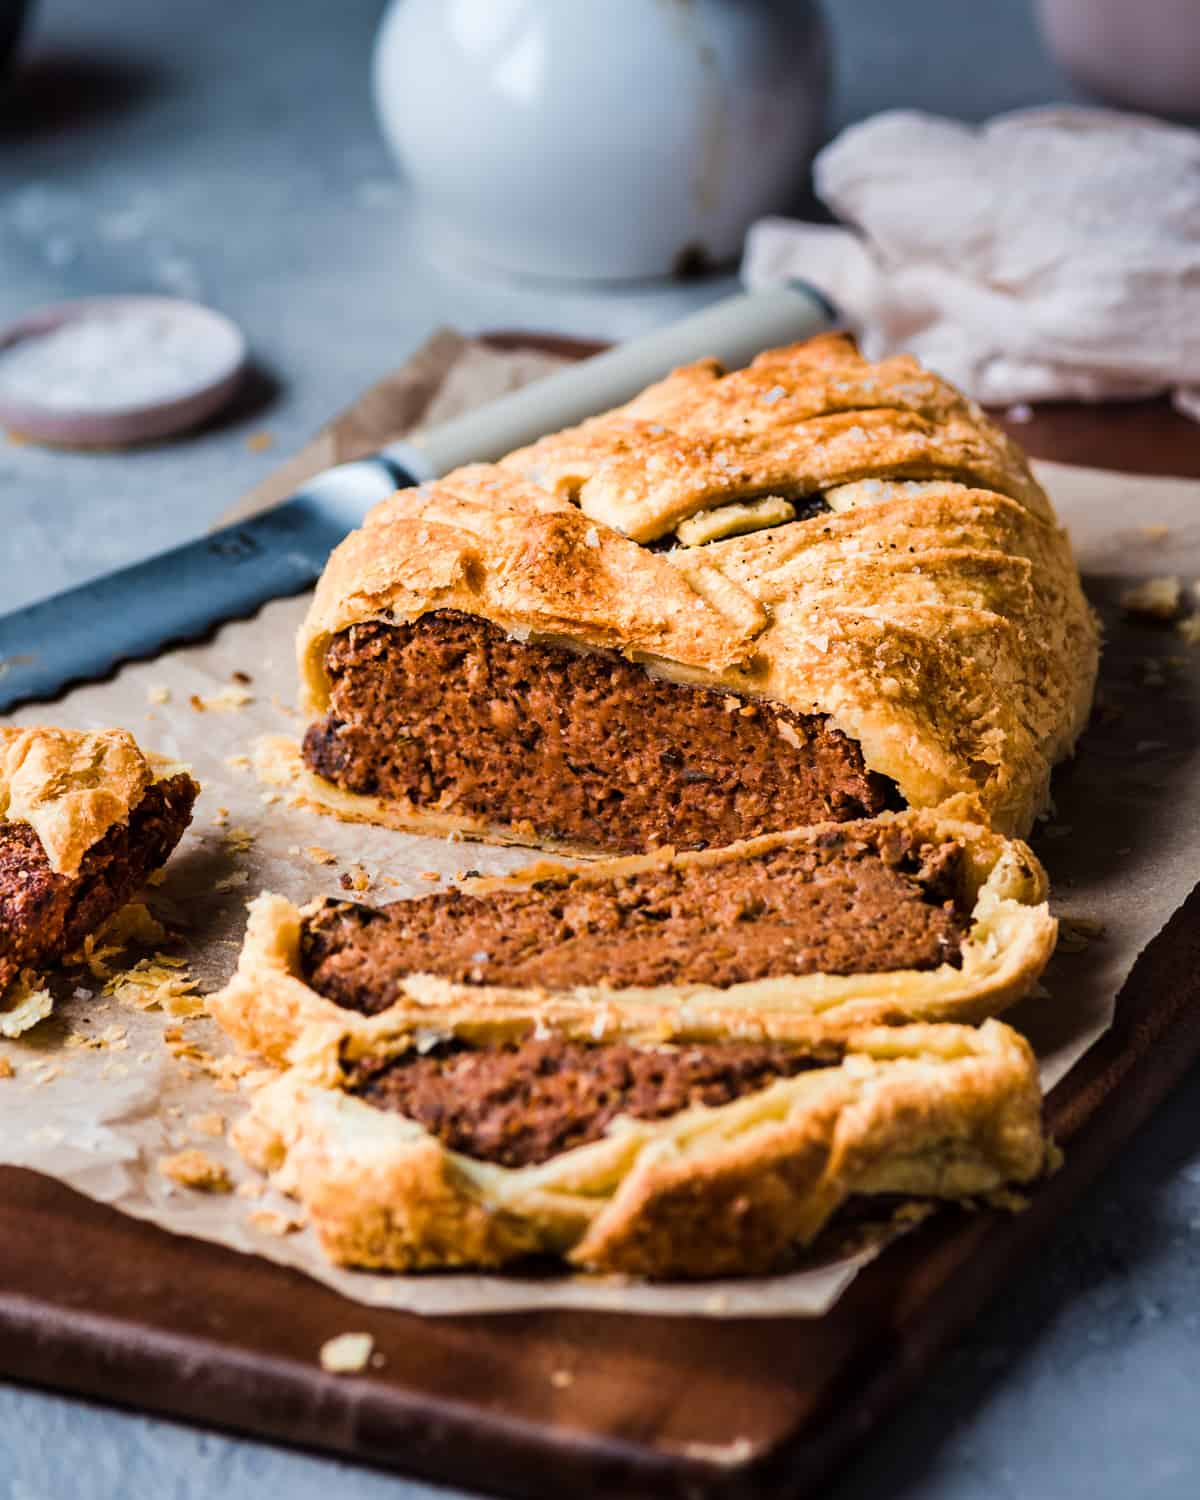
And let me tell you, the mushroom and lentil filling is so dang tasty, you’ll want to eat it plain. The meaty, slightly soft texture contrasts beautifully with the buttery flakiness of the pastry surrounding it.
And yes, this is a more involved recipe (but well worth the effort—read some reviews if you need convincing!) but there are two make-ahead options detailed in the FAQs (you’re welcome!).


Ingredient notes
Lentils
Add this one to the growing list of my must-make lentil recipes. Dried brown or green lentils are cooked, then stirred into the filling.
PS: Lentils are one of the best plant-based protein sources, packing up to 12 grams into just a ½-cup serving! It’s the secret to an extra filling and indulgent vegan wellington.
Substitute: Some folks have made these with canned or boxed, refrigerated lentils as a shortcut, so you can try that out.
Mushrooms
I used a combination of shiitake and cremini mushrooms in the filling, but you can use any variety you like. If you use white button mushrooms, keep in mind that they may need to be cooked for longer because they have a higher water content.
Fresh herbs
Fresh thyme and rosemary bring a potent woodsy depth of flavor to the filling.
Tip: Use an extra sprig or two to rest on top of the wellington as a simple, yet elegant garnish.
Substitute: Dried herbs can be used in a pinch here. You’ll need 1/3 of the amount called for (i.e., 1 teaspoon dried instead of 1 tablespoon fresh).
Walnuts
I love adding walnuts to the filling because they add a surprisingly meaty, chewy texture. Also, they bring yet another source of umami (in addition to the mushrooms, miso, and nutritional yeast). Since we are trying to subtly mimic the taste of meat, the more umami the better!
Toasting the walnuts first is the secret to opening up every bite to a world of flavor. More on this in the Tips section!
Substitute: Toasted sunflower seeds should work if you’re cooking for a nut allergy, though you might need to season the filling a bit more.
Miso
I recommend using white or yellow miso because it isn’t aged for as long as red miso, giving it a nice and mellow flavor. If all you have is red miso paste, use a bit less, as it’s more pungent and pronounced in flavor.
Substitute: Use chickpea miso for a soy-free alternative.
Panko breadcrumbs
I prefer panko breadcrumbs over regular breadcrumbs because the large, airy flakes add a delightful, subtle crunchiness.
Substitute: If you don’t have panko, sub with regular breadcrumbs (or more all purpose flour).
Vegan puff pastry
This naturally buttery dough wraps around the vegan beef wellington, then bakes into a puffy, flaky, and lighter-than-air shell.
You should be able to find vegan puff pastry in the freezer aisle of most major grocery stores. We always have great results with Pepperidge Farms vegan puff pastry. Check out this post for more vegan-friendly brands.
Step-by-step instructions
The lentil and mushroom filling should be prepared before you do anything else.
First, cook the lentils. You can save time by cooking the lentils in the Instant Pot ahead of time (or just on the stove). Or, just buy pre-cooked lentils in the produce section. Transfer the cooked lentils to a bowl and place it in the fridge until they’re fully cooled.
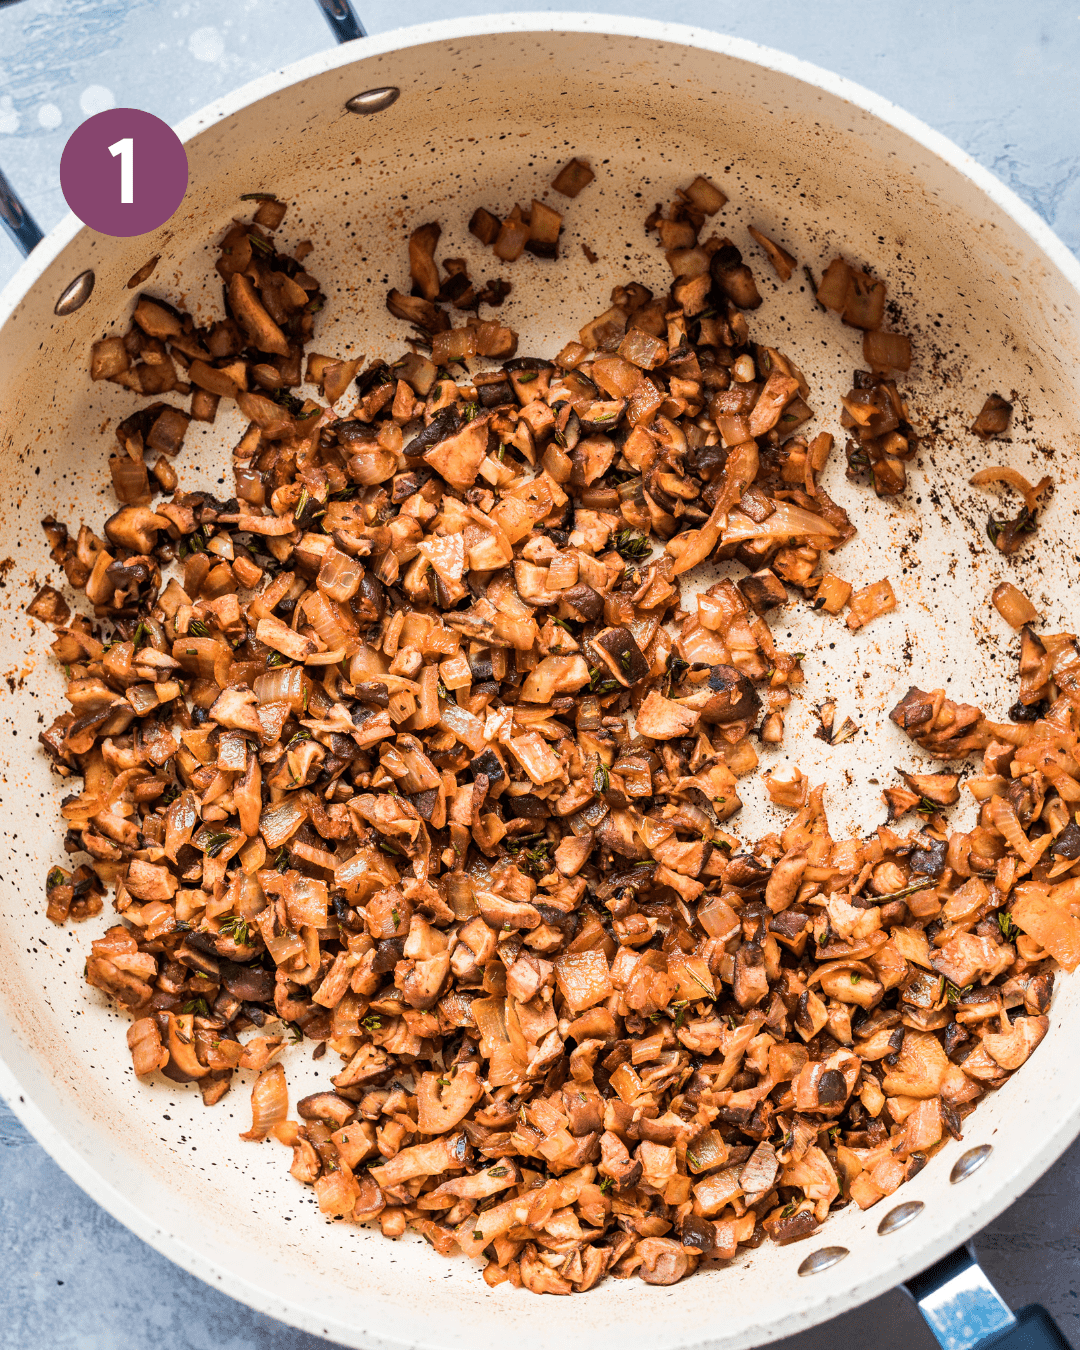
Cook the mushrooms. Heat the olive oil in a frying pan over medium high heat. Once hot, add the onions and saute until soft. Then add the garlic, mushrooms, herbs, paprika, and pepper. Cook until the mushrooms are soft.
Take the pan off of the heat. Transfer the mushroom mixture to a bowl and place it in the fridge to cool down.
Toast the walnuts. While you wait for the lentils and mushrooms to cool, toast the walnuts. Afterward, transfer to a food processor and pulse until they look like fine crumbs. Set aside.
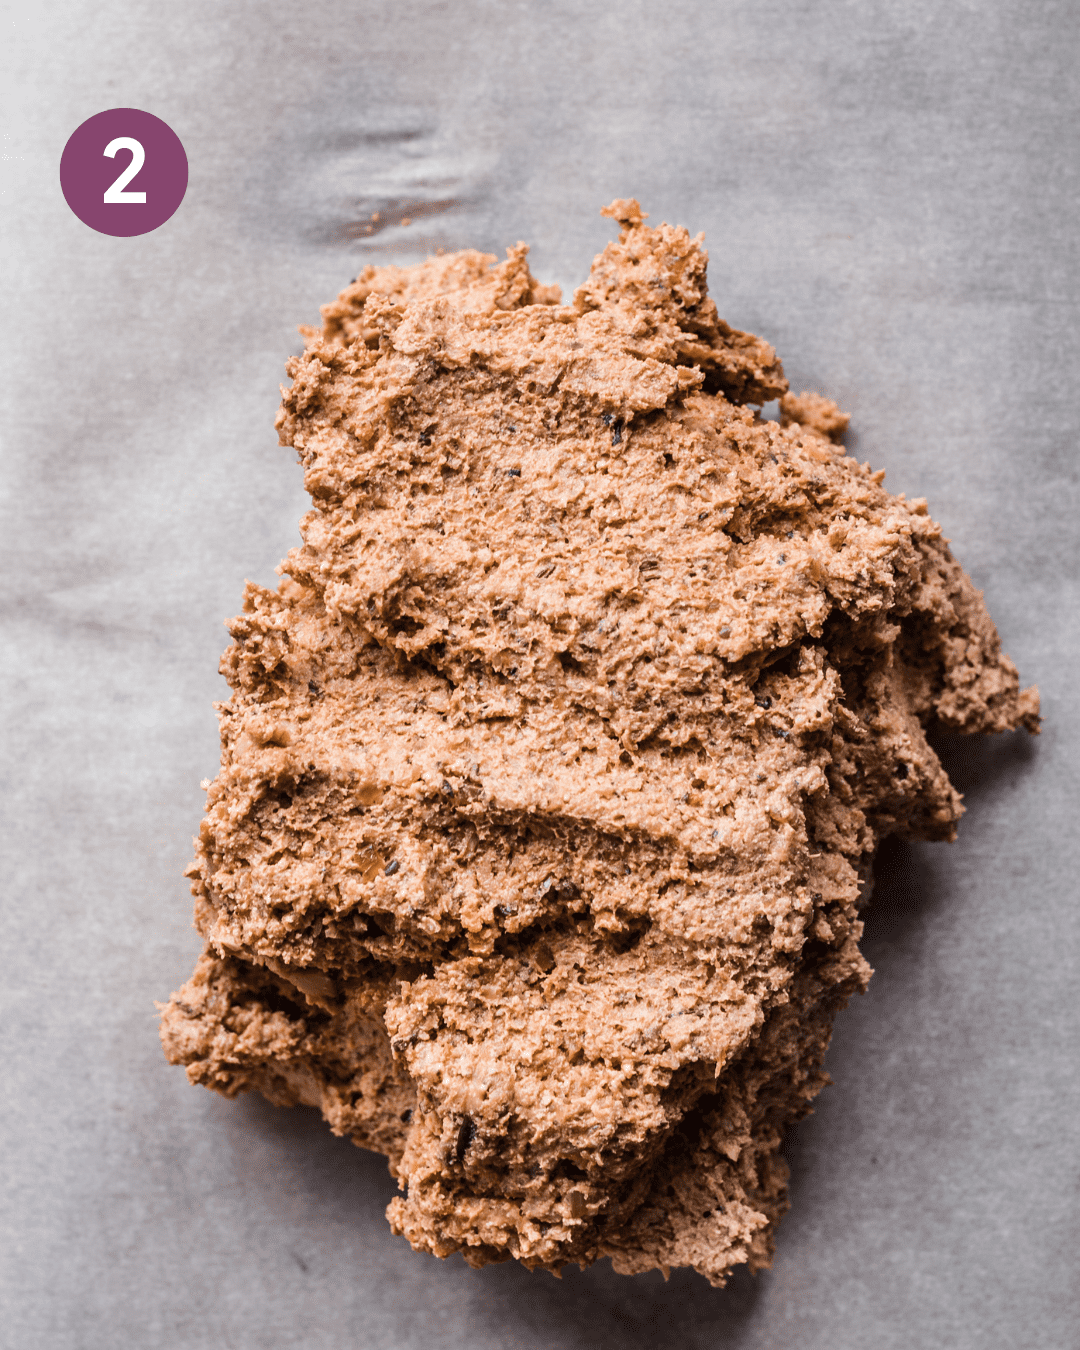
Finish the filling. Add the cooled lentils and mushroom mixture to the food processor, along with the miso, nutritional yeast, tomato paste, and lemon juice. Blend until you have a somewhat smooth, slightly sticky mixture.
Add the walnuts, breadcrumbs, and flour. Blend again until everything is well incorporated.
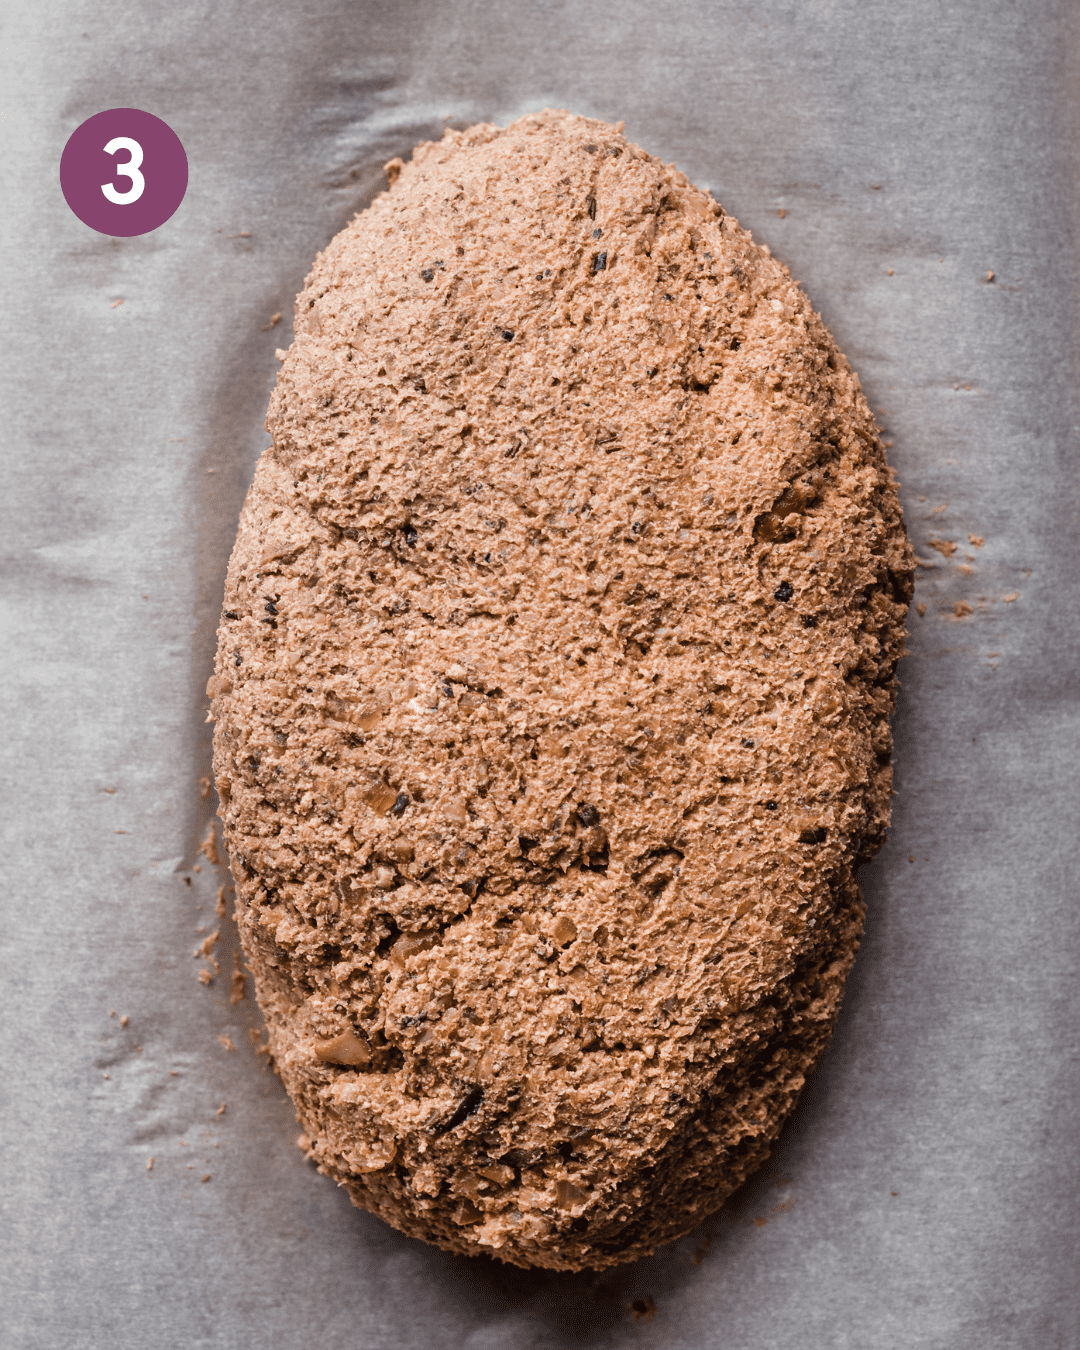
Mold the filling. Pour the filling out onto a parchment-lined baking sheet.
Use your hands to form it into a log shape. It should be roughly 7 inches long and 4 ½ to 5 inches wide (18cm x 11.5-12.5 cm), and no taller than 1 inch.
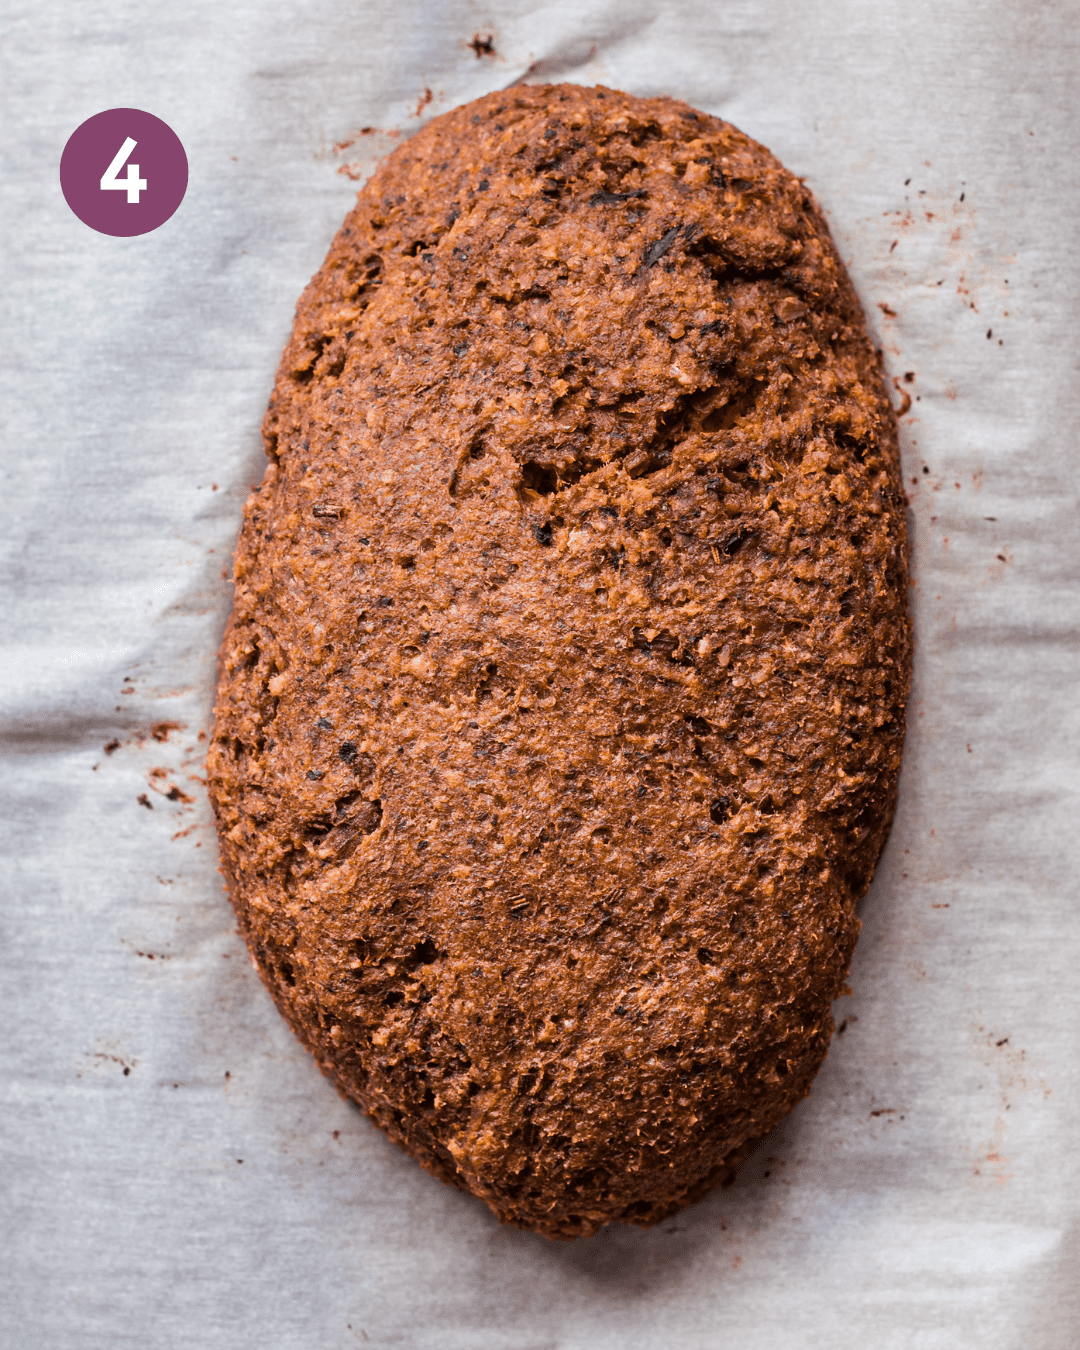
Bake the filling. Bake the mushroom log in the oven until it’s somewhat firm to the touch and slightly brown and crisp on the outside.
Tip: You’ll know the filling is baked through when a thermometer reads the internal temp between 200 to 205ºF or 94 to 96ºC. Cool completely.
Now, you can move onto working with the puff pastry and assembly.
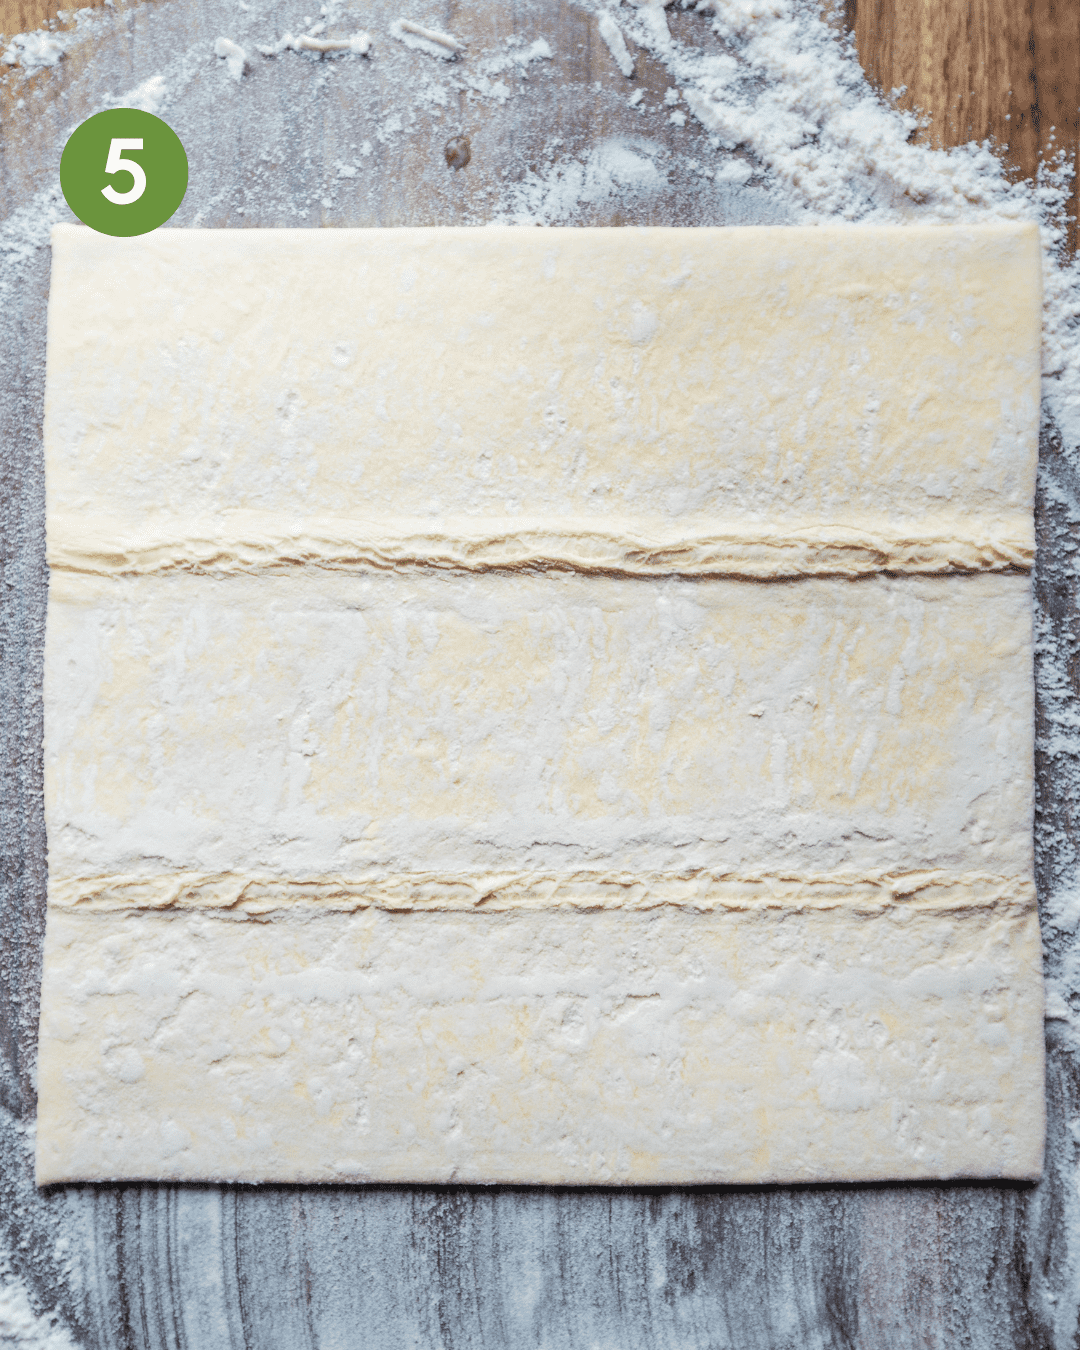
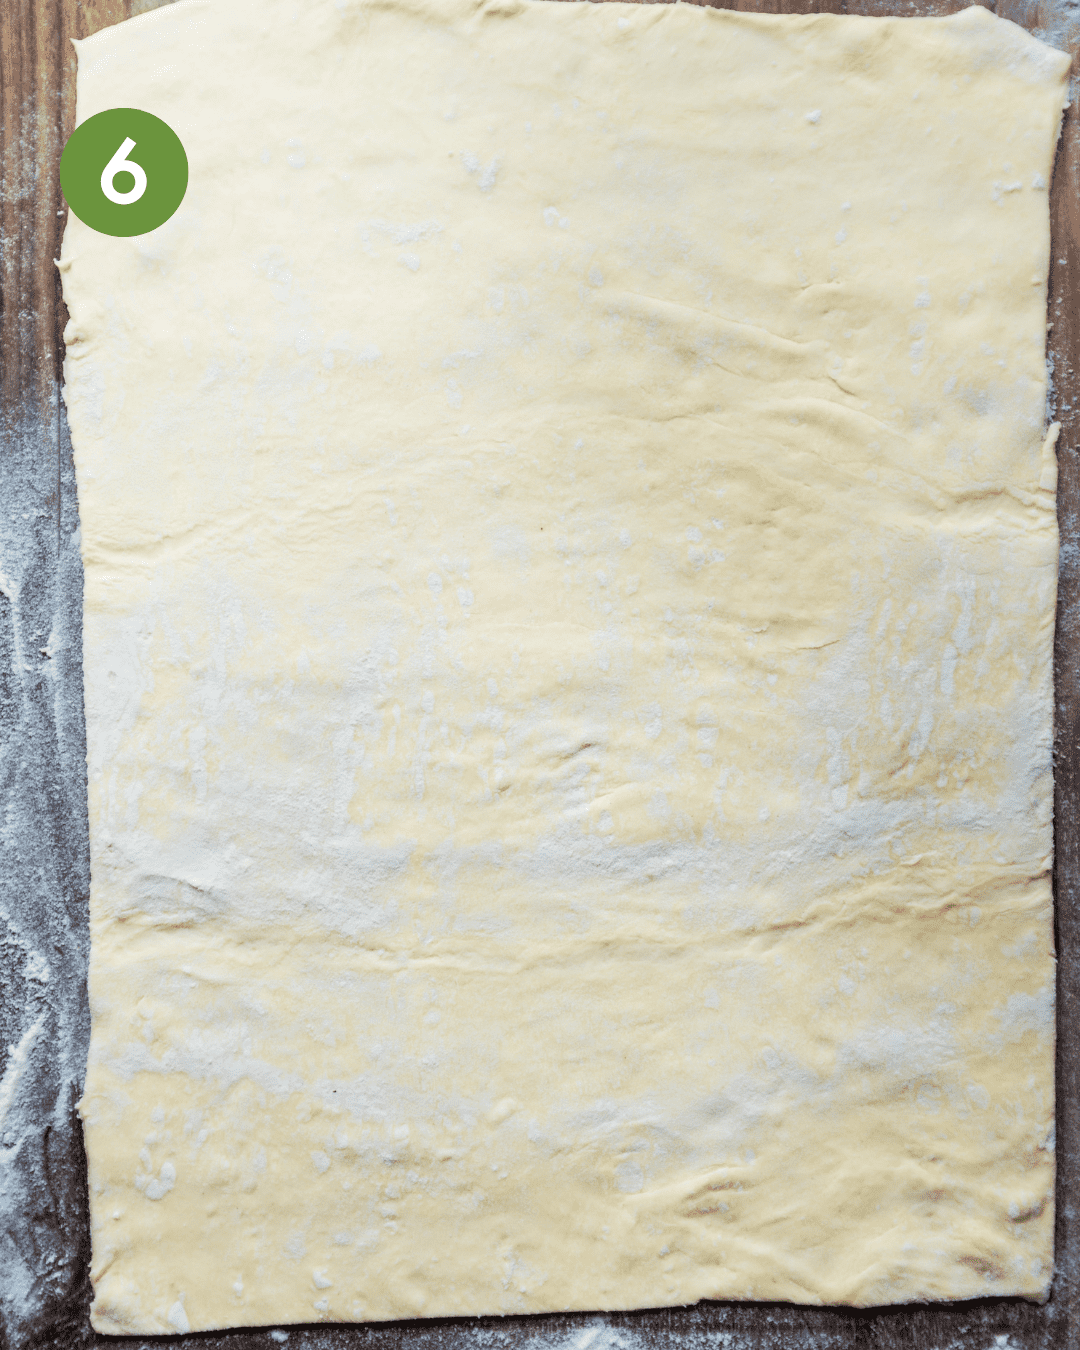
Defrost the pastry. While you wait for the log to cool, take the pastry out of the freezer and lay it onto a lightly floured surface. Let it come down to room temp.
Once thawed, use a rolling pin to roll it into a rectangular shape. It doesn’t need to be perfect, and you can trim off the excess dough with a knife.
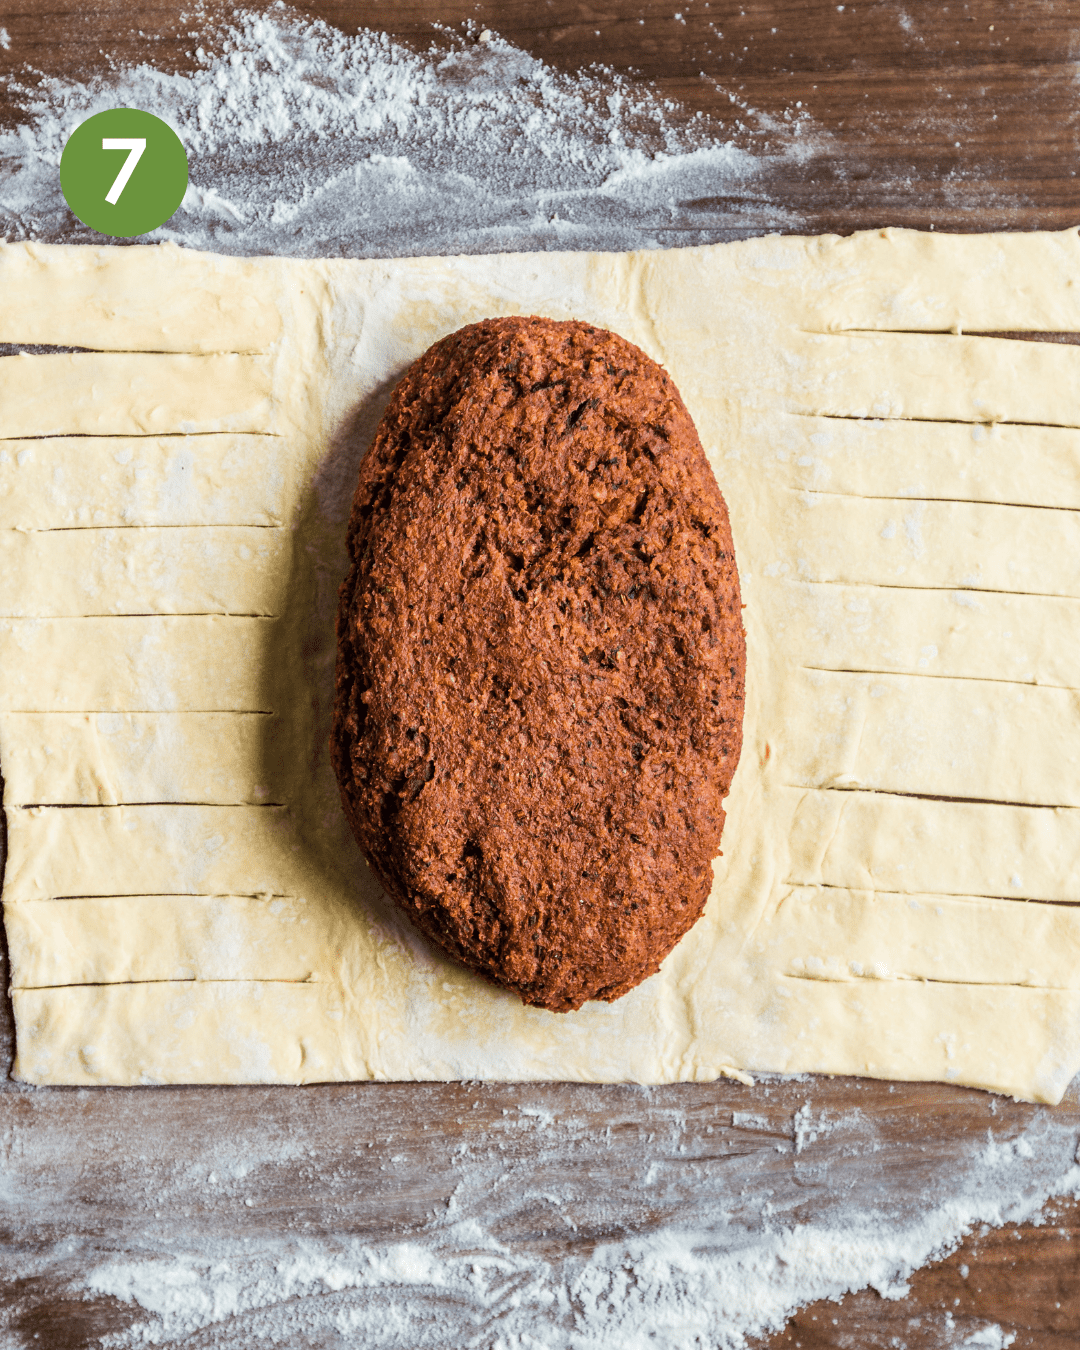
Cut the dough. Move the cooled mushroom log into the center of your pastry. The top and bottom of the log should almost touch the edges of the dough, widthwise.
Start on one end of the pastry and use a paring knife to cut 1-inch strips about a fourth of the way into the dough, almost but not quite reaching where the mushroom log is.
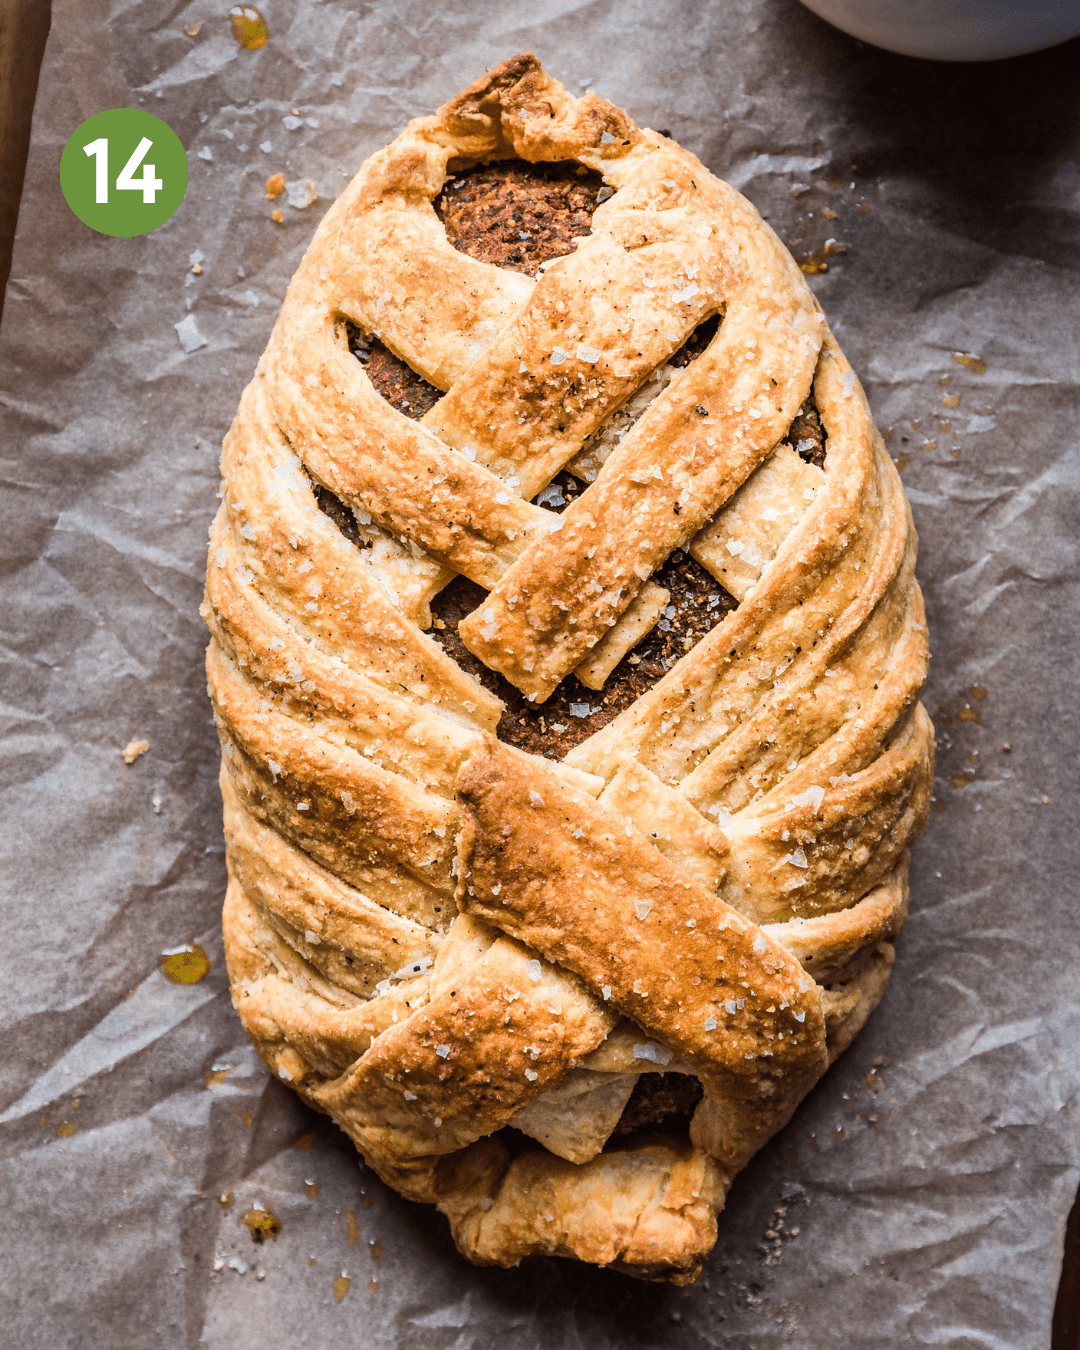
Repeat on the other side. You should end up with about 9 strips on each side. This will enable you to create a beautiful lattice pattern.
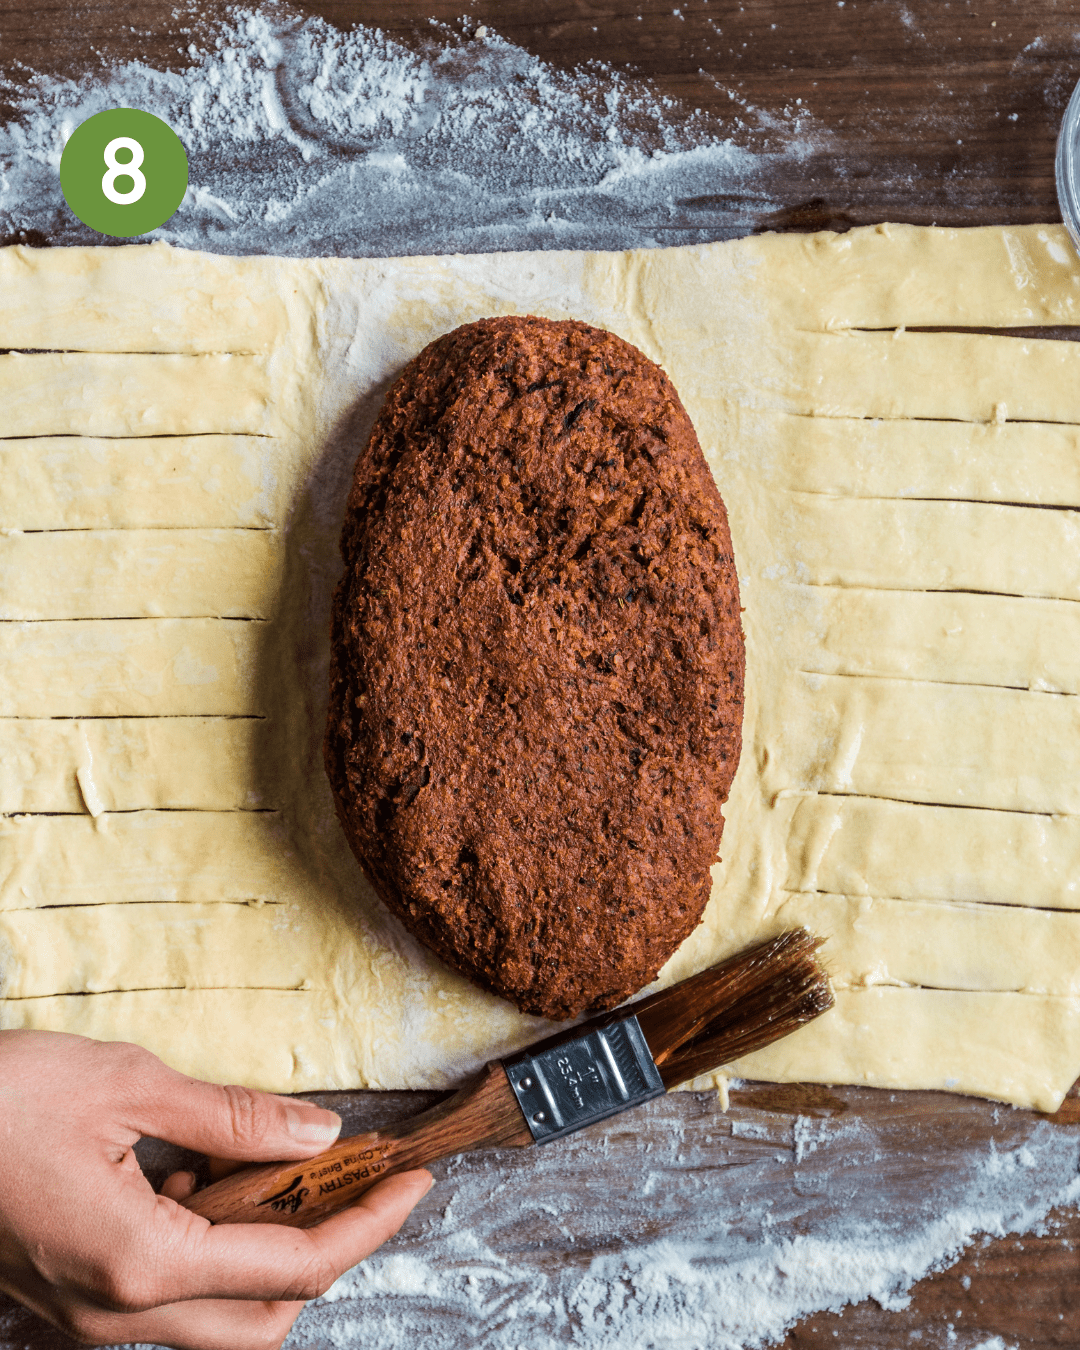
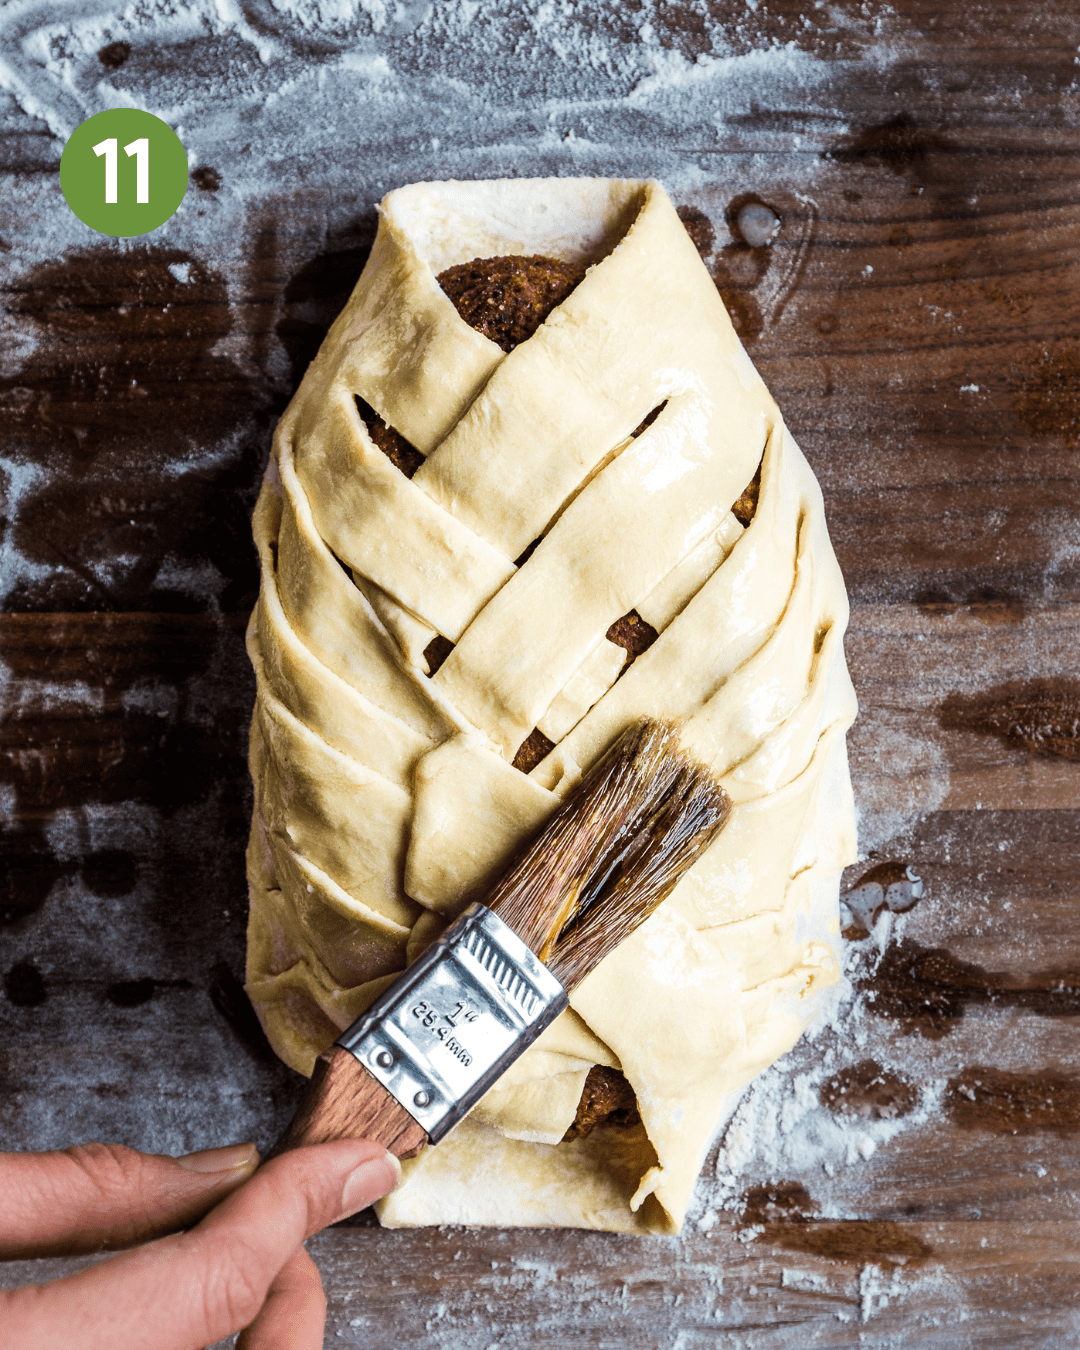
Brush with “egg wash”. Whisk the milk and oil together in a small bowl to make a vegan “egg wash”. Use a pastry brush to brush it onto each small strip of dough. This is the secret to a beautifully golden brown pastry!
Braid the pastry over the filling. Starting at one end, braid one strip of dough on top of the log, then do the same on the other side. Repeat with alternating strips on top of the log until you reach the end.
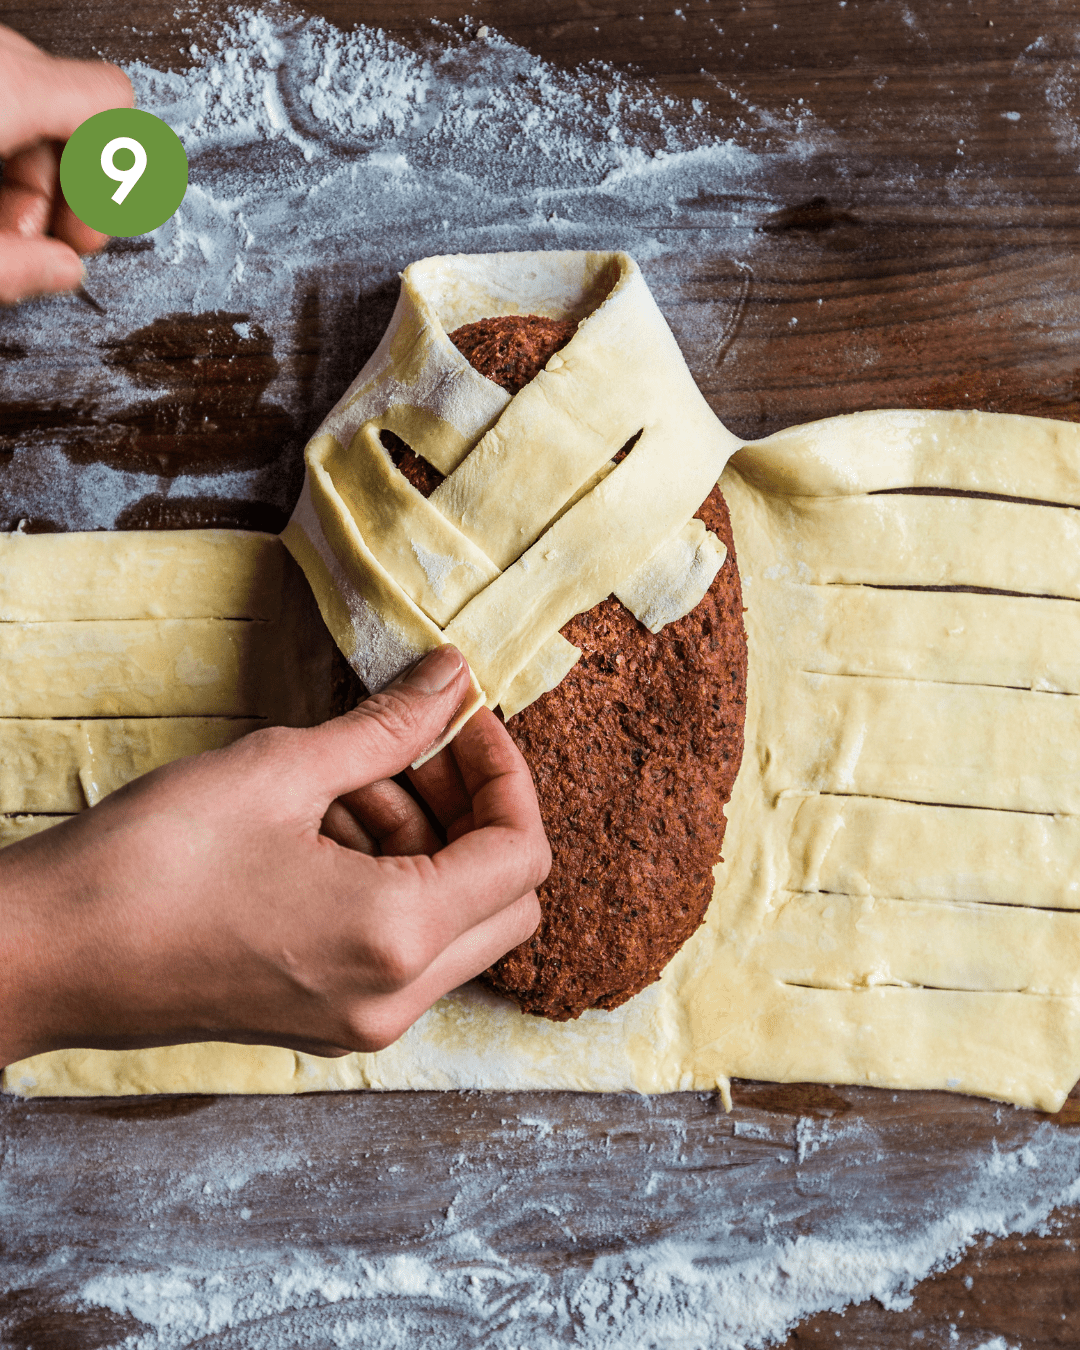
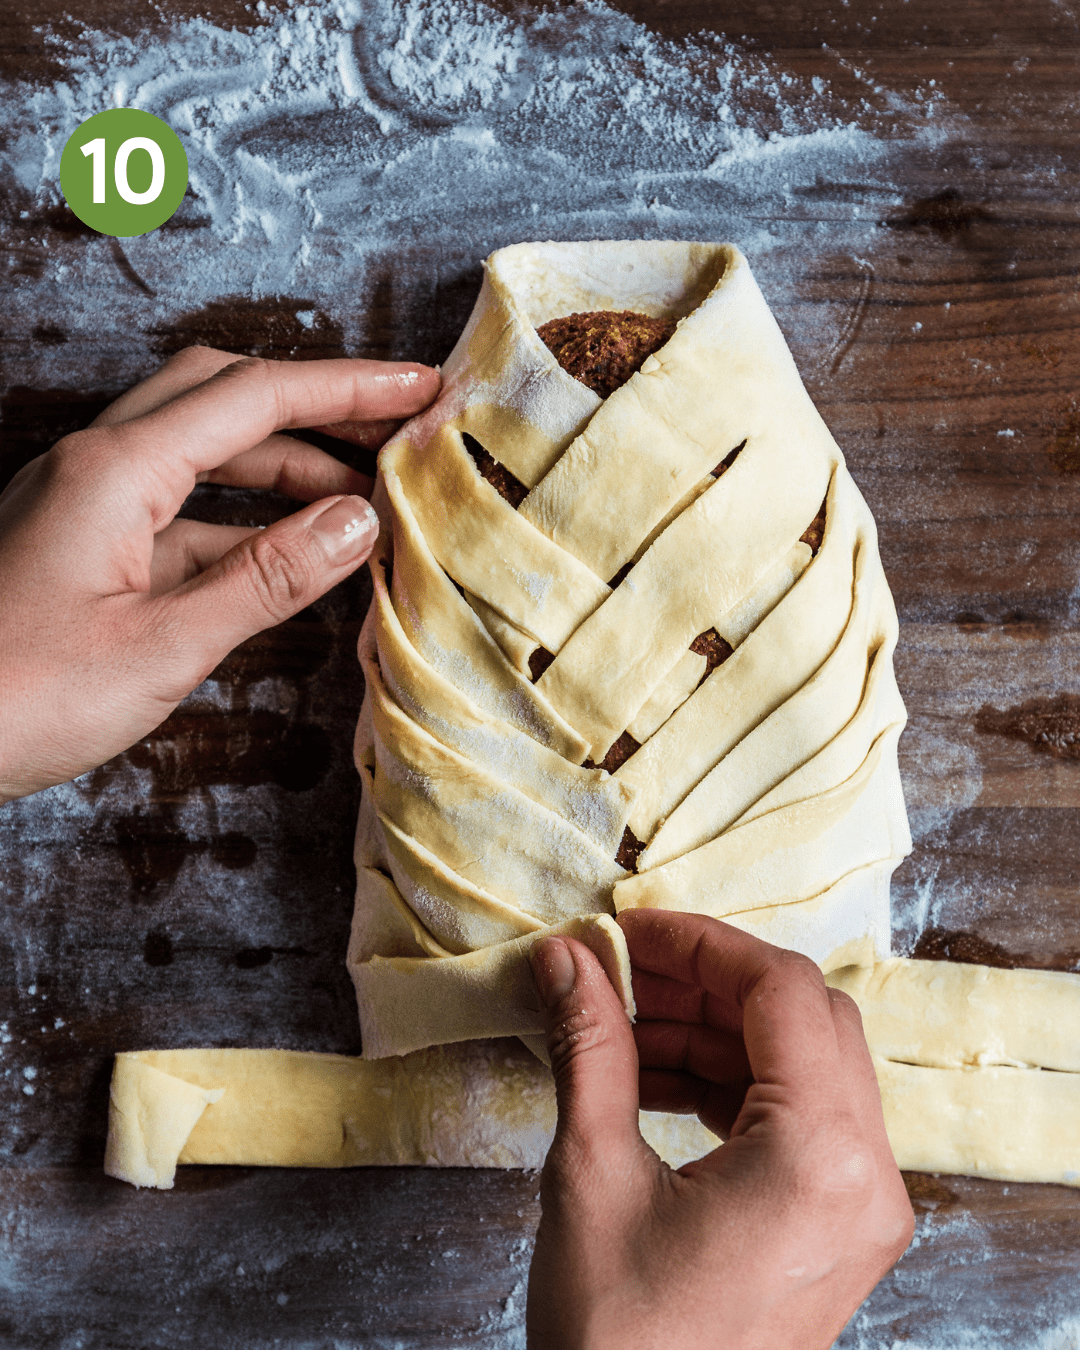
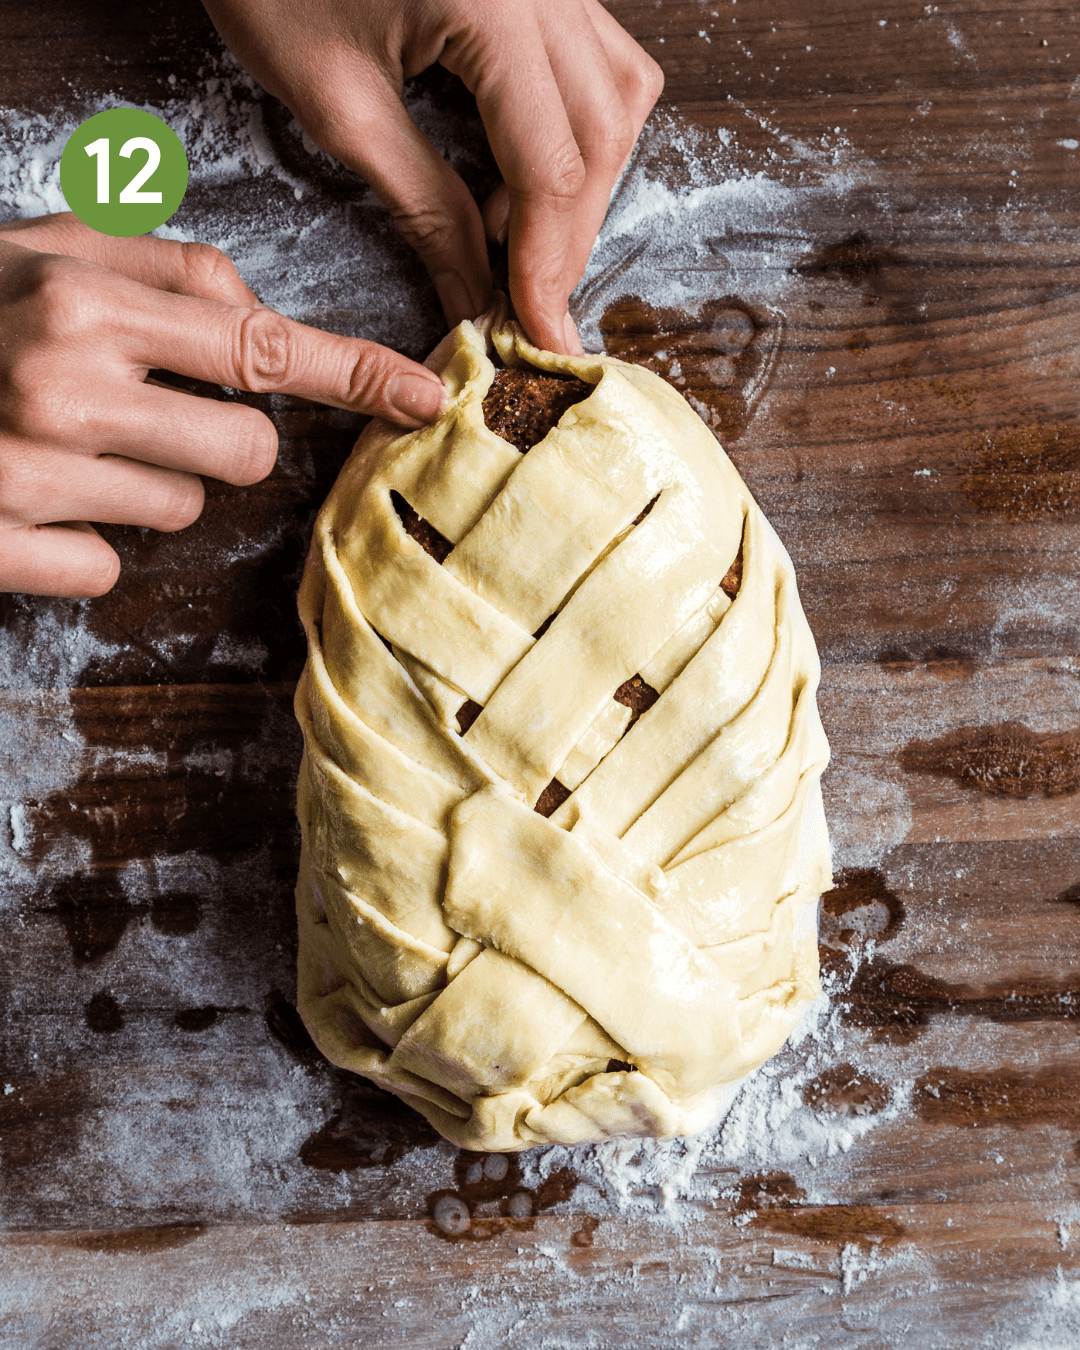
Seal the edges and prevent the braids from coming loose by pinching them together and brushing each one with more egg wash.
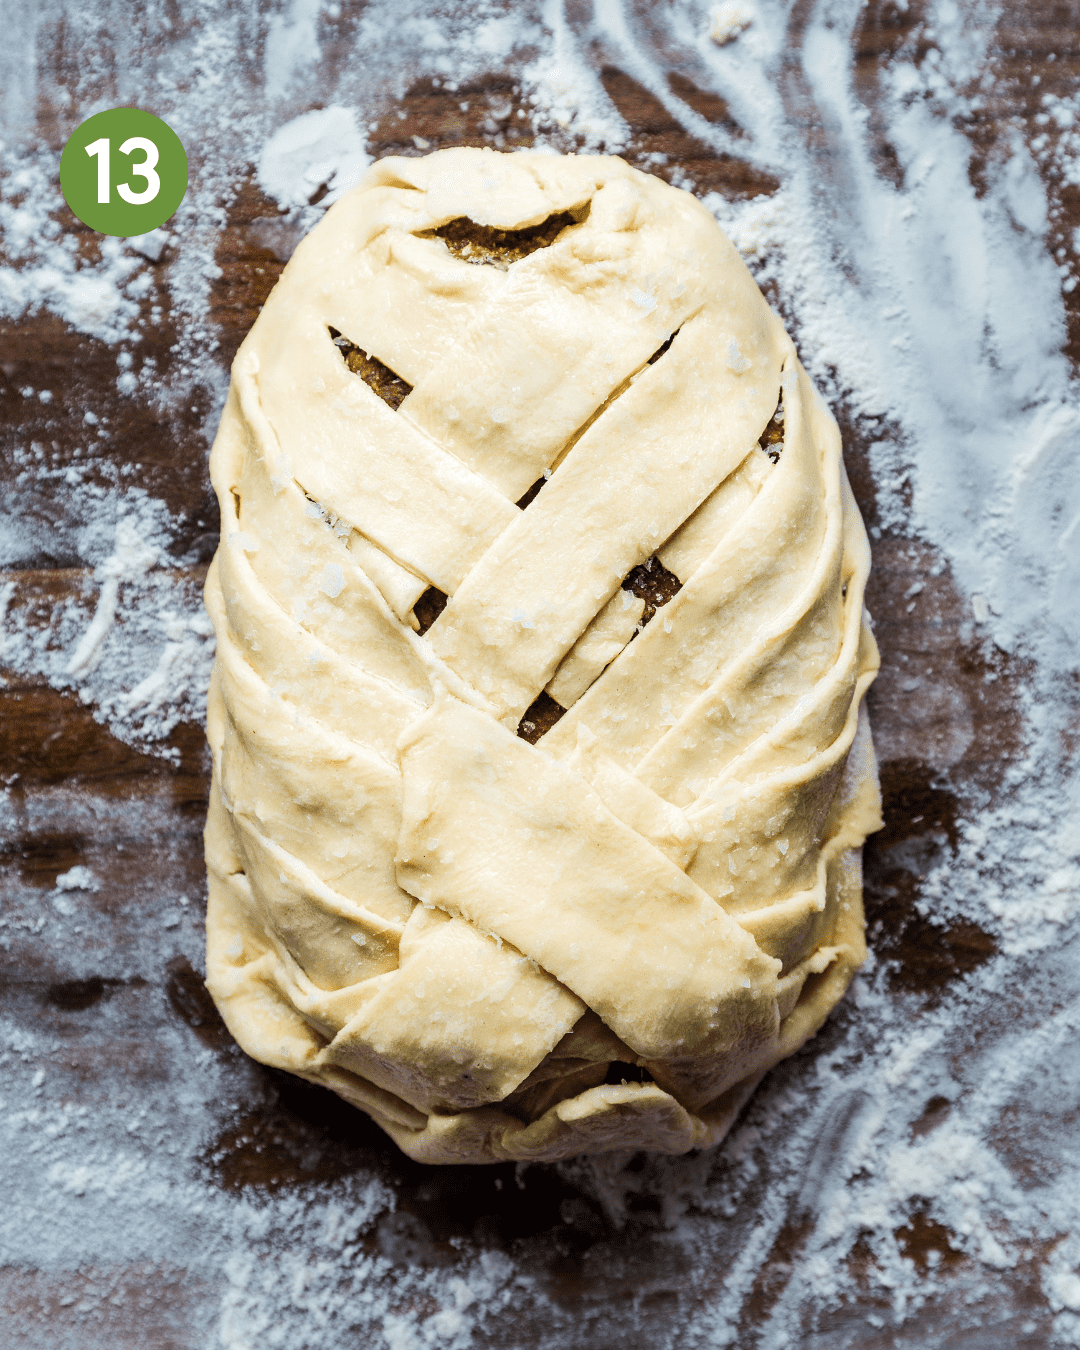
Prick the dough with a fork all over to encourage steam venting. Finish by brushing the rest of the egg wash all over and sprinkling flaky sea salt on top.
Refrigerate. At this point, the pastry will be quite warm since it’s been sitting at room temp and being worked with your (warm) hands. And when you bake warm pastry dough, it can bake unevenly. To avoid this, pop the loaf into the fridge for 15 to 20 minutes.
While you’re waiting, you can do a few things:
- Prepare your baking sheet with a fresh sheet of parchment paper.
- Finish prepping your Mushroom Gravy and/or start making it.
- Start washing some dishes!
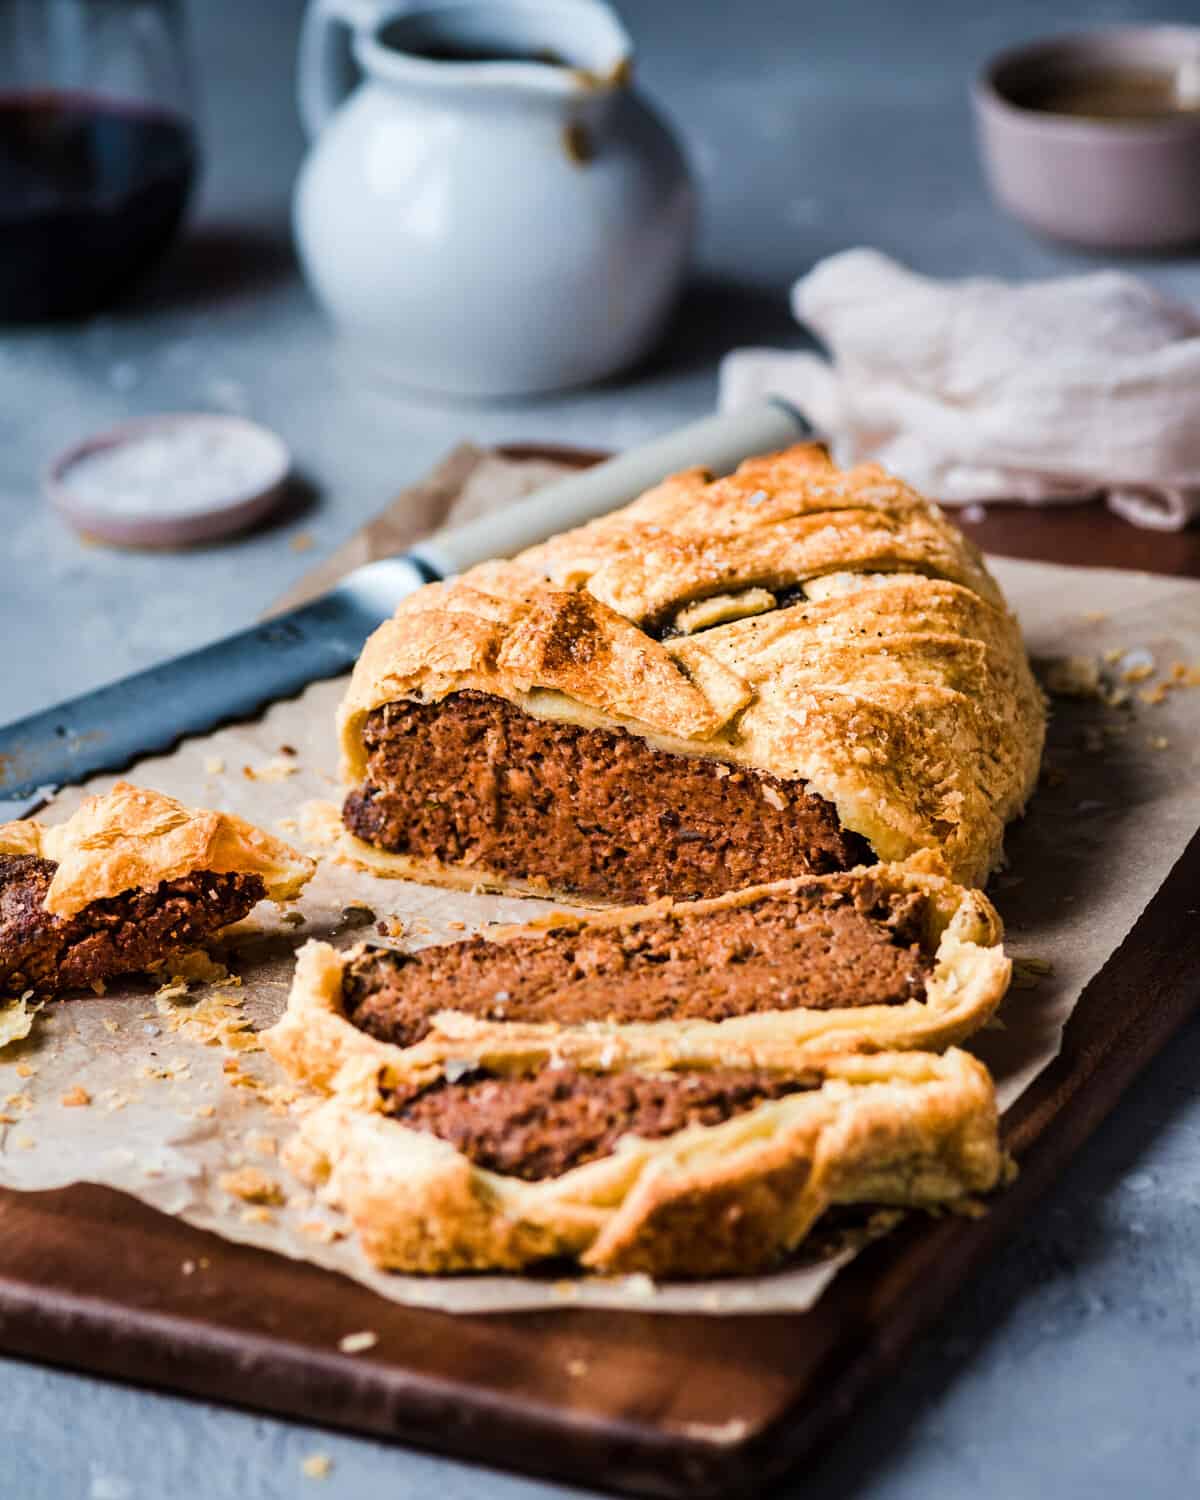
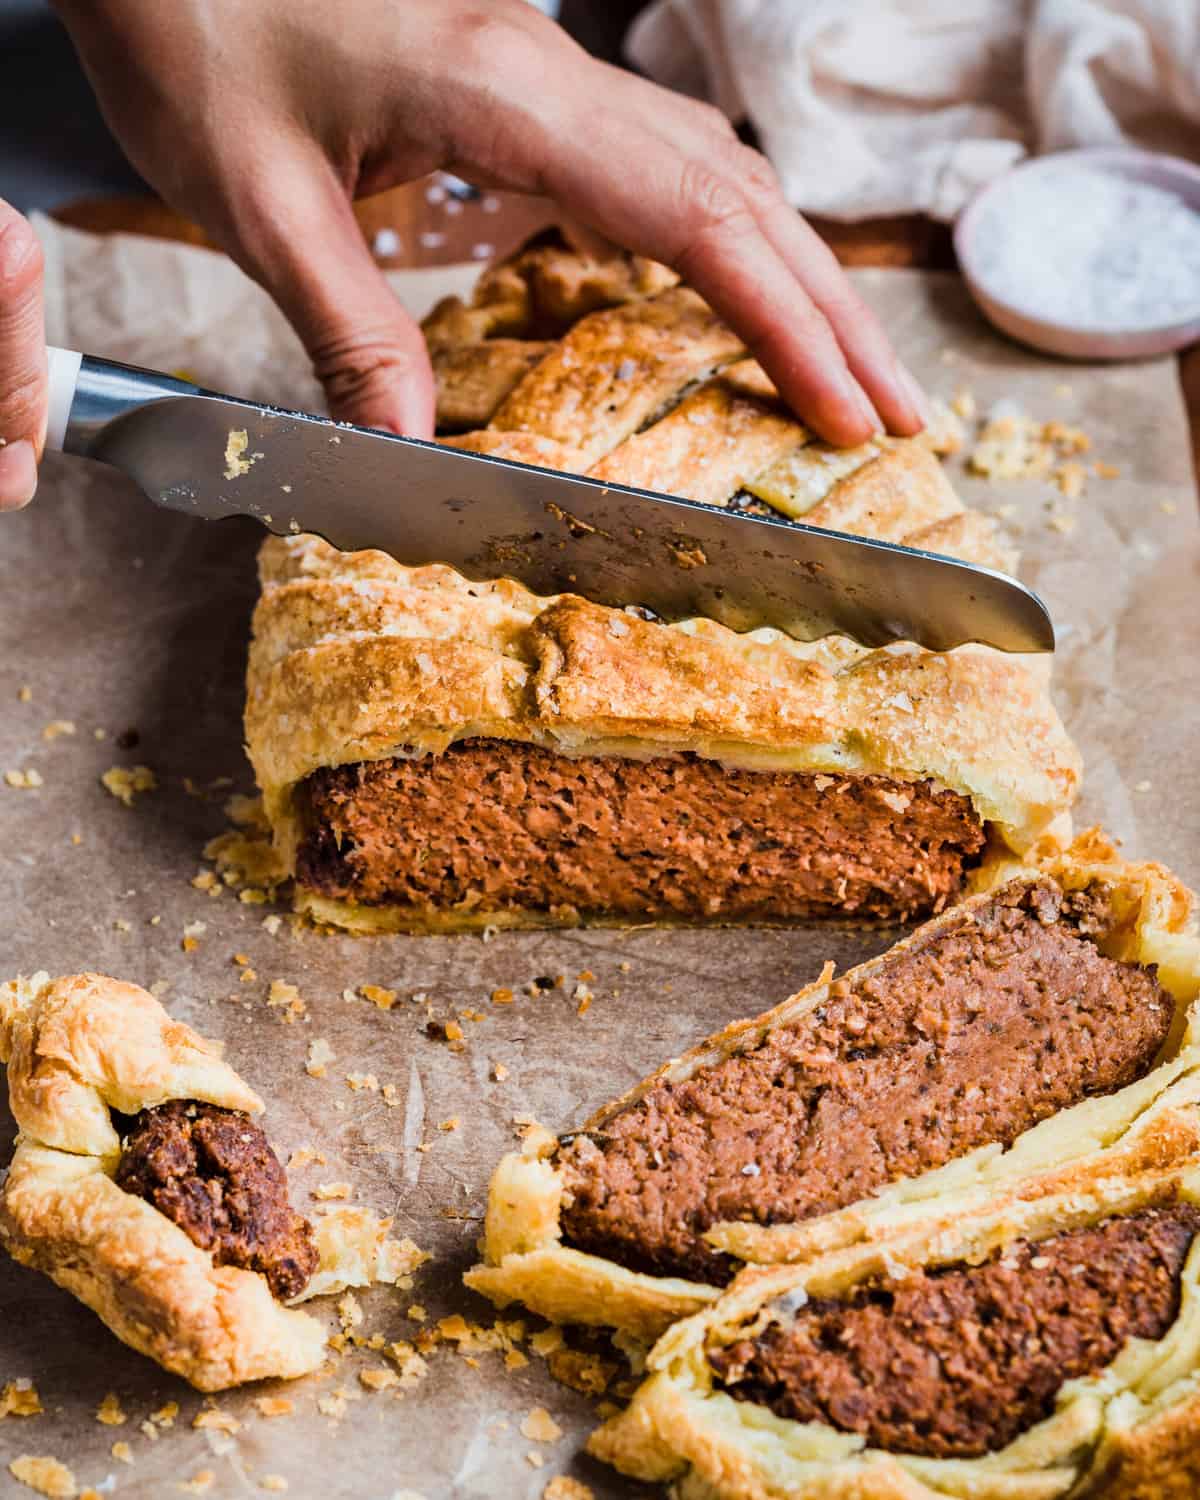
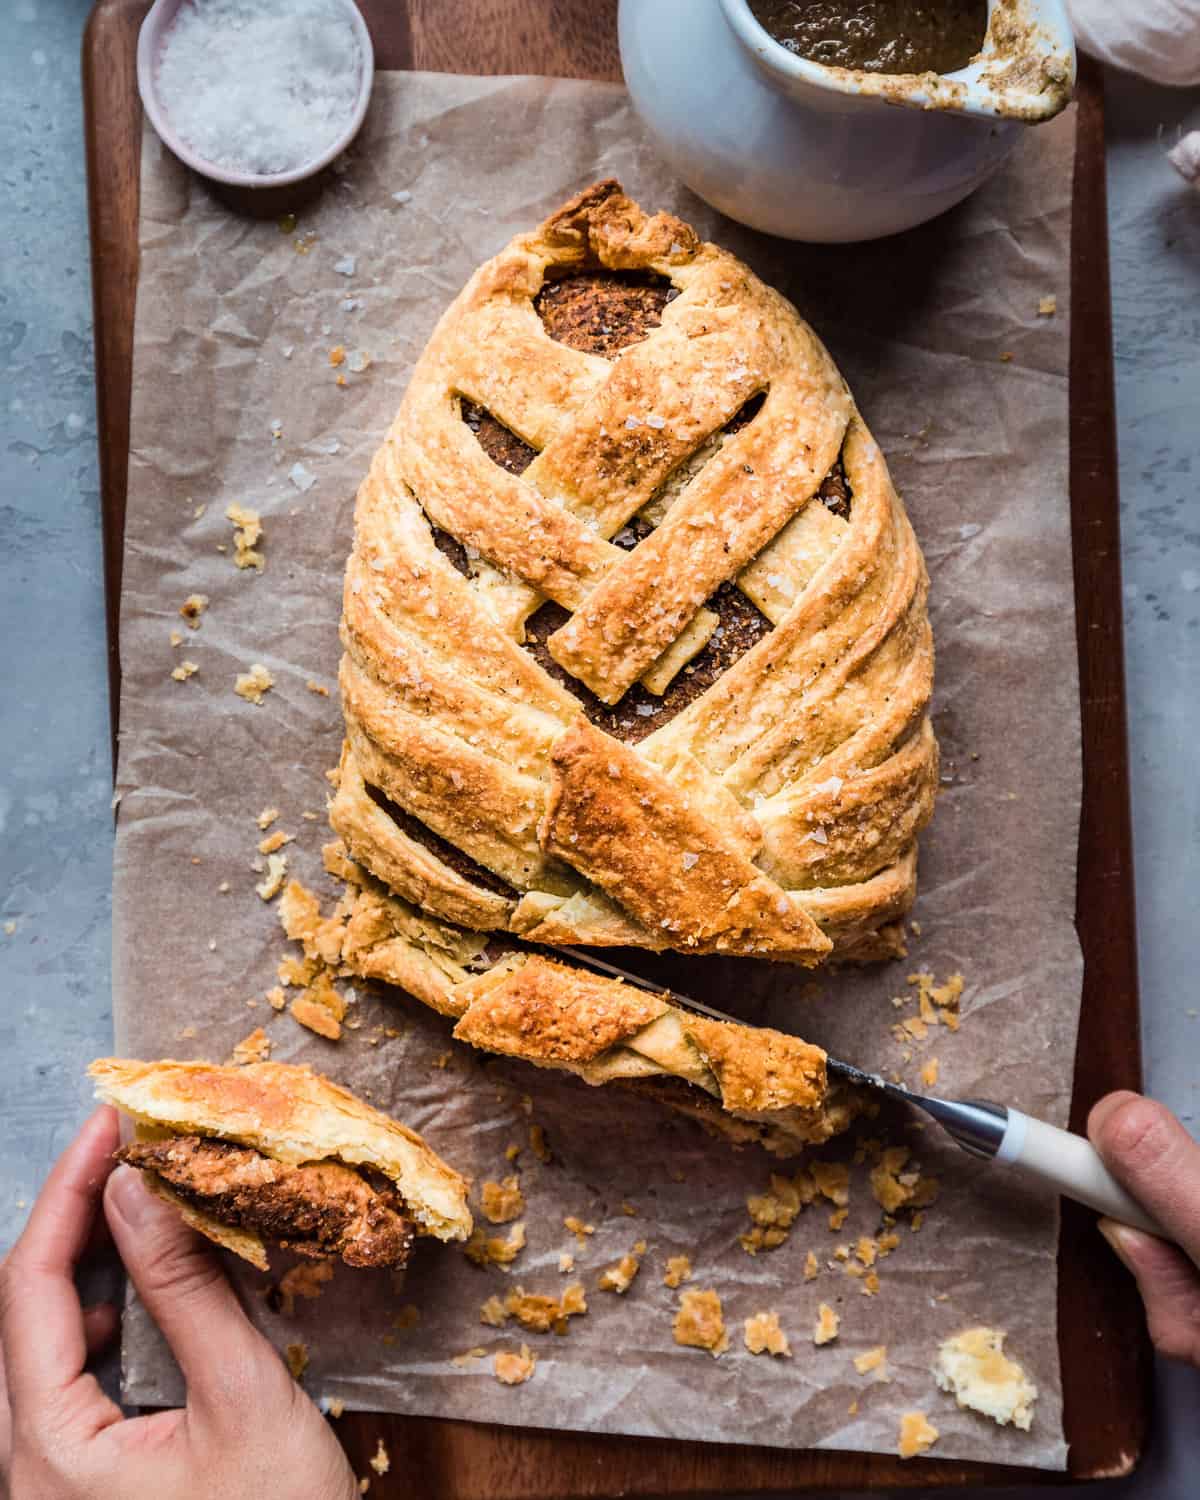
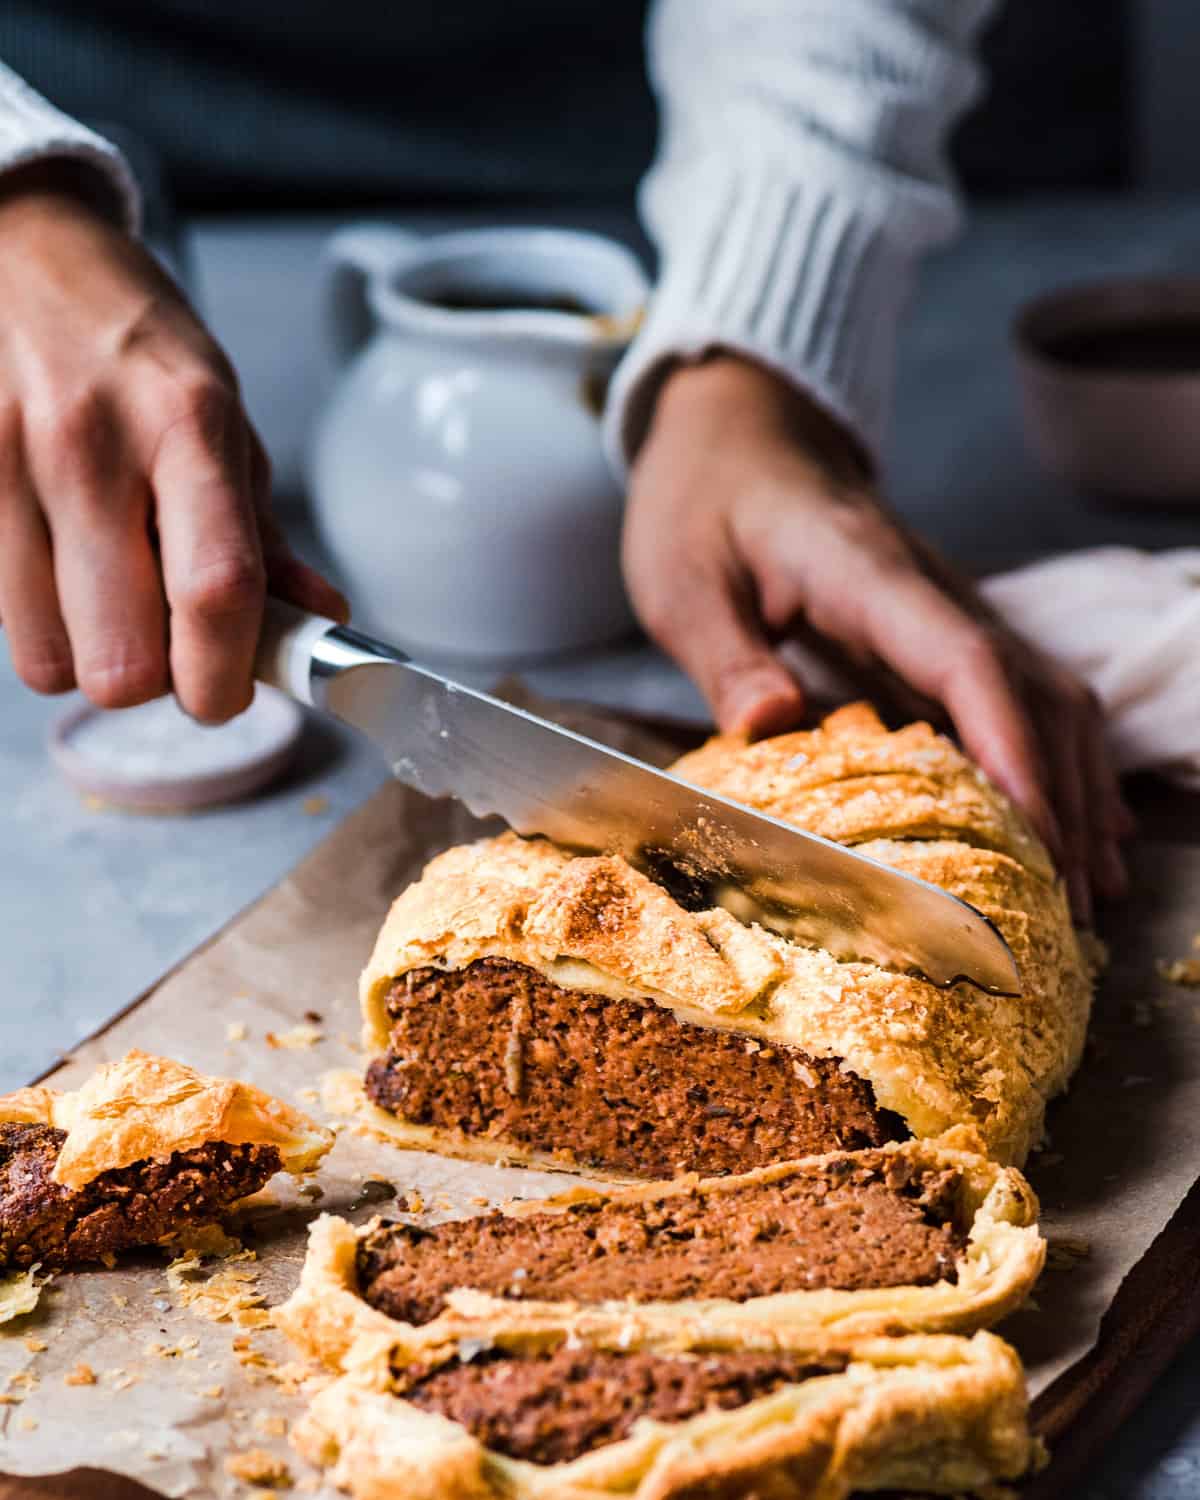
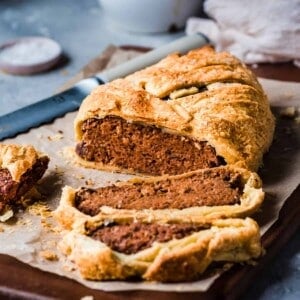
Bake the wellington. Once it’s done chilling, carefully transfer the wellington to a parchment paper-lined sheet pan. Bake the loaf at 375ºF (190ºC) for 25 minutes, then up to 425ºF (218ºC) for 10 minutes or until the top is golden brown, flaky, and puffed.
The loaf is done when the pastry is puffed up and beautifully golden. Allow the vegan wellington to cool for 10 minutes before slicing and serving with more vegan holiday dishes and mushroom gravy on top!
Tips for making this recipe
Read first!
Be sure to read through the steps BEFORE starting this recipe, as it does require a bit more time and prep than usual.
Toast your walnuts
Toasting the walnuts releases their oils, enhancing flavors that otherwise lie dormant and giving your finished filling a deep, roasty savoriness. I beg you not to skip this step.
Cool the lentils and mushrooms in the fridge
If they’re still warm when blended, the mixture gets too sticky to shape.
Keep everything cold
If you don’t need it right away, thaw the pastry in the fridge. I don’t recommend thawing it for more than 30 minutes at room temp, as it can become too warm and sticky to roll.
After you assemble everything, if the pastry feels warm to the touch, pop it in the fridge for 15 to 20 minutes. This ensures the wellington bakes evenly.
Don’t have a rolling pin?
Use a chilled wine bottle instead!
Don’t skip the salt on top
Adding coarse or flaky sea salt on top of the assembled wellington really takes it over the top, flavor and texture-wise.
Stick to the two-temperature system
The first time I baked this loaf, I baked it all at 425°F and the top browned quite quickly, while the inner pieces of dough did not fully bake through. The second time, I baked it all at 375°F and the dough baked through, but the pastry wasn’t as beautifully golden brown.
The solution? Start it at 375ºF, then increase the temperature to 425ºF for an evenly baked and beautifully puffed wellington.
Feel free to skip the gravy
Traditionally, beef wellington is served with gravy, so I provide the option here as well (though personally, I think this loaf is rich and moist enough to do without the gravy). The mushroom gravy is made with many of the same ingredients as the mushroom log, so it should be pretty quick to throw together.
Frequently Asked Questions
Some brands of storebought puff pastry are naturally vegan, which is great news! Still, it’s a good idea to always check the ingredients to confirm there is no butter in the brand you choose. Pepperidge Farms is a widely available brand of accidentally vegan puff pastry.
Yes, you can use 6 ounces (170g) of pre-cooked lentils instead of cooking them yourself.
This probably means it’s too warm (this will be the case if you did not cool the cooked mushrooms). Pop it back in the fridge for 15 to 30 minutes until it’s cool and easy to mold together with your hands.
Yes! You have two options.
1) Prep and bake the mushroom log 1 or 2 days ahead of time. Once it’s baked and cool, wrap it in plastic and refrigerate. You can also freeze the log for a few months (defrost it in the fridge). On the day of serving, wrap the log in the puff pastry as explained in the recipe card, then bake.
2) Assemble everything (bake the mushroom log, then wrap it in pastry) 1 or 2 days ahead of time. Wrap the entire thing in plastic and refrigerate. On the day of serving, let sit at room temperature for 10ish minutes so it’s not too cold, then bake as instructed.
Reheat slices of the wellington on a sheet pan at 350ºF until warmed through.
The leftover gravy can be stored in an airtight container in the fridge for 4 to 5 days, or in the freezer for a month. Reheat on the stove in a saucepan or in the microwave.
You, your friends, and your family will love this Vegan Wellington for Christmas, Thanksgiving, or any holiday! If you love it, please rate and review the recipe below 🙂

Introducing
Big Vegan Flavor
Techniques and 150 recipes to master vegan cooking.
Unbelievable Vegan Wellington
Ingredients
Mushroom Filling
- Scant 1/3 cup (60g) dried brown or green lentils (equivalent of 6 ounces cooked lentils)
- 1 tablespoon olive oil (See Note 1)
- 1 small yellow onion, chopped (See Note 2)
- 6 garlic cloves, chopped
- 8 ounces (~227g) mushrooms (I use part shiitake, part cremini)
- 1 tablespoon fresh thyme leaves (can substitute with 1 teaspoon dried thyme)
- 1 tablespoon rosemary leaves, chopped
- 1 teaspoon sweet or hot paprika (optional but adds a slight reddish color to the loaf)
- Freshly cracked black pepper
- 1 teaspoon kosher salt, plus more to taste
- 1 cup (~110g) walnuts, toasted (See Note 3)
- 2 tablespoons white or yellow miso paste
- 2 tablespoons nutritional yeast
- 1 tablespoon tomato paste
- 1 tablespoon freshly squeezed lemon juice
- 1/4 cup (~20g) panko bread crumbs
- 1/4 cup (32g) all-purpose flour
Pastry
- 1 sheet of vegan puff pastry (See Note 4)
- Flour for rolling out the pastry
- 1 tablespoon unsweetened plant-based milk of choice
- 1 tablespoon olive oil or any neutral oil
- Coarse/flaky sea salt
For Serving
- Mushroom Gravy (optional, see next recipe card)
Instructions
- Cook the lentils. Instant Pot: add the lentils with 2/3 cup (160 mL) water and a pinch or two of salt. Use the pressure cook setting at high pressure for 6 minutes. Allow a natural pressure release for 10 min. If not tender yet, pressure cook for 1-2 more min with a 5 min pressure release. Stovetop: in a small or medium saucepan, add the lentils and cover with a decent amount of water. Bring to a boil, then reduce the heat and cover to maintain a simmer. Simmer, stirring occasionally, for 20 to 30 min, or until tender but not mushy. Drain off any excess water. Transfer lentils to a bowl and refrigerate until cooled.
- Add the mushrooms to a food processor and blitz several times until they’re finely chopped. Or, finely chop with a knife.
- Cook the mushrooms. Heat the olive oil in a large frying pan over medium high heat. Add the onions with a tiny pinch of kosher salt and cook for 7 to 10 minutes, stirring occasionally or until softened and golden brown. Add the garlic, mushrooms, thyme, rosemary, paprika and black pepper. Cook until the mushrooms are softened and the liquid has evaporated, about 5 minutes. Then add the kosher salt and cook for one additional minute. Remove from the heat and transfer them to the fridge to cool down.
- Toast and blend the walnuts. While the mushrooms are cooling, toast the walnuts***. Allow to cool slightly. Transfer toasted walnuts to a food processor and blitz until you have fine crumbs, but don’t over-process or it will start to turn into walnut butter. Transfer the ground walnuts to a bowl.
- Preheat the oven to 375°F / 190°C.
- Make the mushroom-lentil filling. Add the cooled lentils and mushroom mixture to the food processor, along with the miso, nutritional yeast, tomato paste, and lemon juice. Blend until you have a somewhat smooth, slightly sticky mixture that comes together.1. Add in the reserved ground walnuts, bread crumbs, and flour, and blend again until all of the ingredients are well incorporated.2. For a visual of the consistency, check out the step photos in the blog post.3. If your filling is warm (this will be the case if you did not cool the cooked mushrooms), refrigerate for 15-30 minutes until it is easy to mold together with your hands.
- Line a rimmed sheet pan with parchment paper. Transfer the mushroom filling to the pan and use your hands to form it into a log shape that is roughly 7 inches long and 4 ½ to 5 inches wide (18cm x 11.5-12.5 cm), and no taller than 1 inch. See the photos in the blog post for reference.
- Bake the filling. Bake the mushroom log in the preheated oven for 35 minutes until relatively firm to the touch and brown and slightly crisp on the outside (if testing it with a thermometer, the internal temperature should read between 200-205ºF or 94-96ºC). Allow to cool completely and turn off oven.
- Defrost the puff pastry and/or make the gravy. While the log is cooling, place some flour down on a flat work surface and lay the sheet of puff pastry down. Allow to thaw and come to room temperature, about 20-30 minutes. If you are making the gravy, you can get started on that.NOTE: I don't recommend thawing the pastry for more than 30 minutes, as it can get too warm and sticky to roll.
- Assemble the pastry. Once the puff pastry is thawed, use a rolling pin (or a chilled wine bottle) to roll the pastry into a rectangular shape that is roughly 9 inches wide x 13 inches long (23 cm wide vs. 33 cm wide).Line a rimmed sheet pan with parchment paper.
- Braid the dough (look at the photos in the blog post):Place the cooled log in the middle of the pastry sheet so that the top and bottom of the log almost touch the edges of the pastry, widthwise. Start on one end of the pastry and use a paring knife to cut 1 inch/2.5 cm strips about a fourth of the way in, almost but not quite reaching where the mushroom log is. Repeat on the other side. You should have about 9 strips on each side.1. Whisk together the plant milk and oil in a small bowl. This is the vegan “egg wash.” Use a pastry brush to brush it onto each strip of dough.2. Starting at one end, braid a pastry strip on top of the log, alternating each side. When you finish braiding the strips, pinch and tuck the in the edges into the top and bottom of the log, and brush on some of the egg wash to help seal the edges.
- Lightly prick the dough all over with a fork to allow steam to escape during baking. Using a large spatula, carefully transfer the Wellington to the lined sheet pan. Brush the egg wash all over the rest of the pastry (you may not use it all) and then sprinkle with some coarse/flaky sea salt.
- Refrigerate the pastry for 15-20 minutes to allow the dough to cool back down (baking the puff pastry while it’s warm may cause it to bake unevenly).
- Preheat the oven to 375°F / 190°C and line a baking sheet with parchment paper. Remove the pastry from the fridge and bake for 25 minutes. Then increase the oven temperature to 425°F / 218°C and bake for another 10 minutes, or until the top is beautifully golden brown, flaky, and puffed and the internal temperature reaches 200-205ºF or 94-96ºC.
- Cool for 10 minutes before slicing. Serve plain or with the Mushroom Gravy.
Notes
Nutrition
Nutrition information is automatically calculated, so should only be used as an approximation.
Easy Vegan Mushroom Gravy

Ingredients
- 1 tablespoon olive oil
- 1 small yellow onion, diced
- 3 cloves garlic, minced
- 1 tablespoon finely fresh thyme leaves (can substitute with 1 teaspoon dried thyme)
- 1 tablespoon finely chopped fresh rosemary leaves
- 2 cups (~150-200g) chopped cremini mushrooms (“brown button” mushrooms)
- Freshly cracked black pepper to taste
- 1 /2 teaspoon kosher salt
- 3 tablespoons arrowroot powder, or cornstarch
- 1 1/2 cups (360 mL) low-sodium vegetable broth
- 1 tablespoon white or yellow miso paste
Instructions
- Heat the olive oil in a large frying pan over medium high heat. Add the onions and cook about 4 minutes, or until starting to soften. Add the garlic, mushrooms, thyme, and rosemary and black pepper and cook until the mushrooms reduce in volume and the liquid has mostly but not fully evaporated. Add the 1/2 teaspoon kosher salt and cook for 1 more minute.
- Add the arrowroot and whisk it in to coat the mushrooms, whisking constantly for 1 minute. Pour in the vegetable broth and bring to a simmer, whisking until thickened, about 2 minutes.
- Transfer the gravy to a blender and add the miso paste. Blend until the gravy is creamy and smooth.
- Transfer the gravy back to the pan and heat over low heat for 3-5 minutes to further thicken it up. Taste and adjust seasonings as needed.
- Store leftover cooled gravy in an airtight container in the fridge for 4-5 days, or in the freezer for a month.
Nutrition
Nutrition information is automatically calculated, so should only be used as an approximation.


Hi NishaYesterday I made that beautiful recipe and …my girlfriend who is still quite a meat eater was astonish by the incredible taste , she took a second serving,thank you so much it will now be part of my « very special » recipe.Serge
Hi Serge, I am so happy you loved the recipe! It really is so "meaty" and rich in taste, and I’m glad your girlfriend loved it! Thank you for the lovely feedback!
I cannot wait to try this recipe Nisha! I’m sure will make the best savoury centrepiece or my Christmas! Love Silvia
Hi Silvia, you are so sweet! I hope you and your family will love it. Thank you!
Hi Nisha, I’m going to give this a go when I host in a few days, but one of my guests has a nut allergy 🙁 Did you ever try it without the walnuts? I could substitute cashews but seems like the flavor would be all wrong. Any tips greatly appreciated!
Hi Danielle, you mentioned she has a nut allergy but she can have cashews. Can she have other nuts besides walnuts? If she’s not allergic to pecans, that would be the best substitute. I also think sunflower seeds would be a good substitute! They have a bold nuttiness but are a seed so hopefully your guest isn’t allergic to those. Hope that helps!
Gosh I sounds delicious.. thanks a lot for sharing!!!
Hope you get a chance to try it, Maude! Thank you and happy holidays!
Hello,I’m the only vegan in my family, and I really want to try this recipe so I will divide it. But still I won’t eat the 4 serves during Christmas dinner aha! So I would like to know how long you think I can keep it? Thank you very much! Have a good day!
I am making this for my family’s Christmas dinner!
I don’t understand the "rolling" the puff pastry step to make it rectagular, can I just fold it?
Hi Joanie, you need to roll out the pastry because it’s too thick as is when you take it out of the box. If you look at the two photos that are side by side of the pastry dough, the photo on the left is what the pastry looks like when it comes out of the box. The photo on the right is what the pastry looks like once you’ve rolled it into a thiner, longer sheet (using a rolling pin or wine bottle). The dough will be too thick and won’t bake evenly if you don’t roll it out. I hope that helps, let me know if you have other questions!
I think it depends on the brand. I live on the west coast of Canada, and the puff pastry I bought (with all non-animal ingredients) already has the right thickness out of the box. I didn’t have to roll mine. 🙂
This turned out so pretty! And it was absolutely delicious!! The directions you provided were super easy to follow! This will now become a part our family holiday tradition.
This sounds wonderful! I just love how everything and be veganized! It looks simply delicious:)
Thank you so much Mary! I totally agree – so many wonderful ways to veganize all your favorite foods 🙂 Hope you get a chance to try it out!
I am definitely making this for Christmas! Can I make the mushroom loaf ahead of time and keep it in the fridge and then do the puff pastry before serving?
Happy to hear that Nicola! Yes, that should work just fine. Once you’ve baked it, allow it to cool to room temperature. Then wrap it in and store it in the fridge. Just be sure to bring the loaf to room temperature before wrapping it in the pastry so it bakes evenly in the oven.
This is going on my Christmas menu! This is exactly the kind of thing my meat-eating family will love. Thank you for sharing such delicious and creative recipes!
Omg I’m so trying this! Amazing Nisha!!