

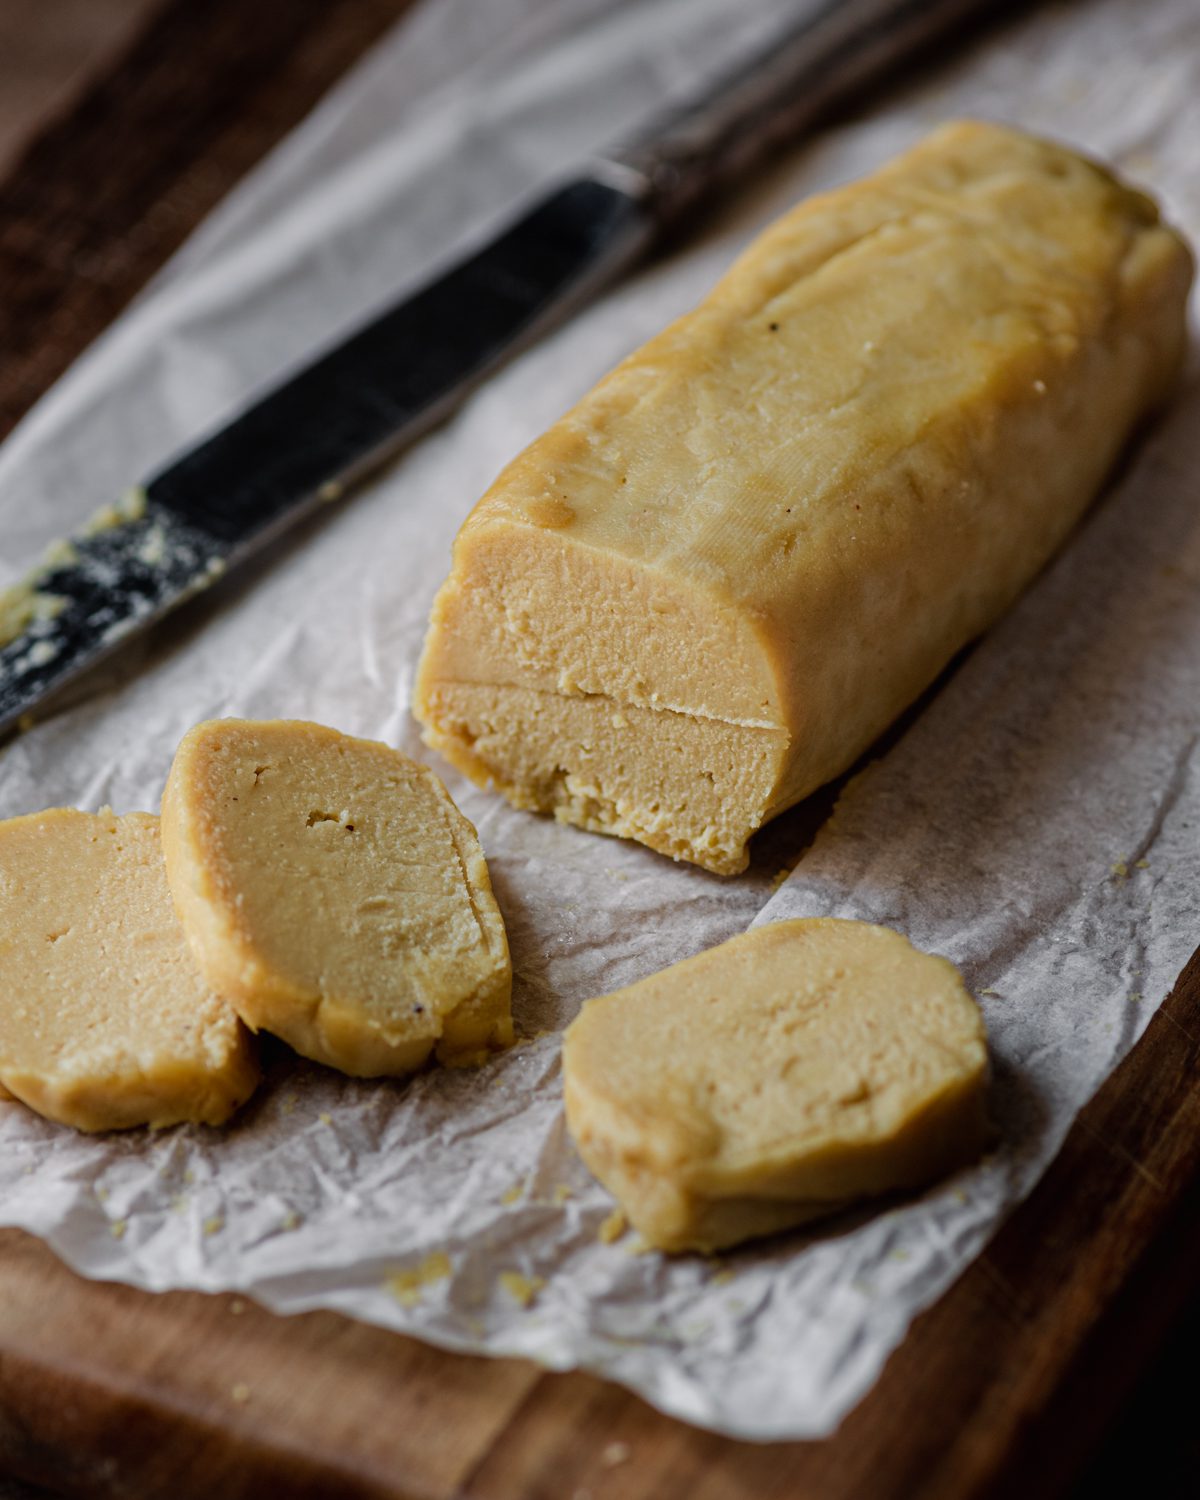
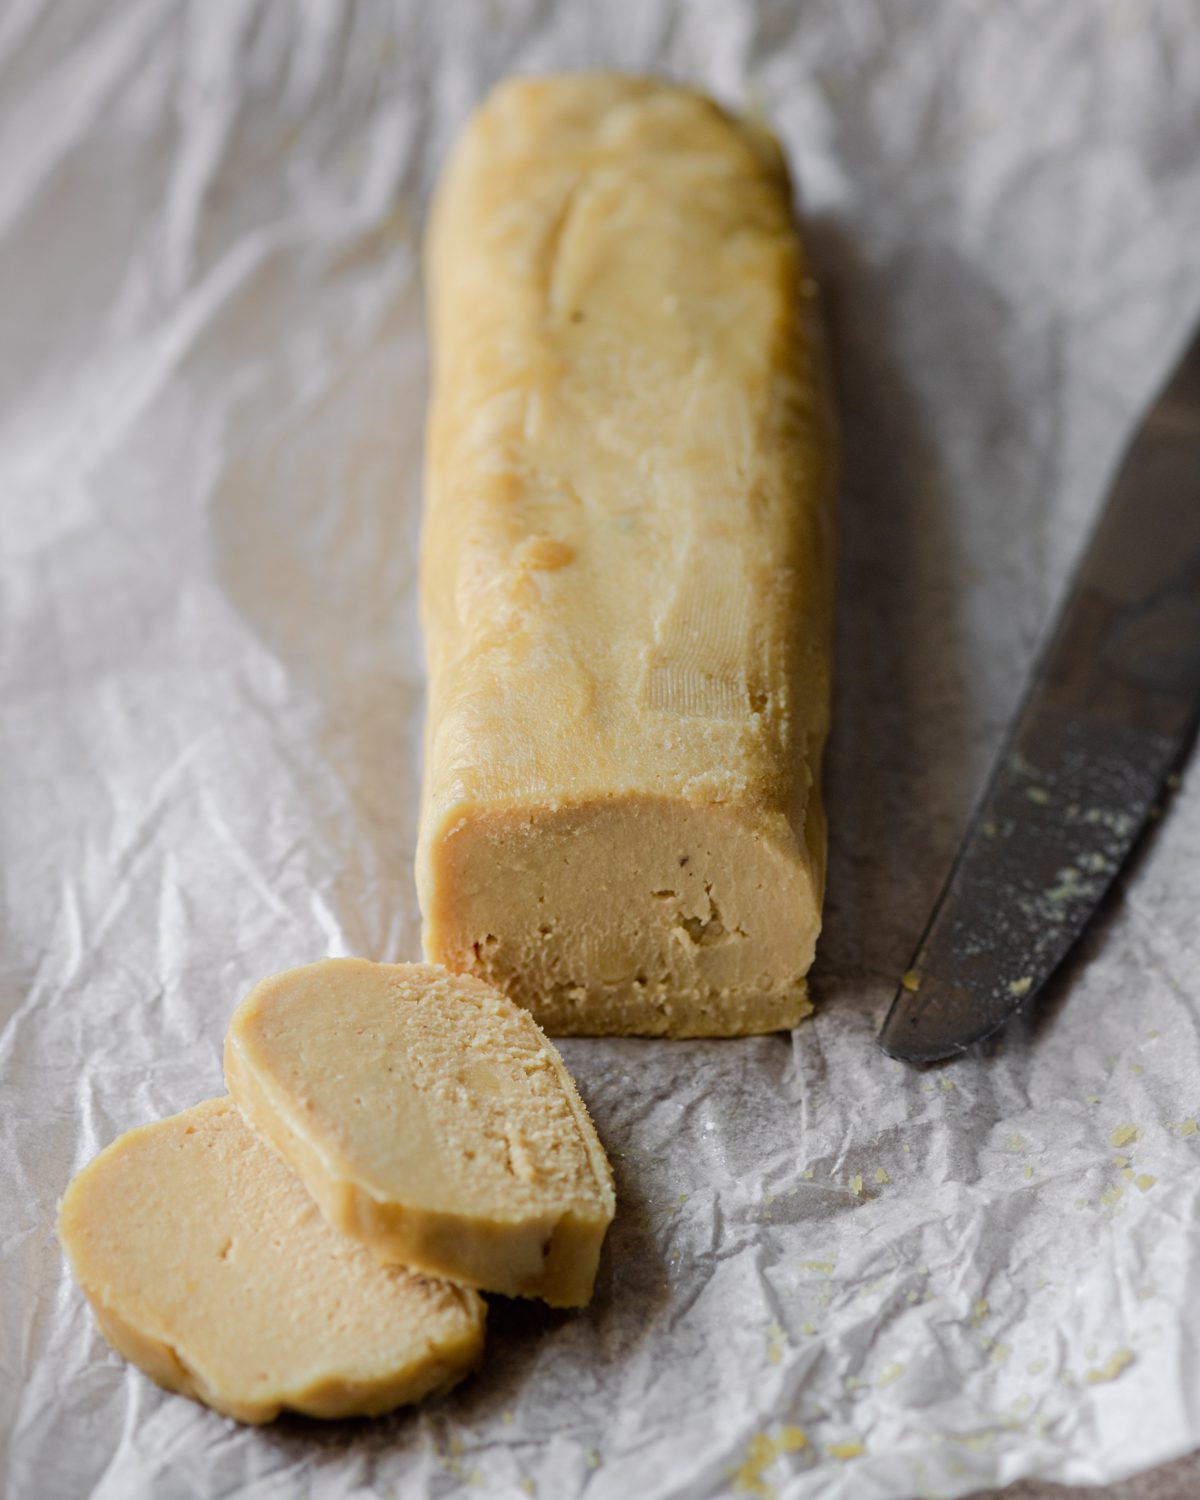
If you miss being able to slice into a log of cheese and spread it on bread or crackers, this fermented cashew cheese will give you back that experience.
And if you’ve ever been disappointed by the vegan cheese options at the grocery store or don’t have access to them, this recipe will be a godsend.
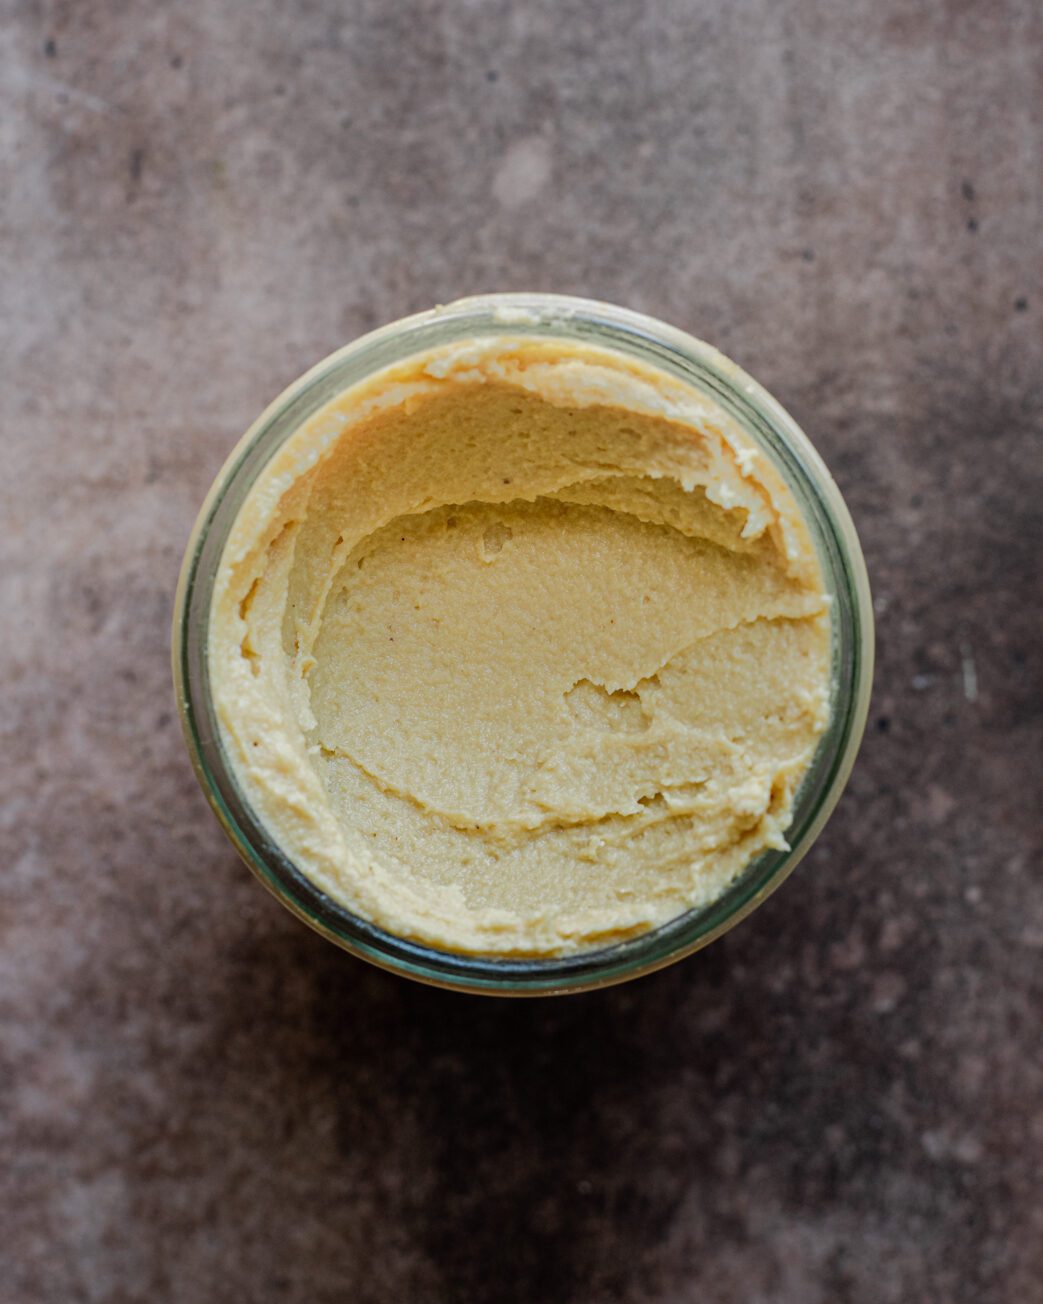
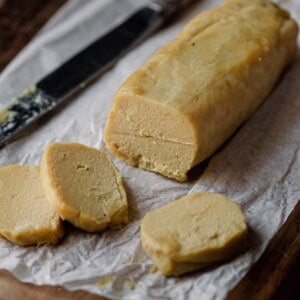
First, a simple mixture of cashews, vinegar, lemon juice, coconut oil, nutritional yeast, and seasonings gets blended until smooth. Then, it ferments for a day or two. Finally, the cheese gets shaped into a log (think a log of goat cheese) and hangs out in the fridge for a few hours. Once sliced, it’s easy to slice and spread (and is SO very tasty).
Hungry for even more vegan cheese?
Check out my complete guide to vegan cheese! It covers the best vegan cheese recipes to use for every situation (like Vegan Feta and Vegan Queso) and reviews the best vegan cheeses you can buy at the supermarket.
Why you’ll love this recipe
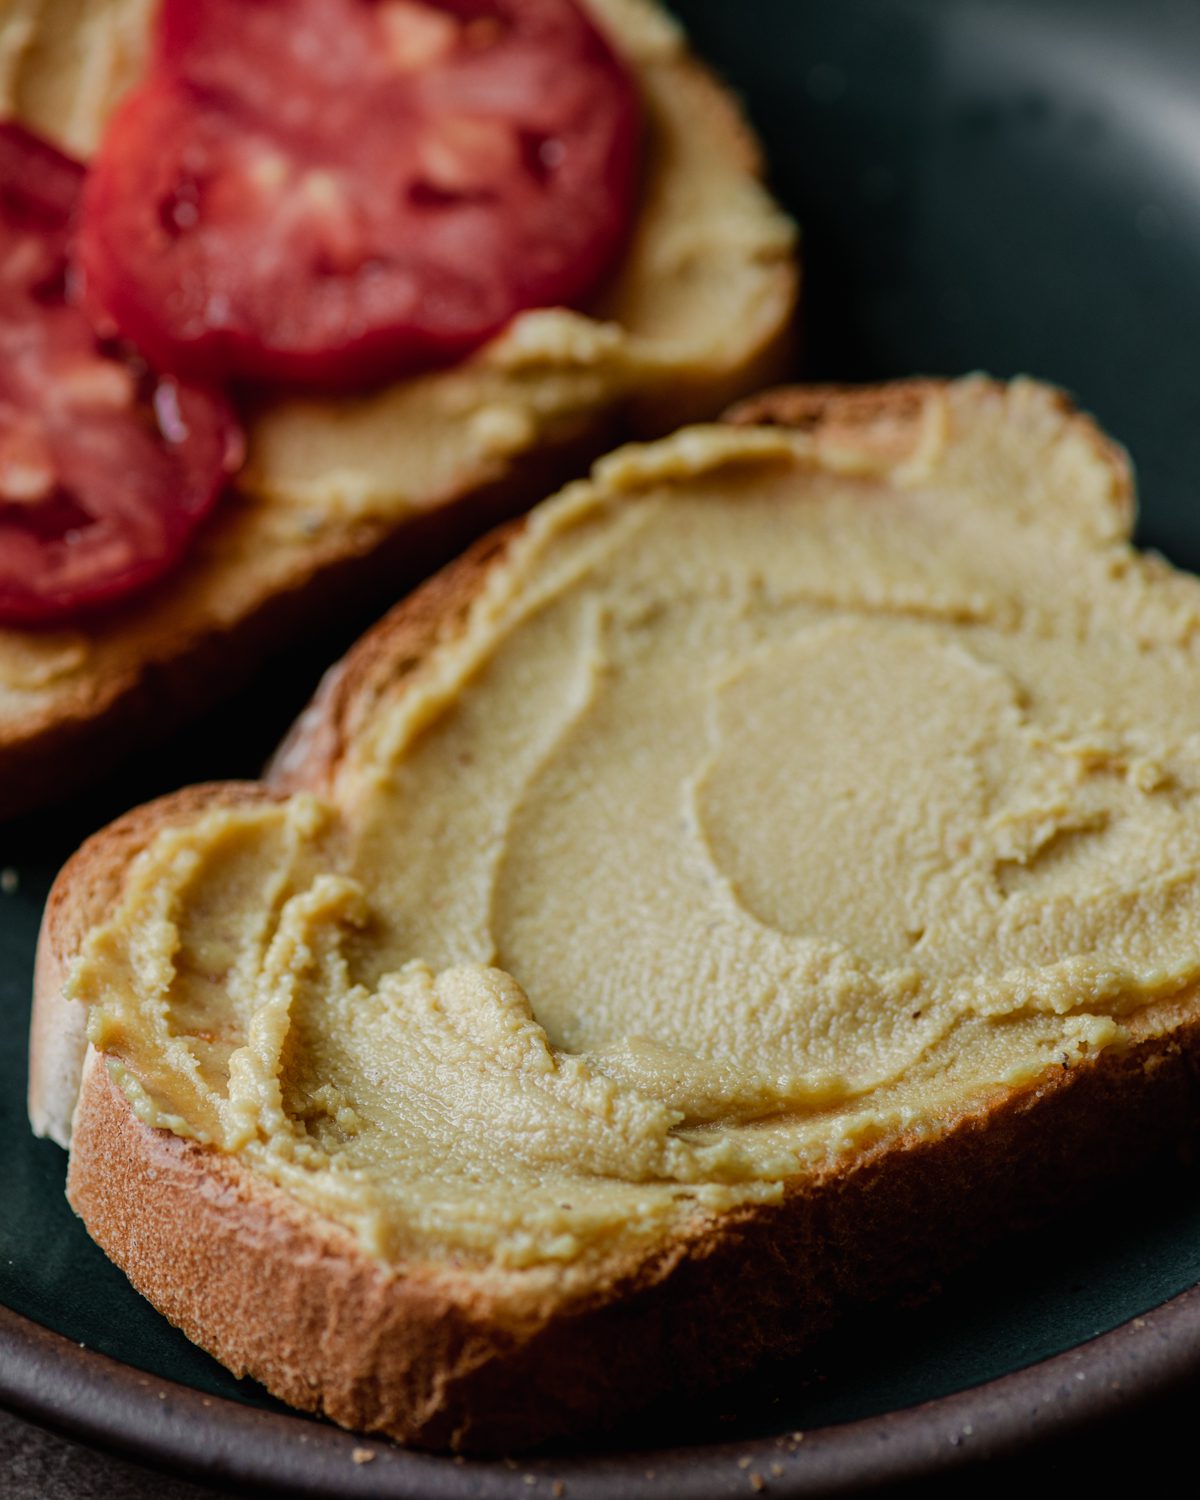
Sliceable and spreadable. Homemade vegan cheese recipes that are sliceable and/or spreadable are hard to come by, and if you don’t have access to vegan cheeses at your grocery store, this is an amazing option to keep in your fridge. The addition of coconut oil and very little liquid makes the cheese solid enough to hold its shape and to slice.
Easy and minimal ingredients. This recipe requires just 10 to 15 minutes of hands-on work and a bit of patience while the cheese ferments. And just 7 pantry-friendly ingredients!
Gourmet and flavorful. Despite being so easy to make, this cheese feels fancier than most homemade cheeses and is packed with flavor. In addition to having subtle cheesy vibes from nutritional yeast, it has so much more tanginess and umami than your standard vegan cheese thanks to fermentation.
Make ahead. Because this is a fermented cheese, it will continue to stay good in your fridge for several weeks… if you can resist eating it!
Wholesome but indulgent. Fermented cashew cheese has all the traditional dairy cheese flavors but it’s made with wholesome plant-based ingredients. Plus, the live bacteria created in the fermentation process are good for your gut!
If you’re interested in some of the crazy cool things cashews can do to recreate your favorite comfort foods, check out my crazy good Vegan Spinach Artichoke Dip or Vegan Moussaka!
How to make this recipe
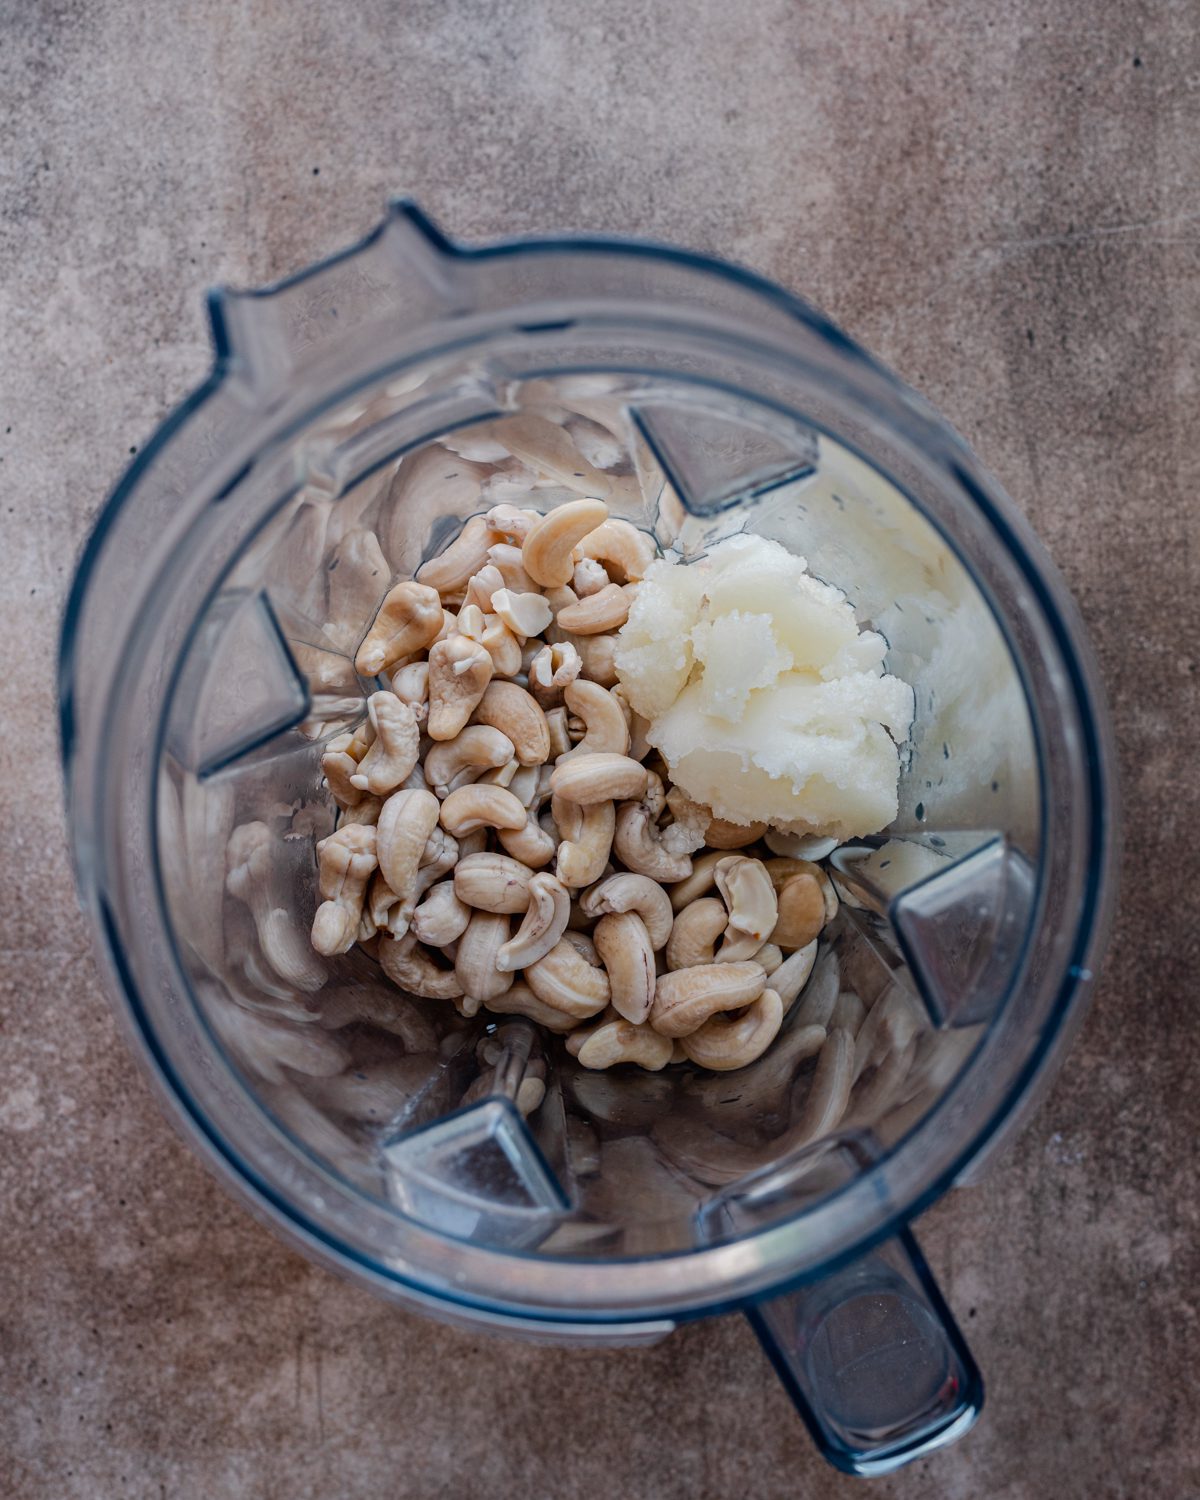
Add the soaked cashews, apple cider vinegar, lemon juice, and coconut oil to a high-powered blender. Blend on medium to high speed for several minutes, scraping down the sides of the blender several times as you go, until relatively smooth.
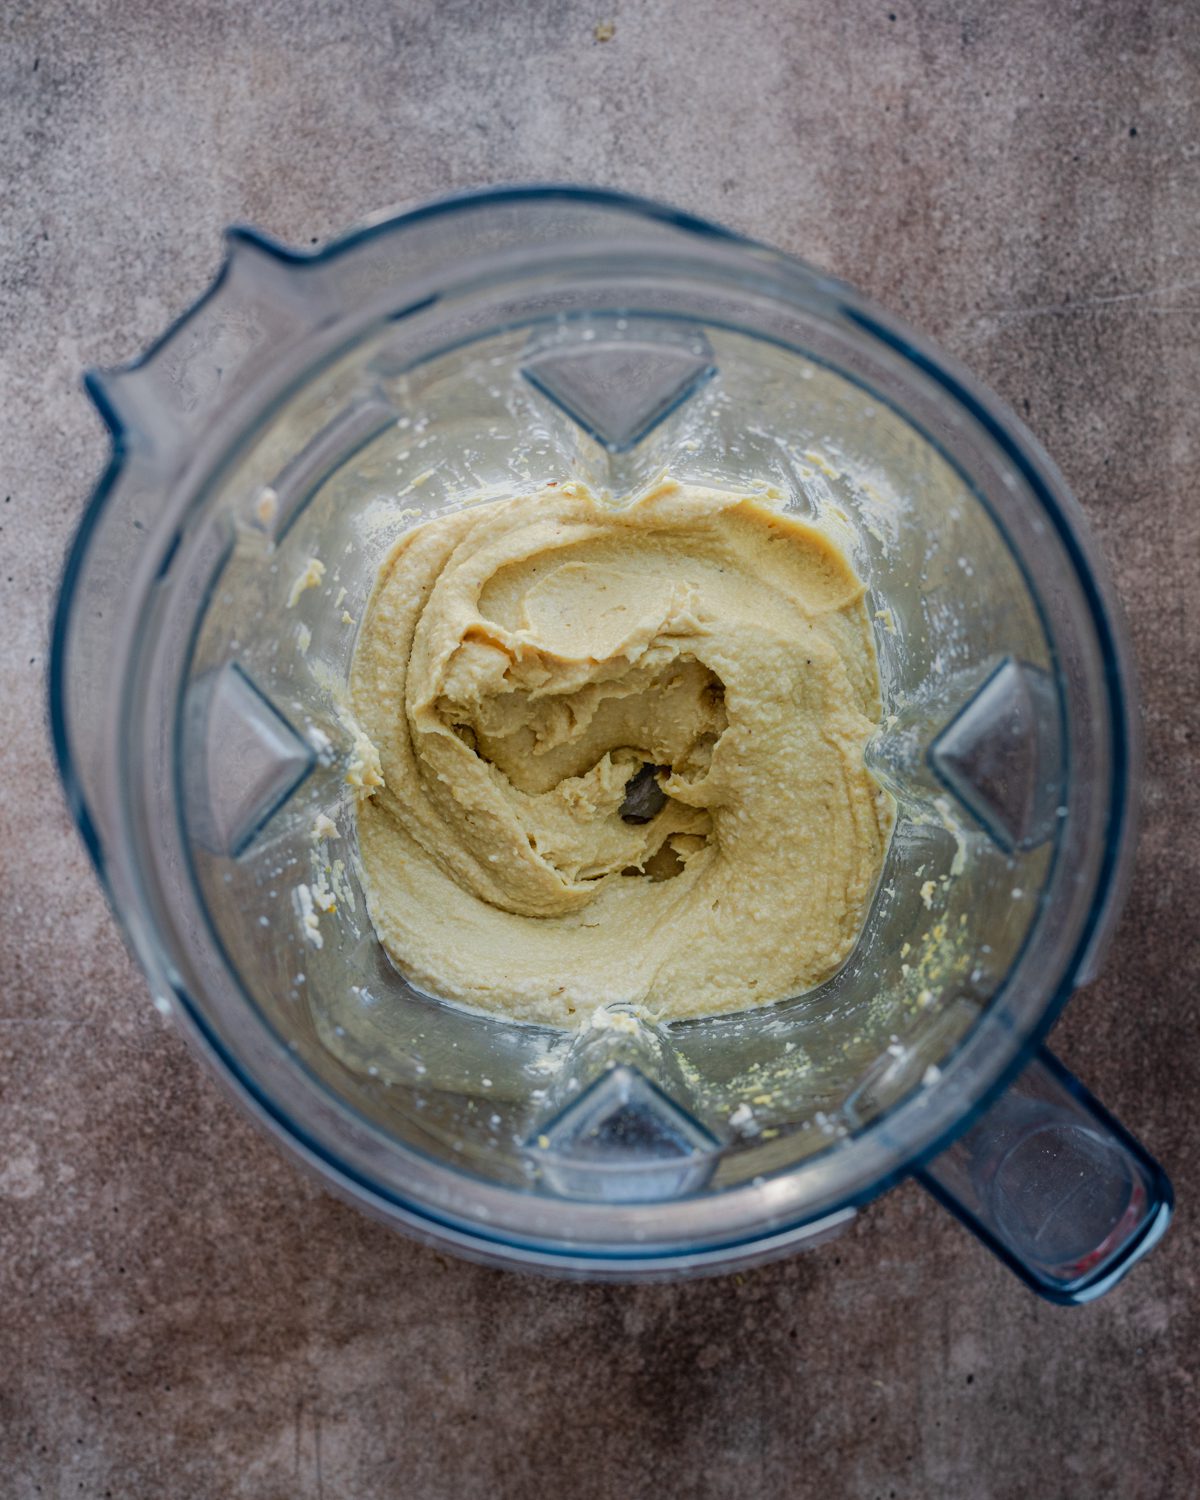
Add the nutritional yeast, garlic powder, onion powder, and salt. Blend again until completely smooth.

Transfer the cheese mixture to a clean mason jar (you can sterilize it if desired but it’s not necessary). Seal the jar and place in a warm spot to ferment for at least 16 hours, or up to 48 hours. (see “Tips” section for fermentation tips).
Stir the fermented cheese and transfer to the fridge for at least 4 hours to set.
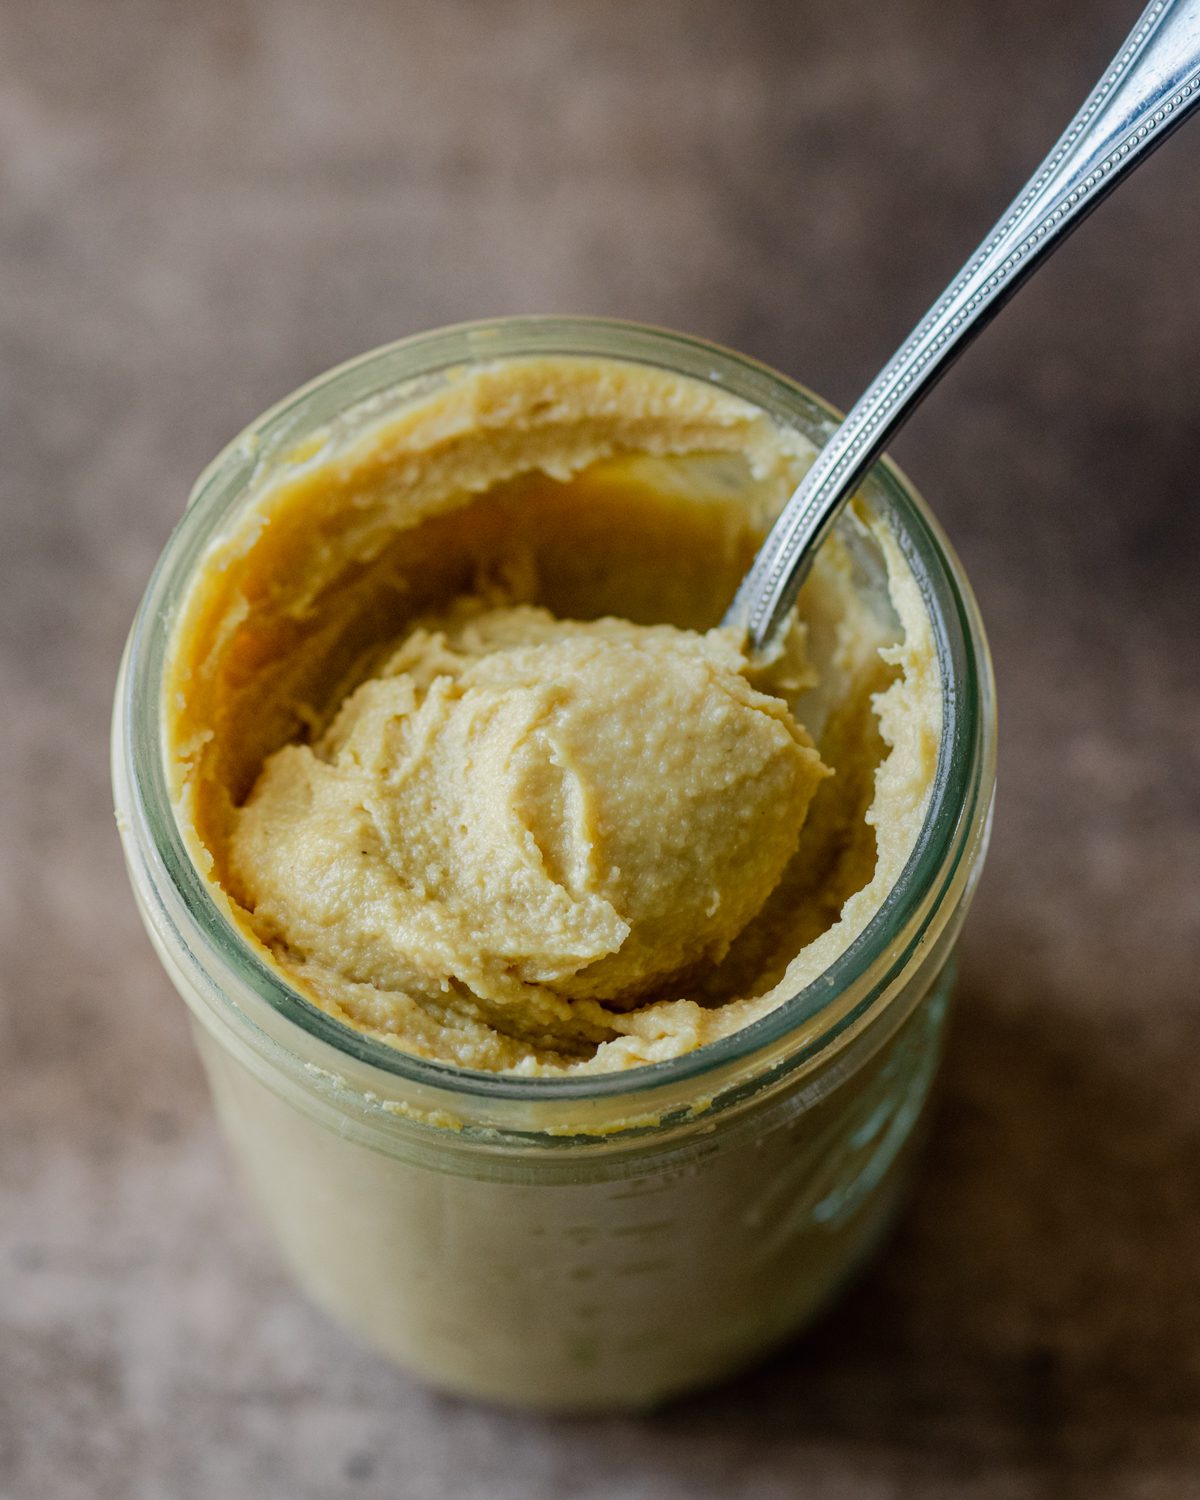
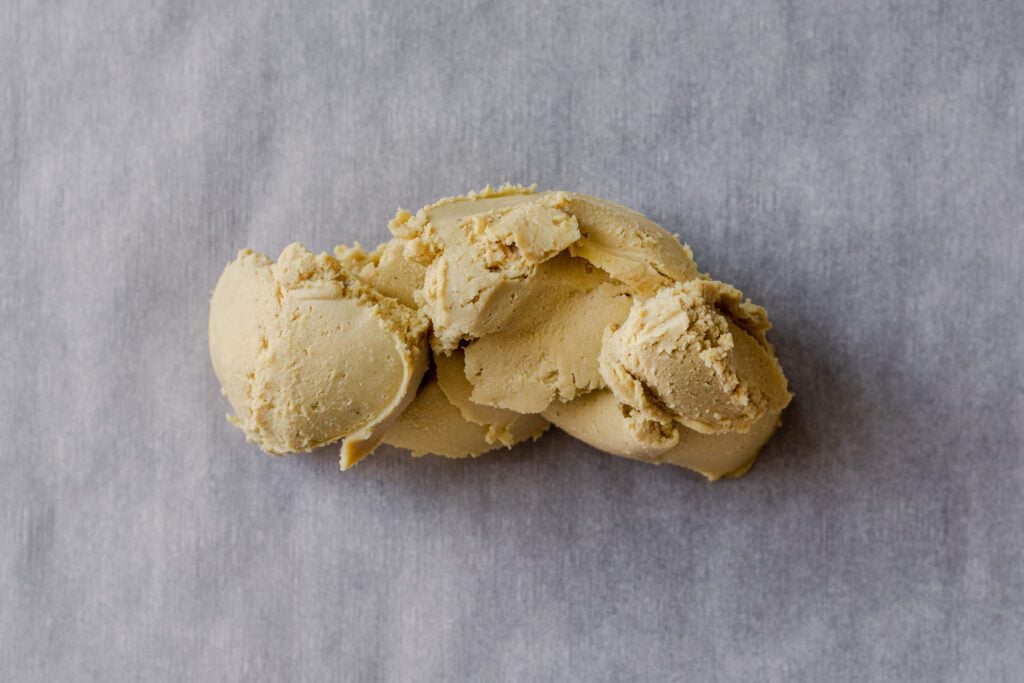
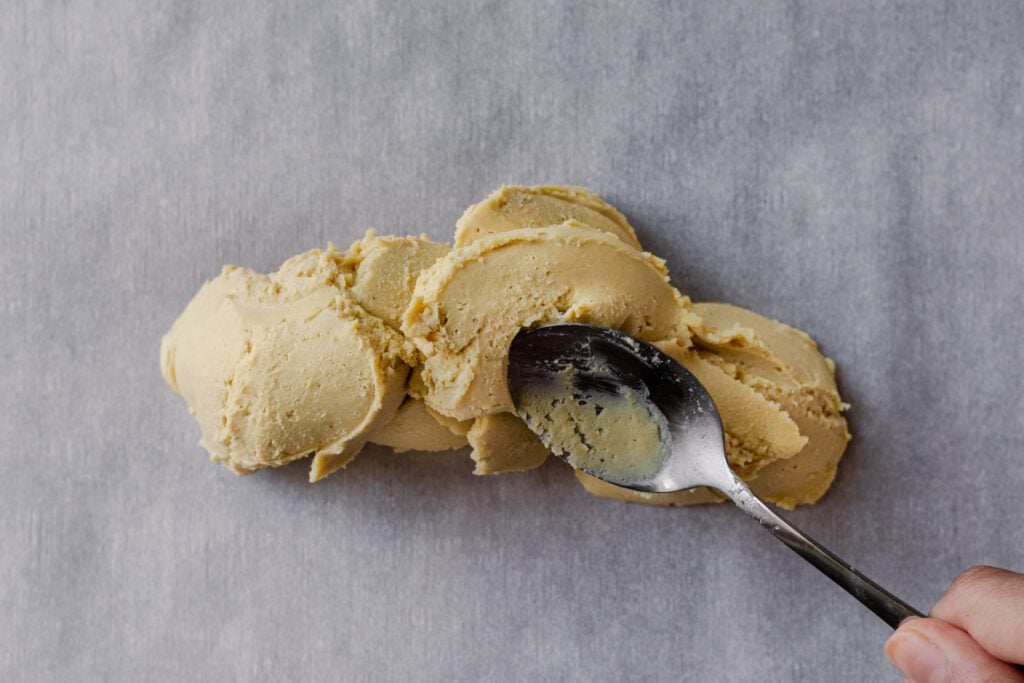
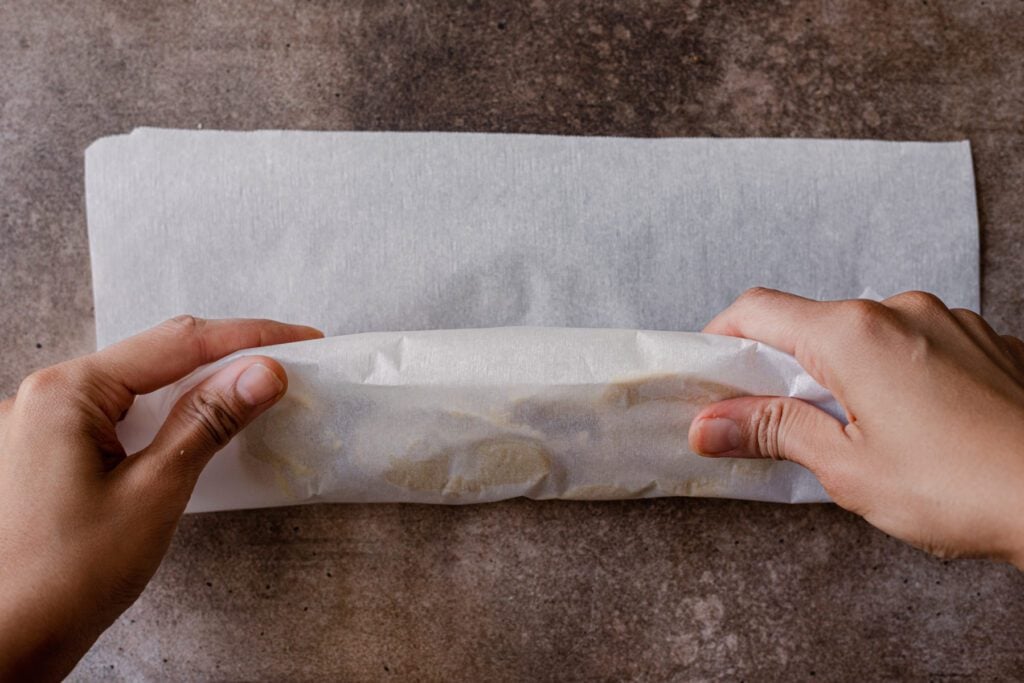
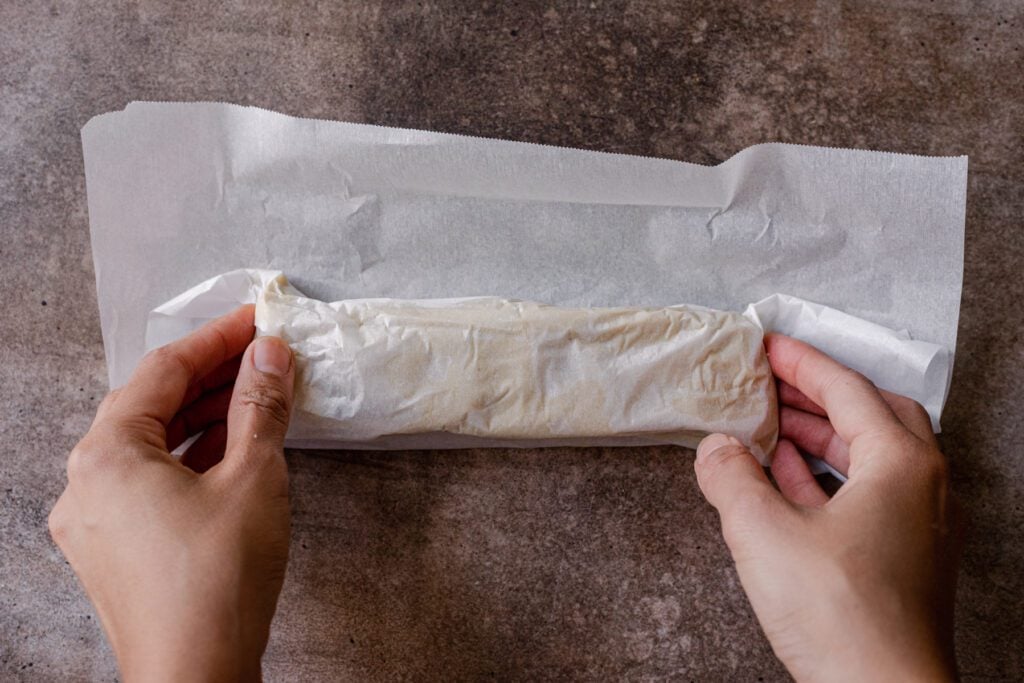
Once the cheese has solidified, scoop out half of it onto a sheet of parchment paper. Use a spoon to push it into a log-like shape.
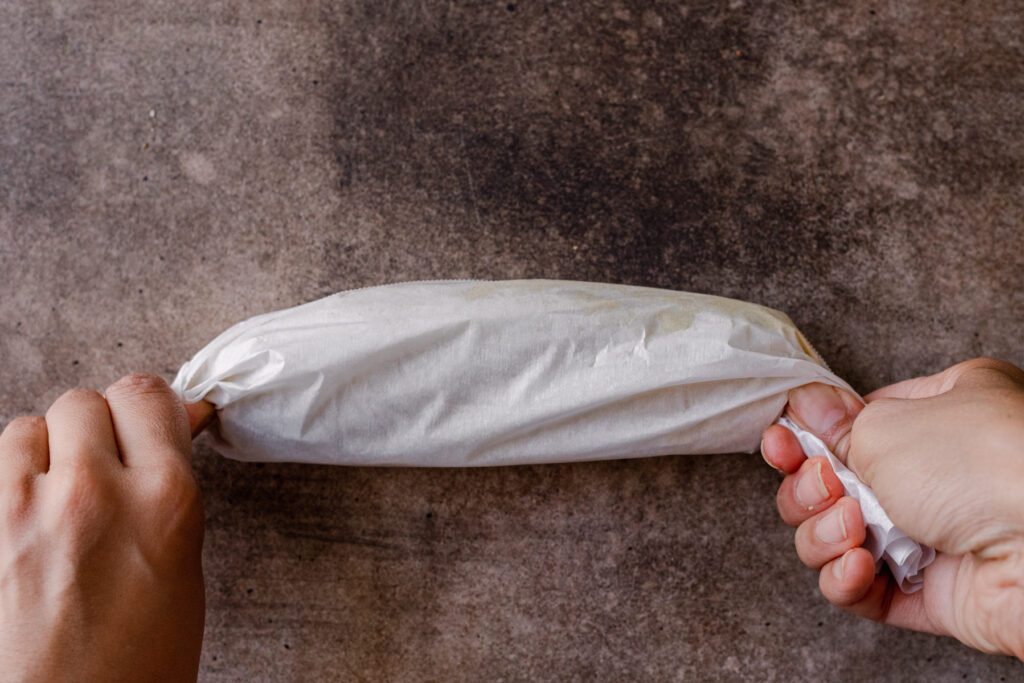
Roll up the parchment paper and your hands to mold and shape the cheese into a log shape. Repeat with the other half of the cheese. Refrigerate the cheese logs for 2 hours, or more, to set.

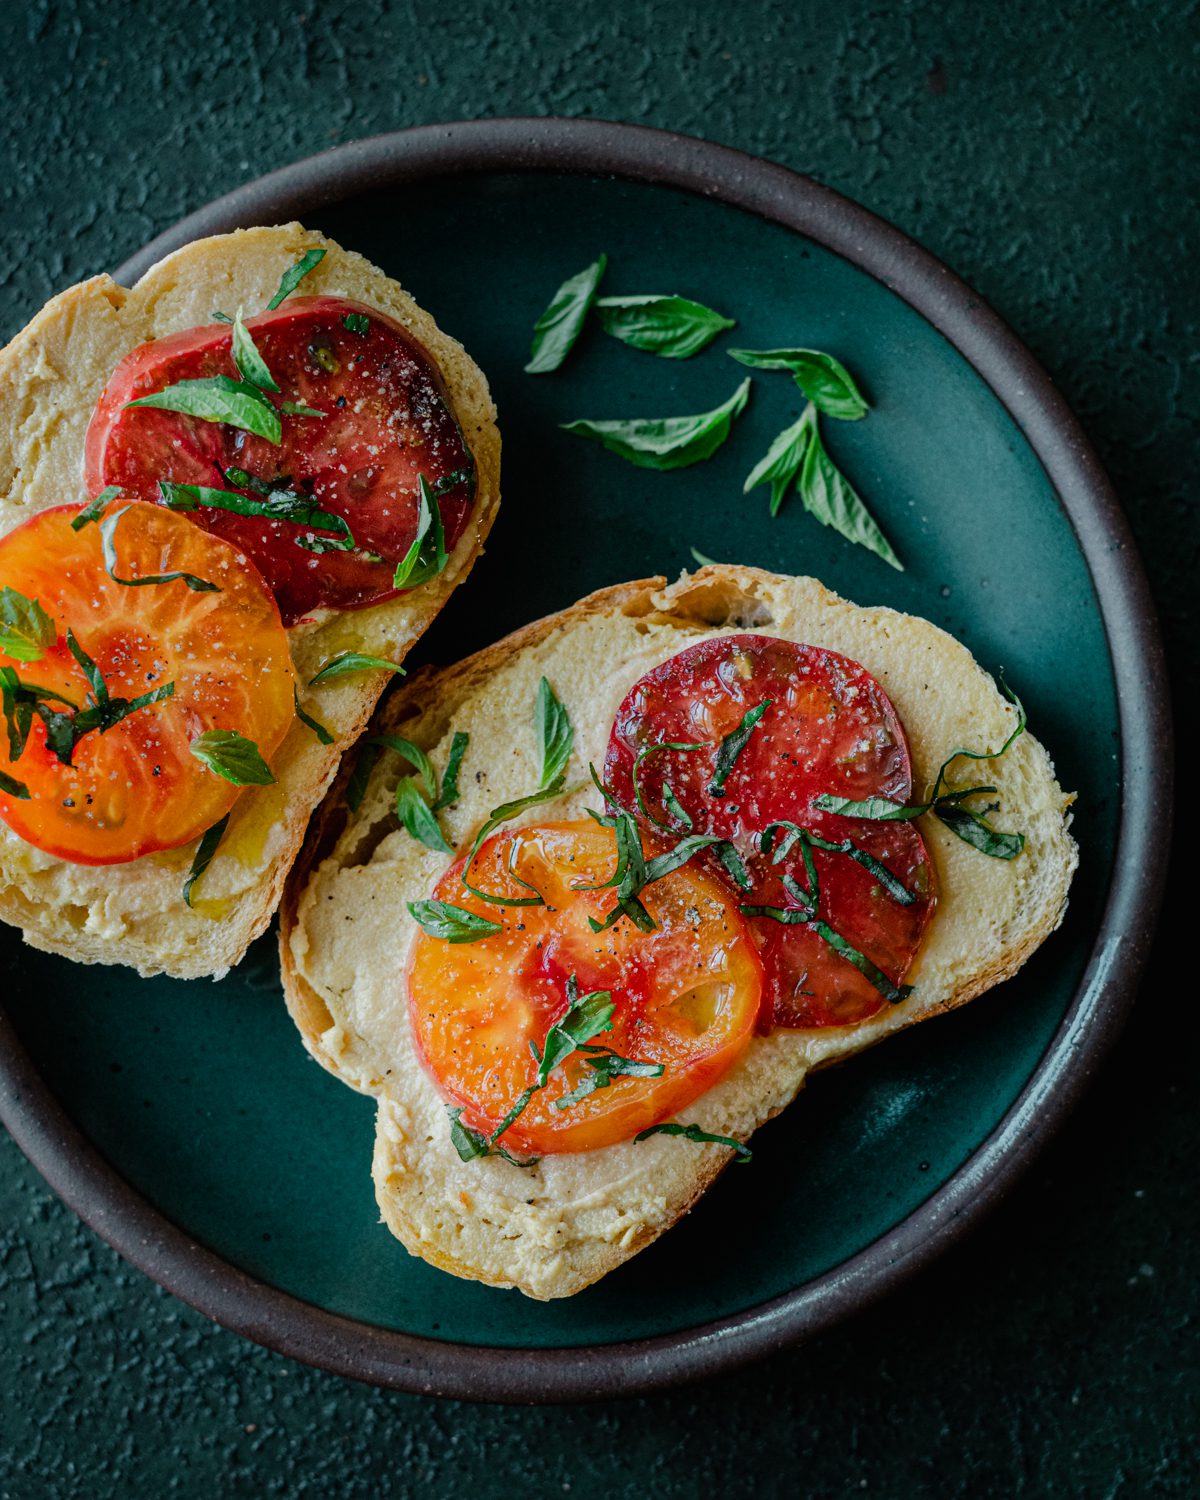
Once the cheese log is set, slice and spread as desired.
Tips for making this cheese
How to soften raw cashews.
I highly recommend soaking your cashews in cool water overnight, or boiling them on the stove for 20 minutes. Since there’s very little liquid, a proper soak or boil is necessary to fully soften the cashews.
Use a clean glass jar.
Wash your jar and lid with soapy warm water and dry well before adding your cheese and fermenting.
Use a high-powered blender.
Along the same lines, you’ll get the best, smoothest results with a high-powered blender, as you want a powerful machine to fully pulverize the cashews. Since there’s not much liquid, you’ll need to scrape down the sides several times as you go, especially if you have a large-sized blender container like me (I have the 64-ounce Vitamix container; it’s considerably easier with a smaller blender container).
Shake the apple cider vinegar.
It’s important to include a bit of the “mother” bacteria from the vinegar to start the fermentation process. Shaking the apple cider vinegar before pouring it ensures that the mother bacteria is evenly distributed.
Let it come to room temperature
If your cheese log has been in the fridge for quite awhile, let it sit at room temperature for 5 minutes to soften up. This will make it much easier to spread.
Where and how long to ferment the cheese.
One of the most important parts in the process is letting the cheese ferment in a warm place.
If it’s summertime, this could be your kitchen counter or pantry. If you live in a warm but not crazy hot climate like I do (Southern California), you can also ferment the cheese outside. Just make sure to not expose the jar to direct sunlight. I typically wrap the jar in ad dish towel during the day and set it outside; in the evening, I transfer it to the oven with the light bulb on (the warmth from the light is sufficiently warm for fermentation).
If it’s wintertime, you can just leave it in the oven as mentioned above. If that’s not an option, you’ll need to leave it out on a counter or in the pantry for at least a few days.
The warmer the temperature, the less time you should ferment it. The countertop when it’s not summer will take more time than in the oven with the light on. If the temperatuer is quite warm, consider fermenting for just 16 to 24 hours to avoid over-fermenting.
Frequently Asked Questions
The coconut oil is key for the texture of this cheese. As you might know, coconut oil has a high melting point compared to other oils (that’s why it’s solid at room temperature instead of liquid, like other oils). So when you refrigerate the cheese mixture, the coconut oil helps solidify it, leaving you with that sliceable texture.
If you are strictly oil-free, try my other oil-free cheese options (Vegan Queso and Nut-Free Cheese Sauce). If you are allergic to coconut products, you can try using olive oil, but I don’t know if you’ll get the same sliceable texture, as coconut oil is solid at room temperature.
NO! The combination of fresh garlic and oil at room temperature for more than a few hours can foster the growth of clostridium botulinum bacteria (aka botulism). It’s toxic and can cause bad severe food poisoning!
Roll it tightly in the parchment paper and store it in the fridge for at least 2 weeks. If the paper isn’t wrapped tightly, the edges dry out, so to avoid this, store the wrapped cheese in an airtight container.
Yes! Some flavor ideas are below. Just sprinkle them on after you’ve rolled the log and it’s hardened a bit. Use your hands to pat the mix-ins into the cheese. Then refrigerate again for 2 hours (or longer) to set.
– Sundried tomatoes + dried oregano
– Chopped dill + parsley
– Dried cranberries + crushed walnuts
– Pomegranate seeds + crushed pecans
How to use this cashew cheese
I have no doubt you’ll find countless uses for this delightful cheese, but here are a few to get you started:
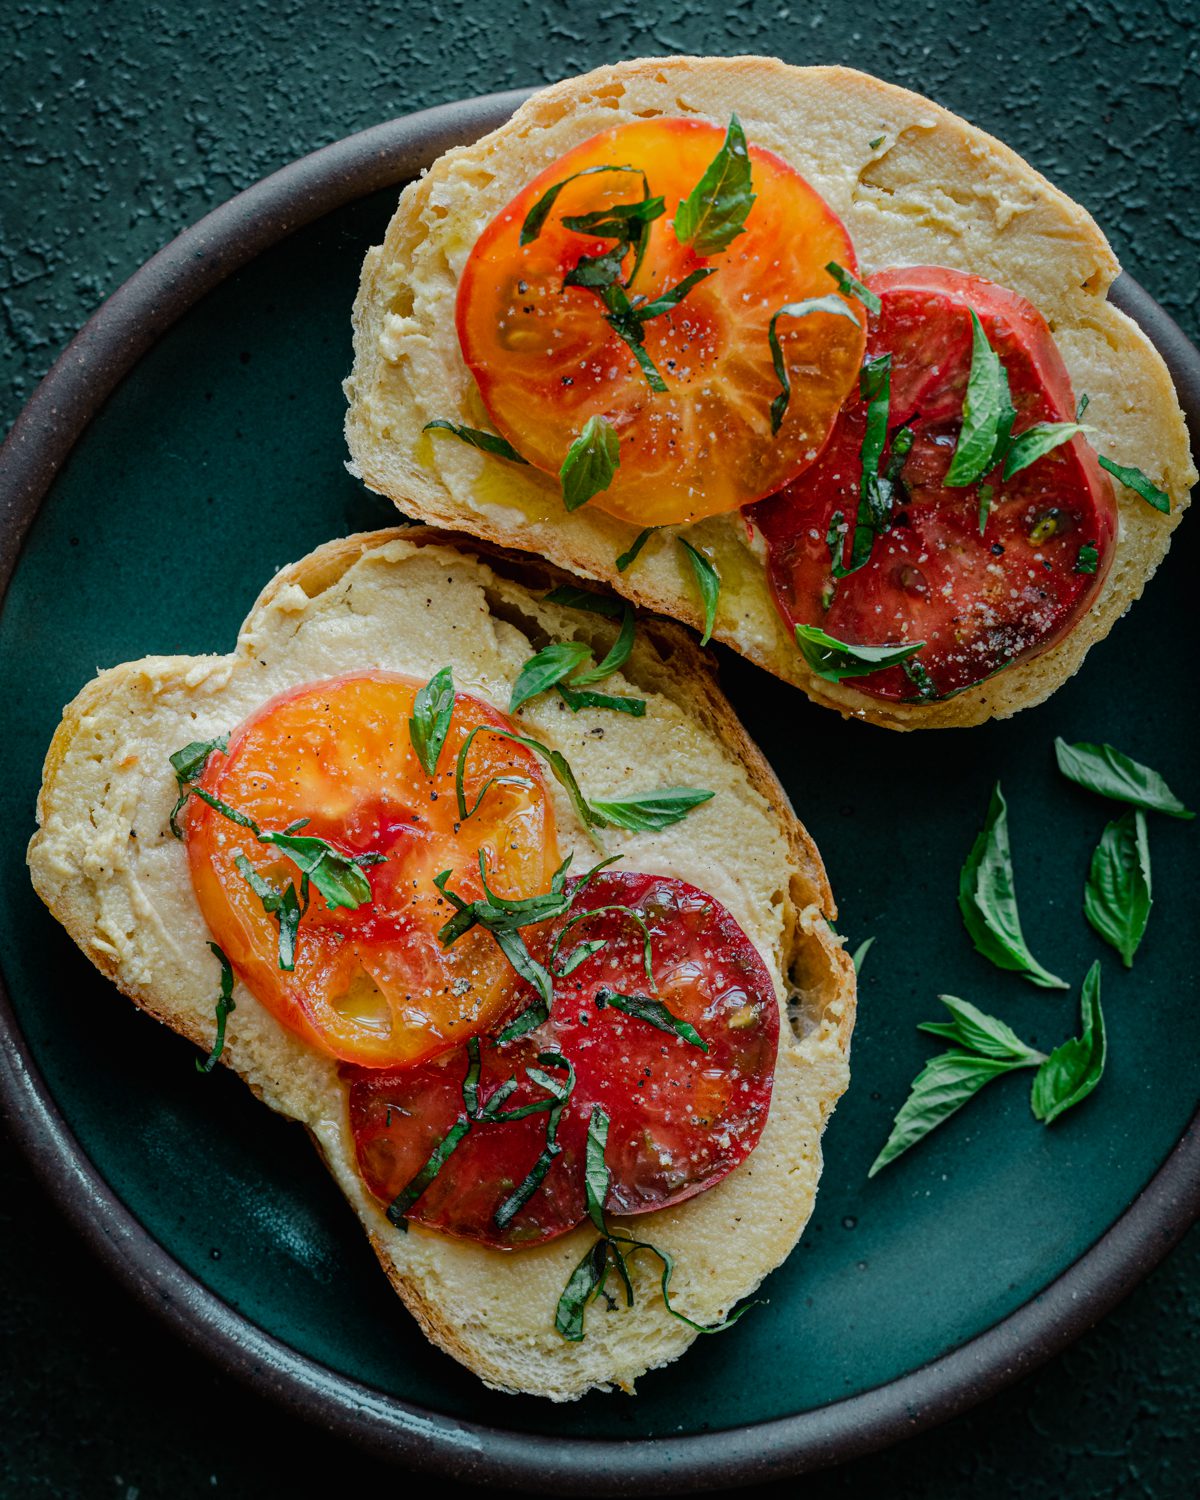
- Spread it onto bread! My current favorite is a good crusty bread, a thick layer of fermented cheese, and heirloom tomatoes sprinkled with sea salt and pepper.
- Add some to a bowl as a dip for crudités or spread for crackers.
- Serve as part of a vegan charcuterie or cheese board with crackers, olives, and fruit.
- Use as a sandwich spread instead of mayo.
- Spread onto a pita round or flatbread and add your favorite toppings and bake in the oven for an easy pizza!
If you love this fermented cashew cheese, please leave a rating and review with your feedback and tag me on Instagram with your remakes 🙂

Introducing
Big Vegan Flavor
Techniques and 150 recipes to master vegan cooking.
Fermented Cashew Cheese
Ingredients
- 1 1/2 cups (200g) raw cashews, soaked in water overnight or for 8 hours or boiled in water on the stovetop for 15 minutes
- 2 tablespoons apple cider vinegar with the “mother”, shake the bottle to evenly distribute
- 1 tablespoon freshly squeezed lemon juice
- 3 tablespoons water
- 1/3 cup 67g refined coconut oil
- 1/2 cup ~25-30g nutritional yeast
- 3/4 teaspoon garlic powder (do NOT use fresh garlic!)*
- 3/4 teaspoon onion powder
- 1 1/4 teaspoons sea salt, more as needed
Instructions
- Drain the soaked cashews and rinse. Wash your glass jar and lid with warm soapy water and dry well.
- Add the cashews to a high-powered blender, along with the vinegar, lemon juice, water, and oil. Blend on medium or high speed, scraping down the sides as you go, until relatively smooth and creamy. Add the nutritional yeast, garlic powder, onion powder, and salt, and blend again until well incorporated and completely smooth. If you have a large blender container, like a 64 ounce jar, this will take several minutes, as you will need to scrape down several times, as there is very little liquid.
- Pour the mixture into a glass jar with an airtight lid. Seal and let the jar ferment in a warm place, for a minimum of 16 hours, or up to 48 hours.**If it’s summer, your kitchen counter works great. You can also place it in the oven with just the lightbulb on (be sure to not preheat your oven during this time and don't place it right next to the light, as it might get a little too warm). You can also ferment it outside if you live in a warm but temperate climate (no direct exposure to sun; loosely wrap the jars in a dish towel).
- Once the cheese has fermented, give it a stir and then refrigerate for at least 4 hours to firm up.
- Once the cheese has solidified, spoon half of it onto a sheet of parchment paper. Use a spoon to push it into a log-like shape. Roll up the parchment paper and use your hands and the parchment paper itself to mold and shape the cheese into a log shape. Repeat with the other half of the cheese in a second log. Refrigerate the cheese logs for 2 hours, or more, to set. Store leftovers wrapped in parchment paper in the refrigerator for at least 2 weeks.
Video
Notes
Nutrition
Nutrition information is automatically calculated, so should only be used as an approximation.


This is sooo delicious oh my goodness, but I noticed mine is not firming up or solidifying — it is like a cream cheese texture (still lovely). I followed the directions to a T — hoping you can help me troubleshoot.
Me again, answering past me’s question. Just wait longer, Marie. For you, it will take 6 hours before shaped and then another 6 after shaped to fully set to a sliceable texture. And if you are realllly patient and can wait 2 days, it will be evvvven better. Haha. So good!!! 💛
Yay, great to hear you figured it out, Marie!
Hi Marie, did you use coconut oil and refrigerate it after fermentation? Those two should help firm it up!
Good to hear you’re a fan of the taste, though! 🙂
Hi there, I just found this recipe but I found another one before it that when blended, suggests to put it in cheesecloth and ferment outside for 8 hours and then leave on a rack to ferment further. I didn’t have a cheesecloth so just put in a sieve over a bowl and covered it. Is this ok or does it have to be in a sealed container? Thanks!
Hi there, a great question! (and sorry for the late reply here!) I’ve also been without a cheesecloth and have used a sieve and covered it with a thin towel (or a paper towel would work too) and it worked out lovely. Enjoy!
Hi there, I’m so excited to try this recipe but just a quick question. In Nisha’s new book it seems the ACV is replaced with vegan yogurt. Is there a big difference? I always have ACV but almost never have yogurt, so I’d love to understand the difference in taste/texture? Thanks so much!
I saw another with kombucha and one miso…. I think it’s the cultures in them that’s important. I like the idea of the miso one best personally as I feel it’ll impart a good flavour
Hi Shilpa, both versions are great! The probiotics in yogurt are a bit more concentrated, which makes the cookbook version a bit more fermented, slightly more mature cheese-like in flavor with that characteristic tang. If you don’t have yogurt, the ACV version is also lovely!
Insanely good. I’m eating it as a spread on thinly sliced, very dense German sunflower seed bread. Incredible.
That sounds lovely indeed, BE! Thanks for sharing 🙂
Hi! My friend made this cheese for our group, and it was sooooo great that I can’t forget that flavor! Thanks for the good recipe🥹
Now I’m trying to make this myself, and I have some questions!
– Is it okay to use roasted cashews instead of raw cashews?
– Is it okay to make with out garlic powder and onion powder?
Thank you☺️😌
Hi Hayeon, so happy that you all enjoyed this recipe! To answer your questions:
No, I don’t think roasted cashews will work. Raw cashews, when soaked in water, plump up and get super creamy. Roasted cashews will not do the same.
Yes, you can omit the garlic and onion powder (but don’t add fresh garlic because that can create a risk for a food-borne illness called botulism).
i can’t count how many times i’ve made this recipe! i tend to halve the coconut oil because i use the cheese as a spread. like others, i’ve also incorporated raw sauerkraut for additional ~funk~! my favorite part comes after the fermentation where i can experiment with flavors: my top additions are tons of fresh mined dill or scallions and gochugaru pepper flakes. thanks for the recipe! 🙂
Those additions sound absolutely incredible, Meridith! Thank you for taking the time to leave a review 🙂
I think I may have made a mistake. And, Im a little paranoid of making fermented dishes. I didnt seal the jars immediately. I was multitasking and missed the part about sealing with lid. So, I just put a paper towel over the top of jar with a rubber band. It sat like this for two hours before I realized my mistake. Do I need to throw this batch away, or see how it turns out?
Hi Mike, sorry we didn’t get to this in time. Did you end up going forward with the fermentation process?
Hi, Kaitlyn. I have made this recipe several times. My husband this cheese on his veggie burger almost every day for lunch. I like to add a few blobs to my salad sometimes. We also make a tofu mozzarella cheese and I use sauerkraut juice for the acid, so instead of lemon juice I use sauerkraut juice for this cashew cheese, which gives it that little bit of funk that we like. I still use the apple cider vinegar for the mother, though. I’m thinking of halving the oil, since hubby is spreading it, so it doesn’t need to be solid. Maybe just keep it in a tub in the refrigerator once fermented so that he can use it like cream cheese. Thank you so much for the recipe! It’s delicious!
Thanks for sharing, Diana! It’s lovely to hear this recipe is such a staple in your household and you’re having fun getting creative with its uses!
Is it possible to substitute unrefined coconut oil for refined?
I’ve made this is the past and it is delicious!
Hi Christine, unrefined coconut oil will make this cheese taste coconutty, so we don’t recommend it.
We hope you get a chance to try the recipem enjoy!
Rather than a comment, I have a question — can I substitute powder lactic acid for the Apple cider vinegar? Thank you. I plan on trying the recipe either way – it sounds great