

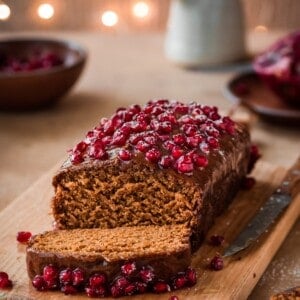
Where has this Fluffy Vegan Gingerbread Cake been all my life?
Earlier this year, I released my 8-ingredient banana bread that very quickly became one of my most popular recipes. Not surprising because the texture was shockingly fluffy, light and tender. And that’s not something you typically associate with banana bread, especially a vegan banana bread.
I then used that recipe as inspiration for my pumpkin spice bread, which is the perfect combination of moist and tender.
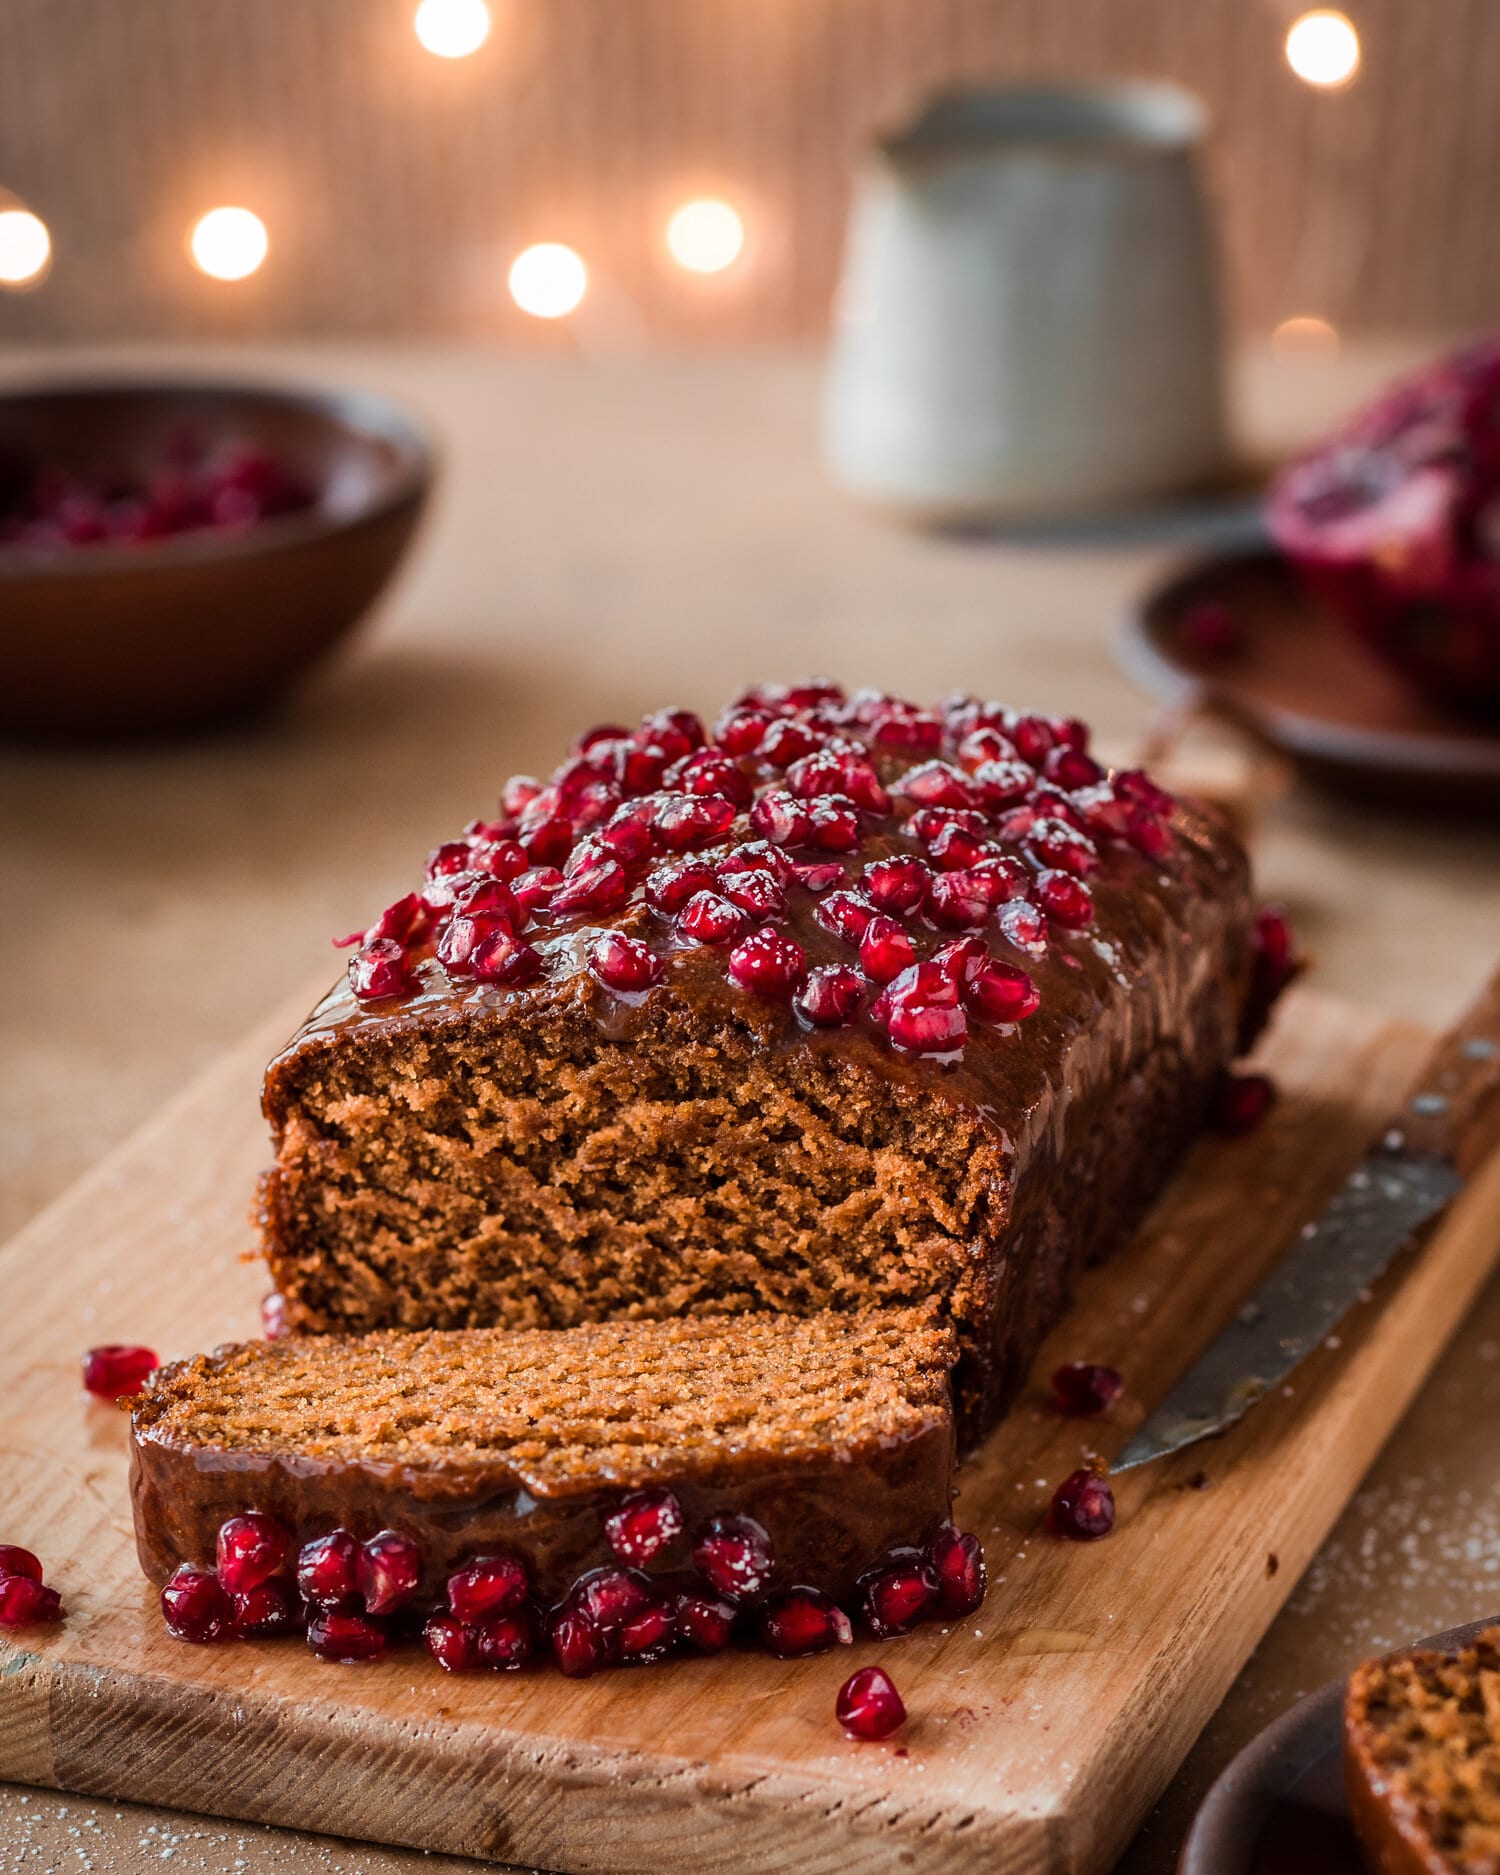
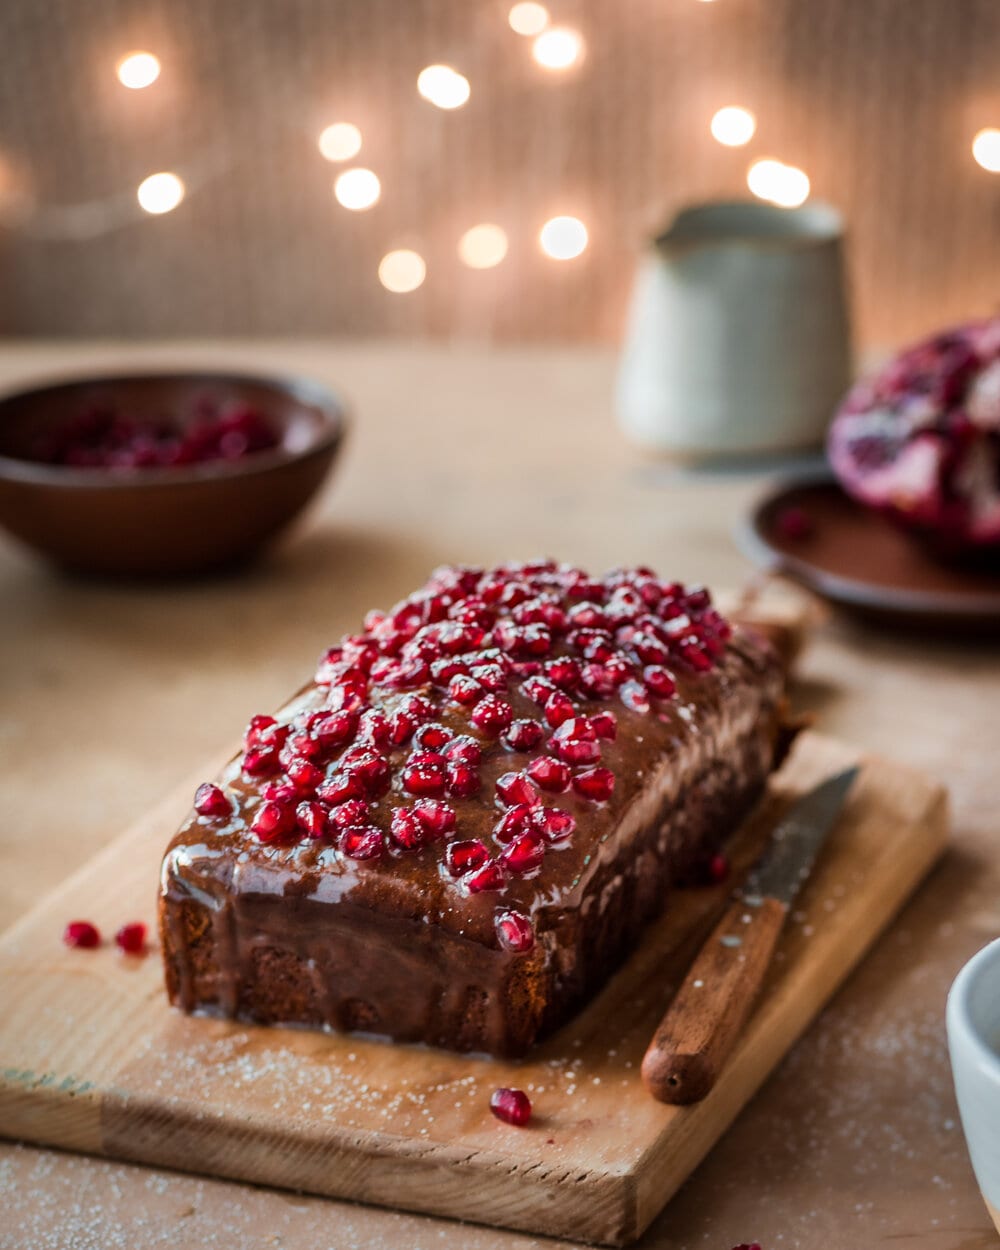
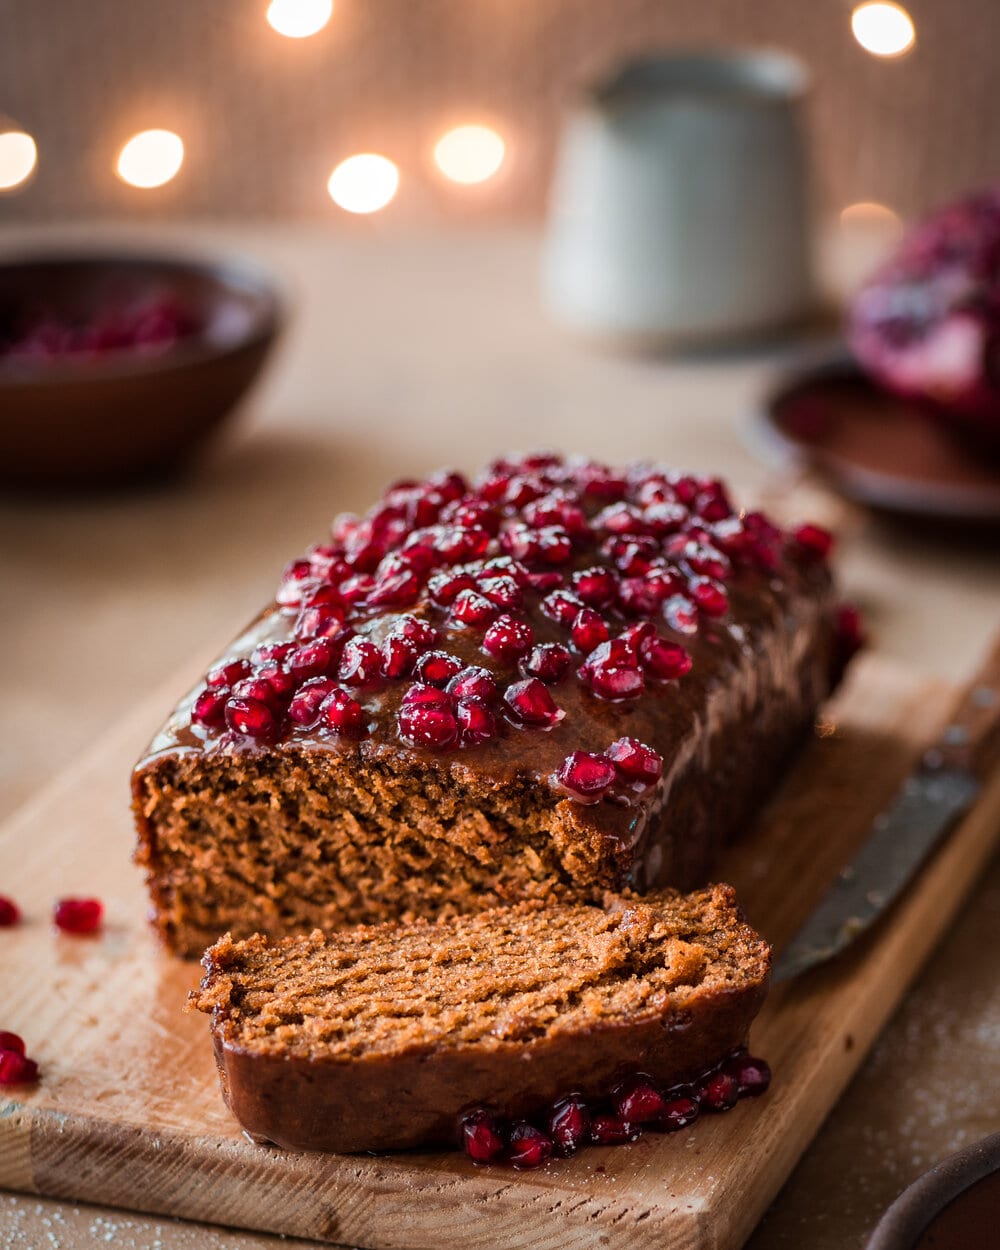
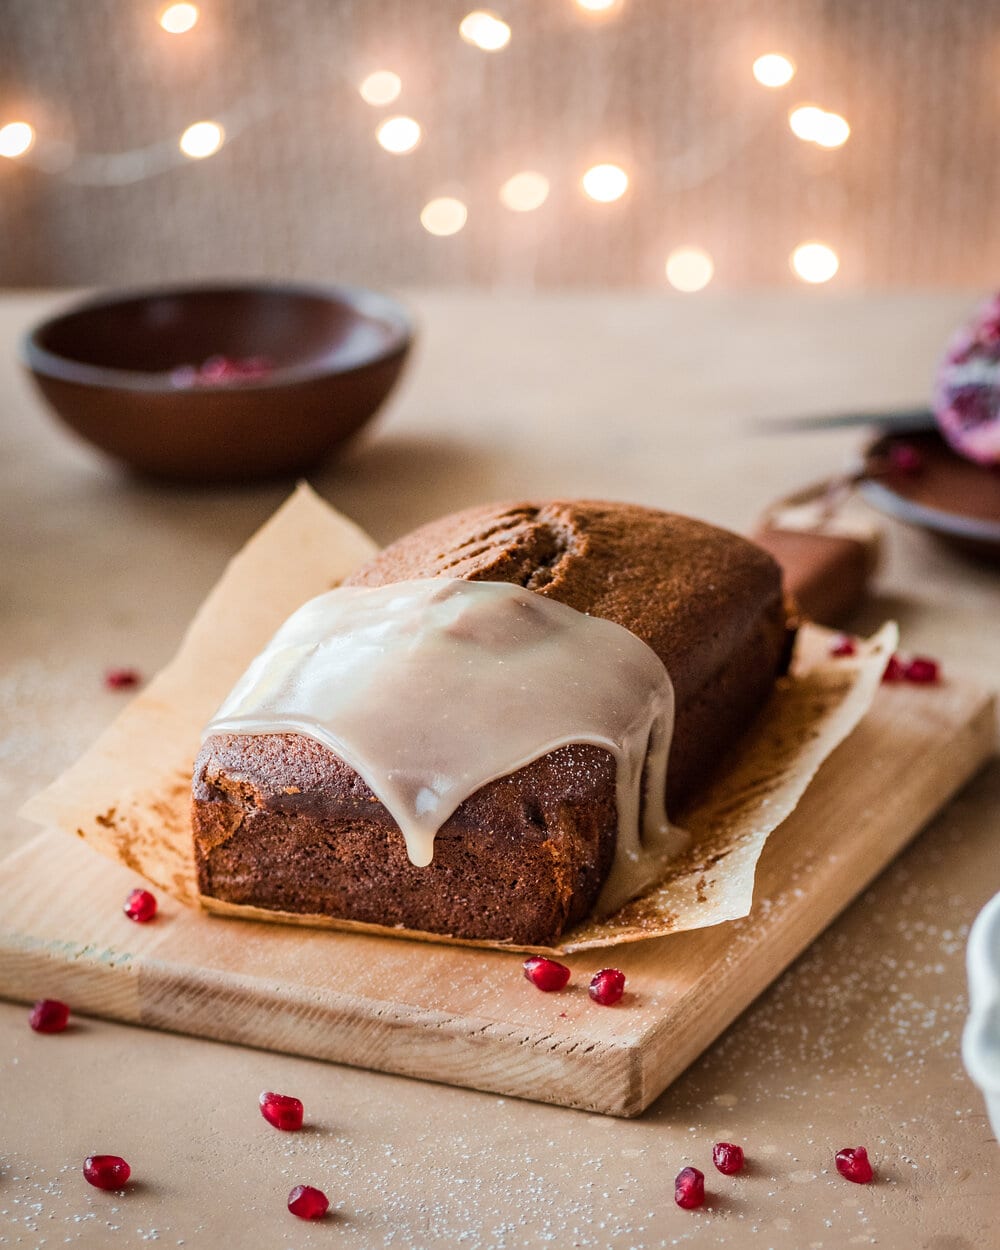
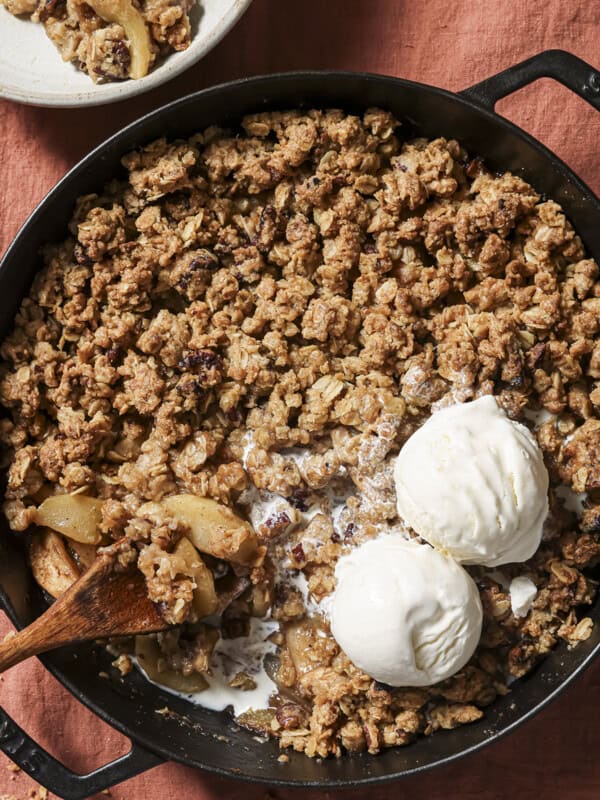
And now I’m fusing the best of those recipes to bring you this incredibly Fluffy Vegan Gingerbread Cake. The cake is so light, tender, and buttery (without any butter) that it practically melts in your mouth. And it gets finished with a decadent vanilla cream sauce that is absolutely irresistible!
Table of Contents:
1. Why this recipe works
2. Ingredient notes
3. Step-by-step instructions
4. Recipe video
5. Tips for making this recipe
6. Frequently Asked Questions
7. Recipe card with notes
Why this recipe works
Simple to make. Like many loaf cakes/quick breads, this gingerbread cake is easy to make! No expert baking skills or fancy equipment is needed.
Tender and fluffy. Most many vegan cakes, especially loaf cakes can be quite dense and heavy or dry. But this gingerbread cake is quite literally the opposite. It’s so light, tender, and fluffy that it almost melts in your mouth.
Warming and cozy. There’s a generous amount of homemade gingerbread spice that will warm you up this season!
Decadent and buttery. You could serve this gingerbread cake naked (i.e., plain) and it would be delicious. But for a truly decadent treat (it’s the holidays, after all), the vanilla cream sauce really takes this baby over the top!
And if you’ve got warming holiday treats on your mind, my rich and creamy Vegan Hot Chocolate is a must-make!
Ingredient notes
Aquafaba
The type of vegan egg substitute you use should depend on the type of baked good you’re making and your desired texture. I have a whole blog post on the topic of vegan egg substitutes in baking if you’d like to learn more!
With a cake, I want the texture to be airy and light, so I like to rely on aquafaba. Aquafaba is simply the liquid leftover from cooked or canned chickpeas. When you lightly whip aquafaba, as is done in this recipe, it turns foamy and light. This helps to create a light and fluffy texture and gives a nice lift to cakes.
The first time I made this recipe, I didn’t use aquafaba, and the batter was so much denser, so it really does make a world of a difference!
Molasses + Coffee
Molasses is an essential ingredient in a gingerbread cake, but I want to offer a few caveats. First, please use regular molasses, not the blackstrap variety. While blackstrap molasses is very healthy (it’s rich in iron, calcium, magnesium), it is not great for baking.
Molasses is the sticky syrup leftover when sugar has been boiled. The first boil yields a light colored, sweeter molasses. Blackstrap molasses is the result after the third boil, when the sugar is gradually extracted. That’s why blackstrap molasses is very strong in taste, quite bitter, and not very sweet at all.
Blackstrap molasses is better used in savory dishes, such as barbecue sauce or beans. Or, if you want to use it to make a healthy beverage, such as this gingerbread hot chocolate.
The second caveat is that molasses is very thick and goopy, which makes it hard to incorporate into cake batter. It can also make for a cake batter that’s too dense. That’s why I mix the molasses with hot coffee. It thins out the molasses texture while retaining its robust, warm and sweet flavor. But it also brings a nutty, spiced, almost chocolatey flavor from the coffee.
Step-by-step instructions
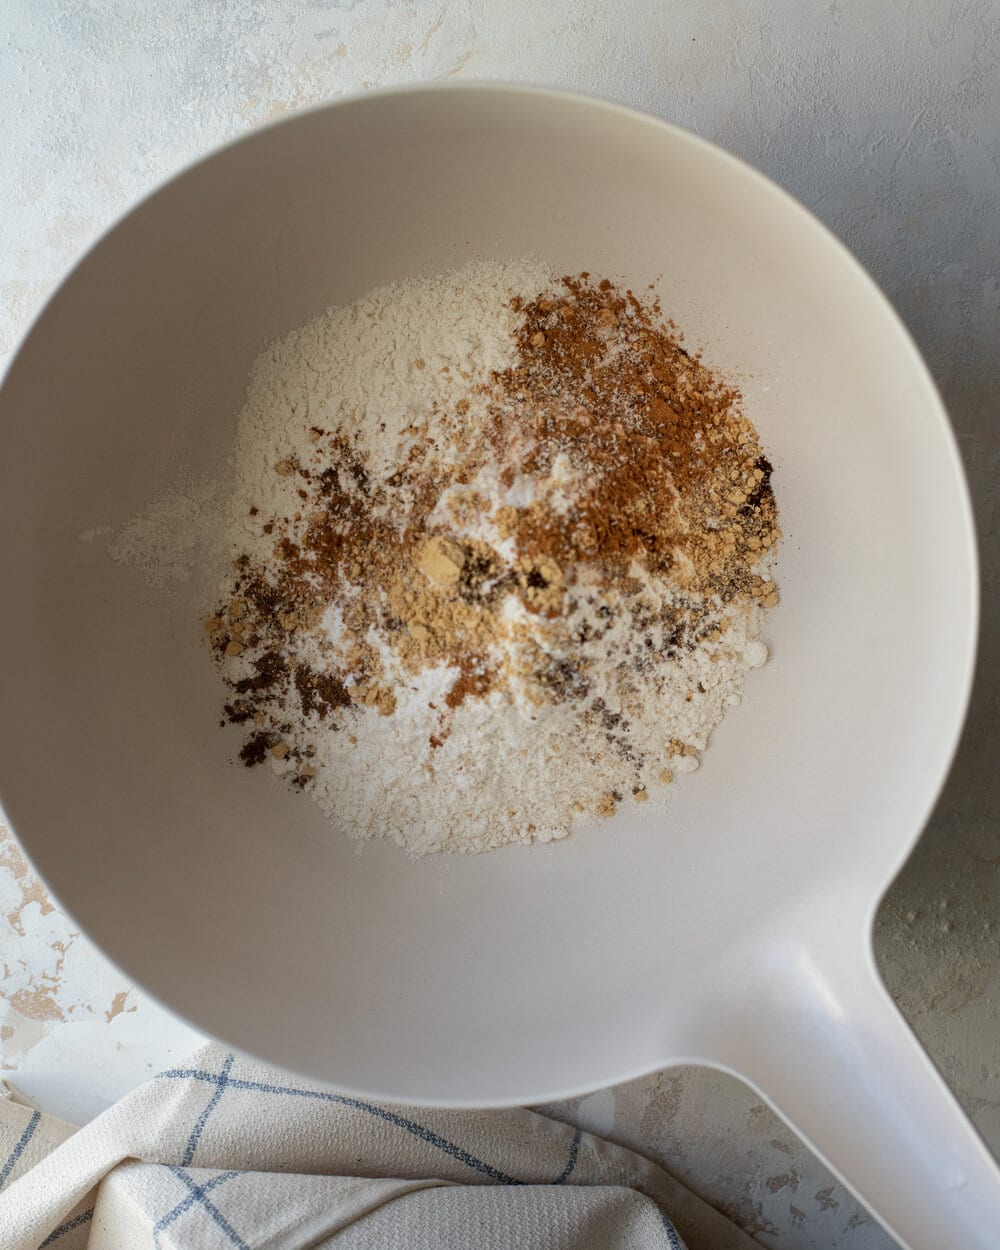
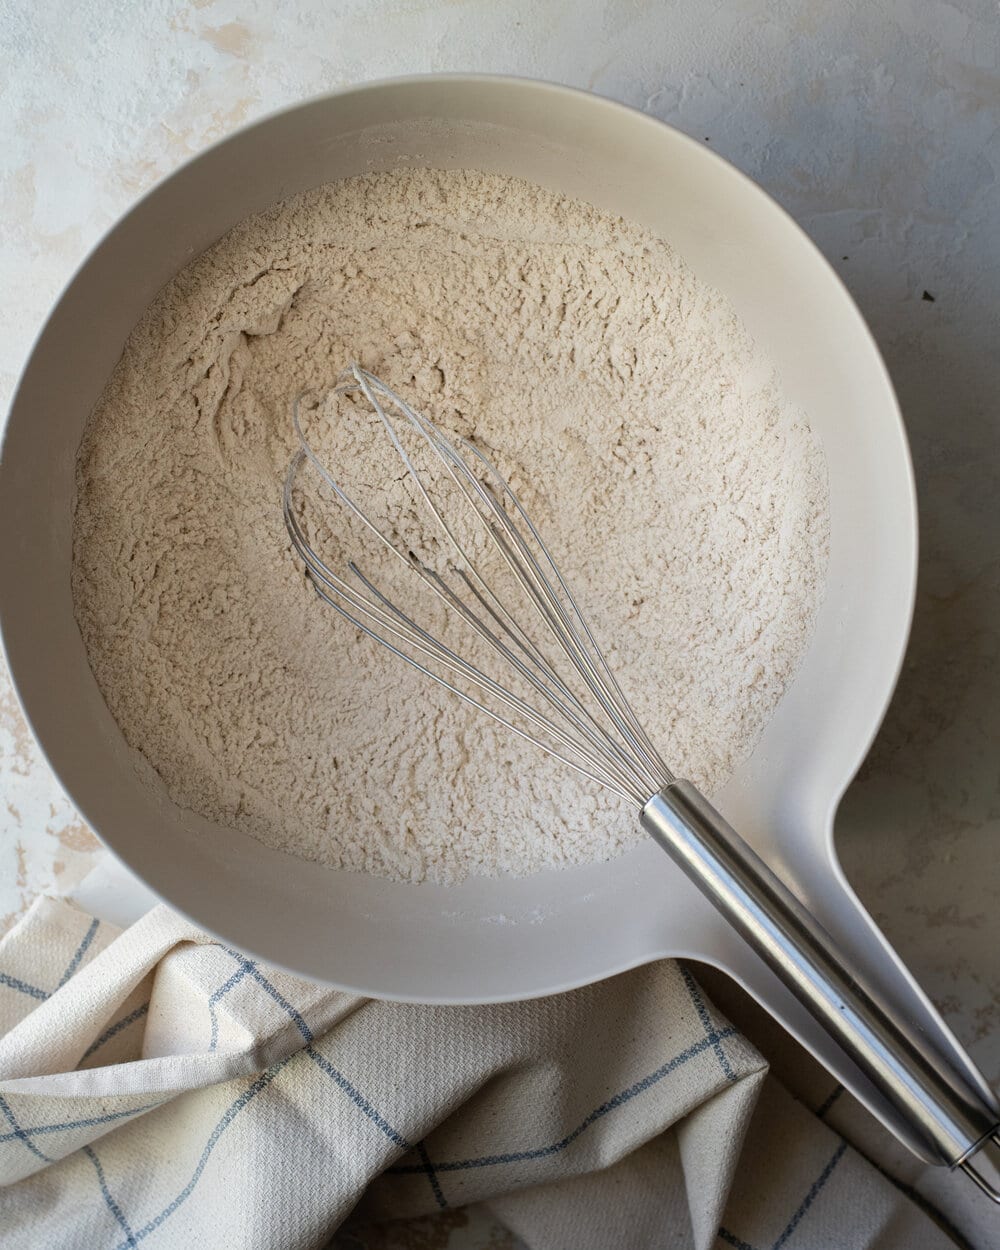
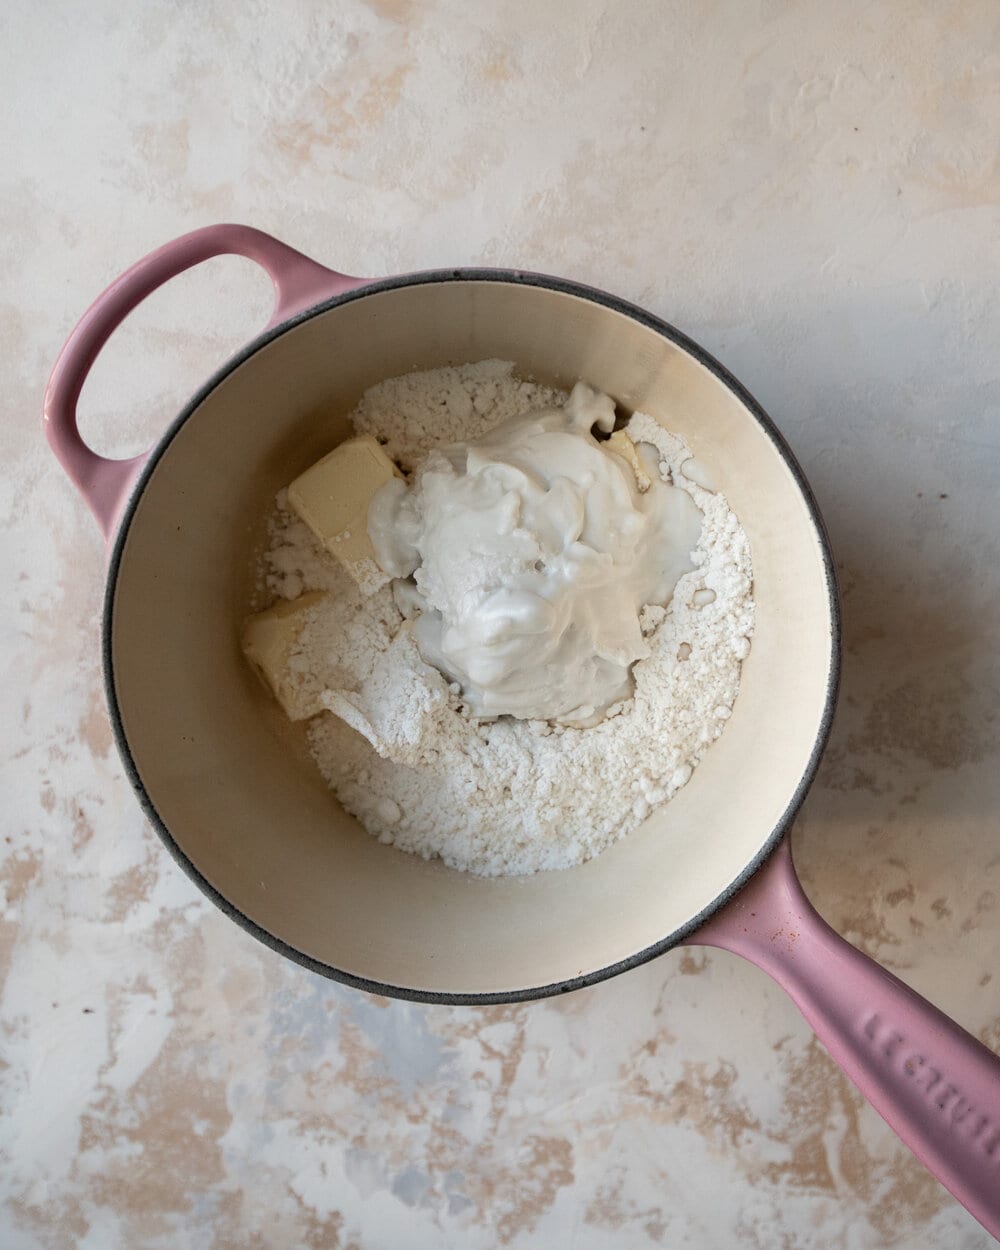
Combine the dry ingredients in a large bowl: flour, baking soda, salt, ginger, cinnamon, nutmeg, allspice, and cloves.
Whisk the dry ingredients until well combined.
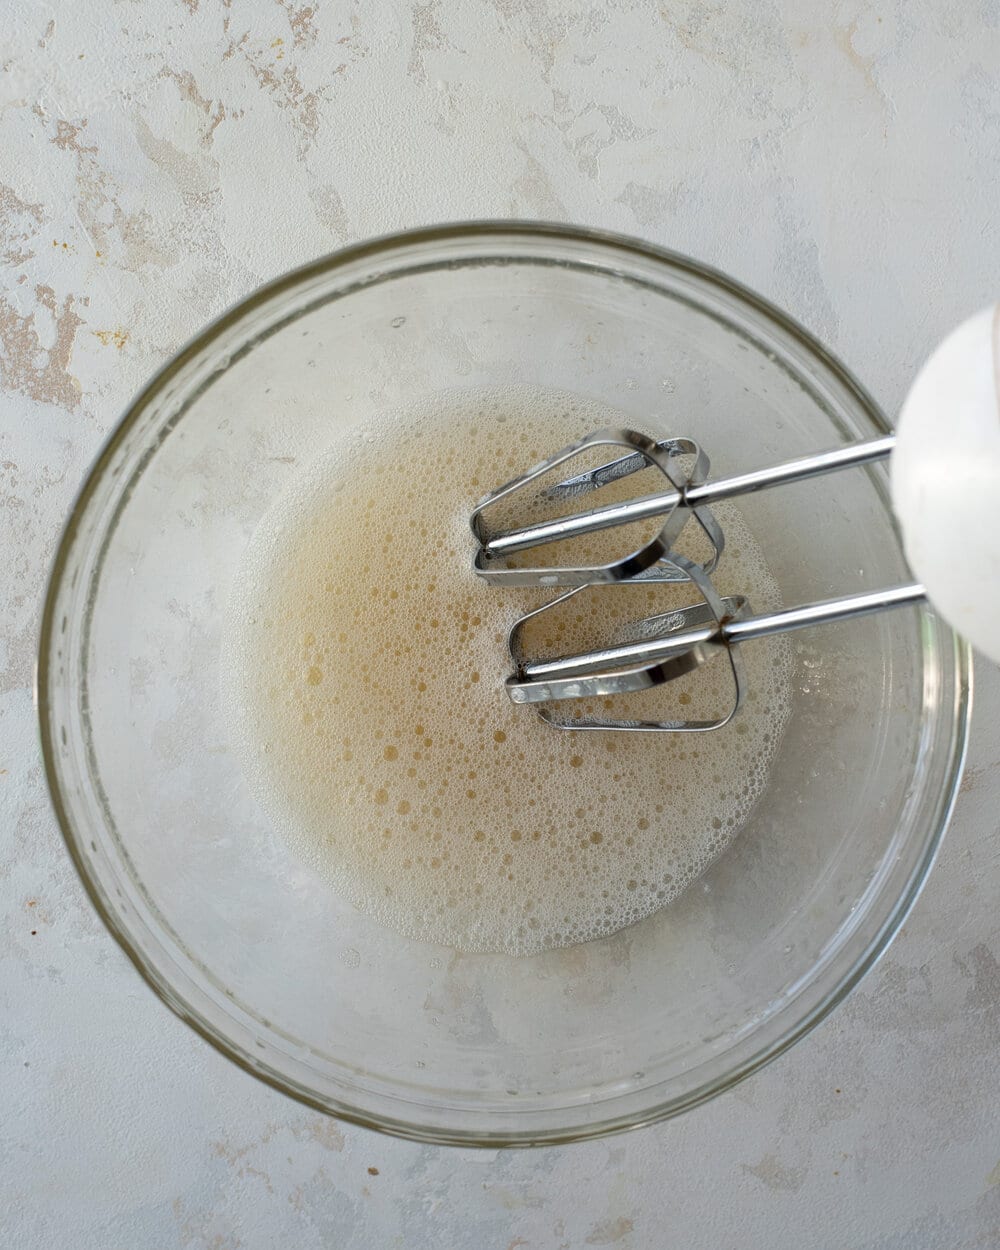
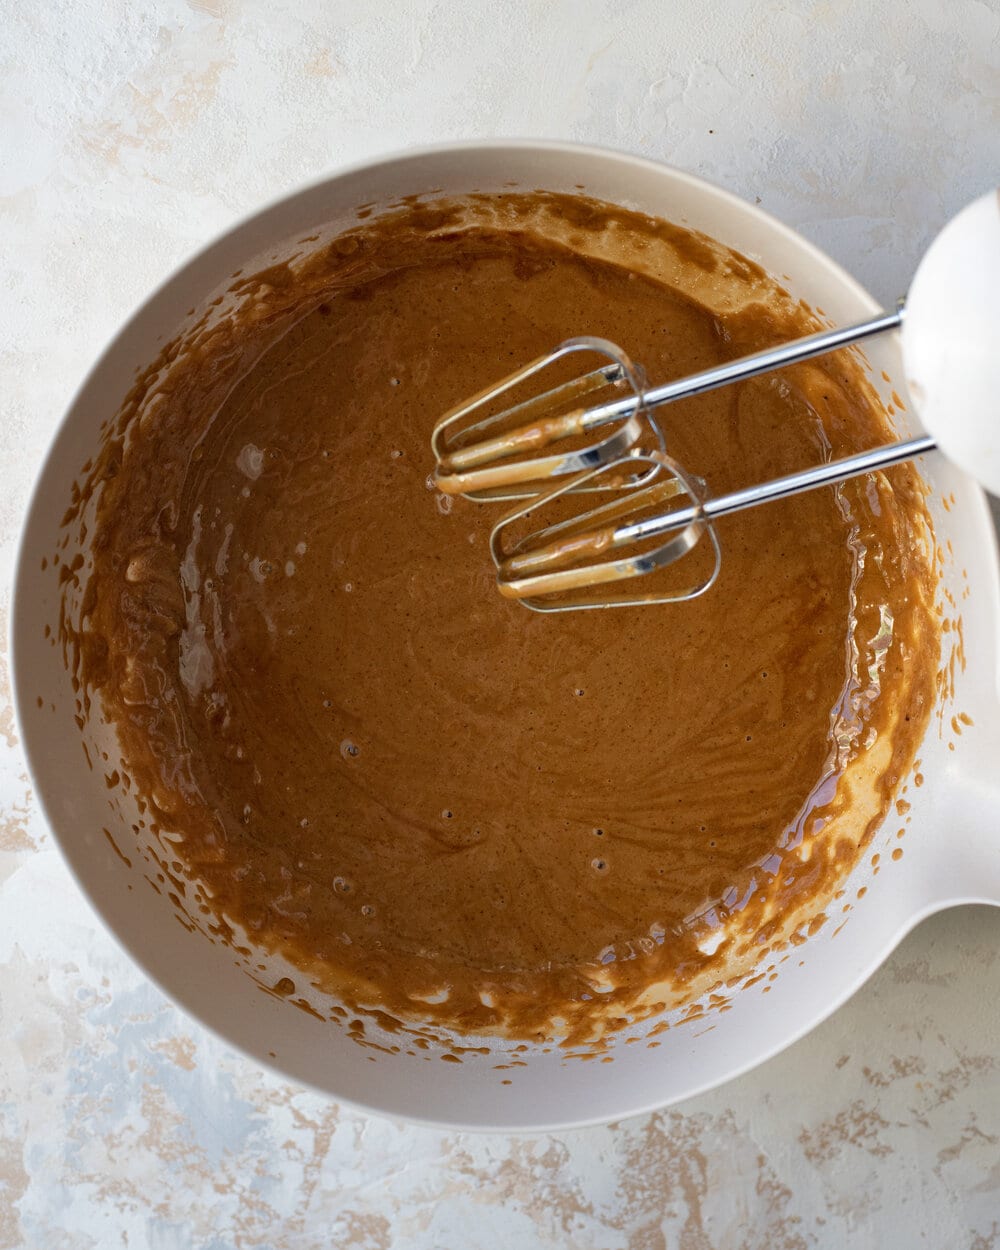
Whip the aquafaba with an electric mixer until uniformly foamy.
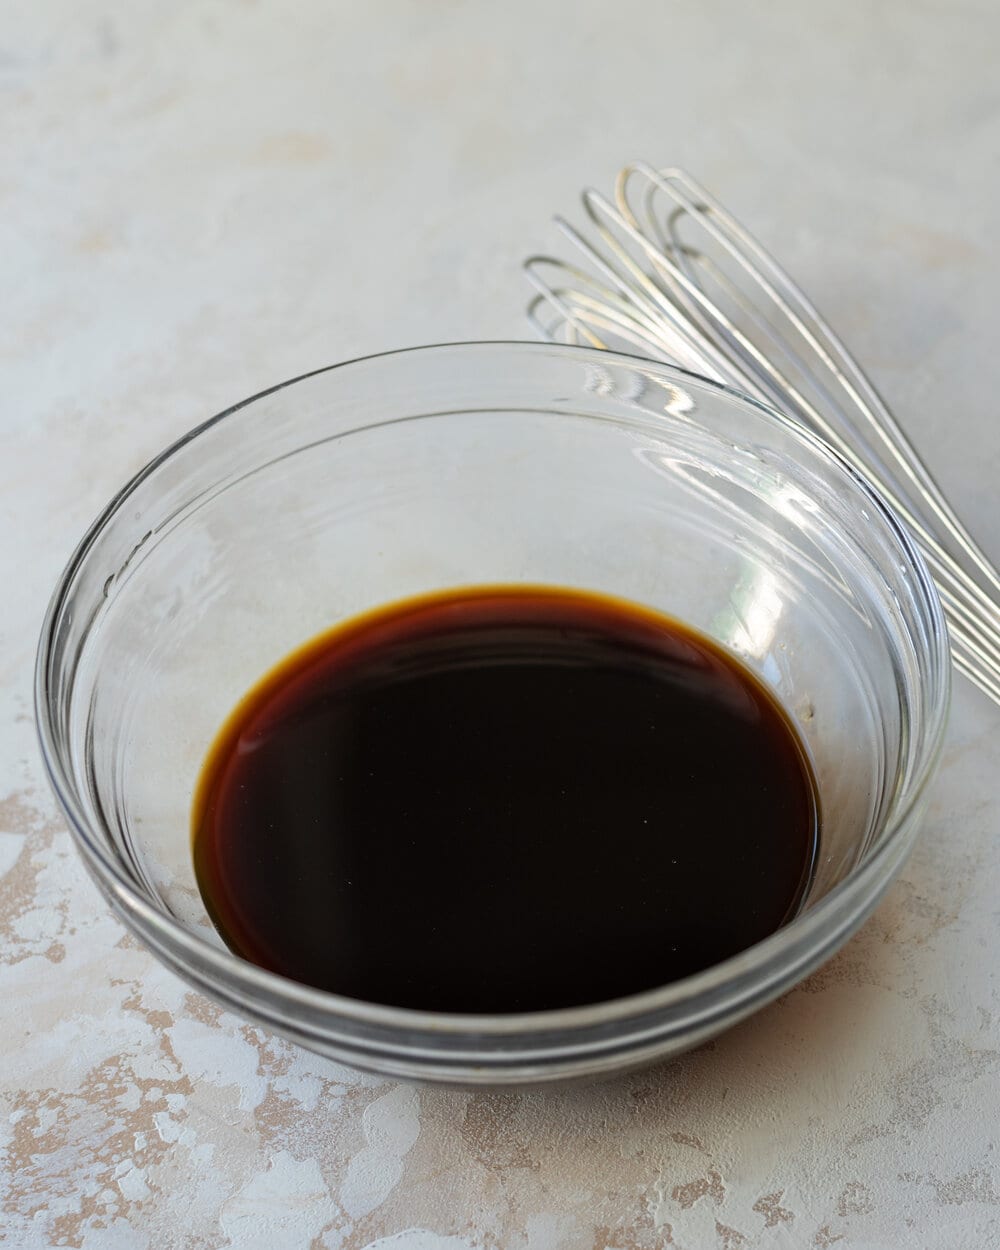
Mix together the molasses and hot coffee and whisk until well combined.
Make a well in the center of the dry ingredients. Add the whipped aquafaba, oat milk, oil, brown sugar, vanilla, and molasses- coffee mixture.
Using low speed, mix the dry and wet ingredients until just combined.

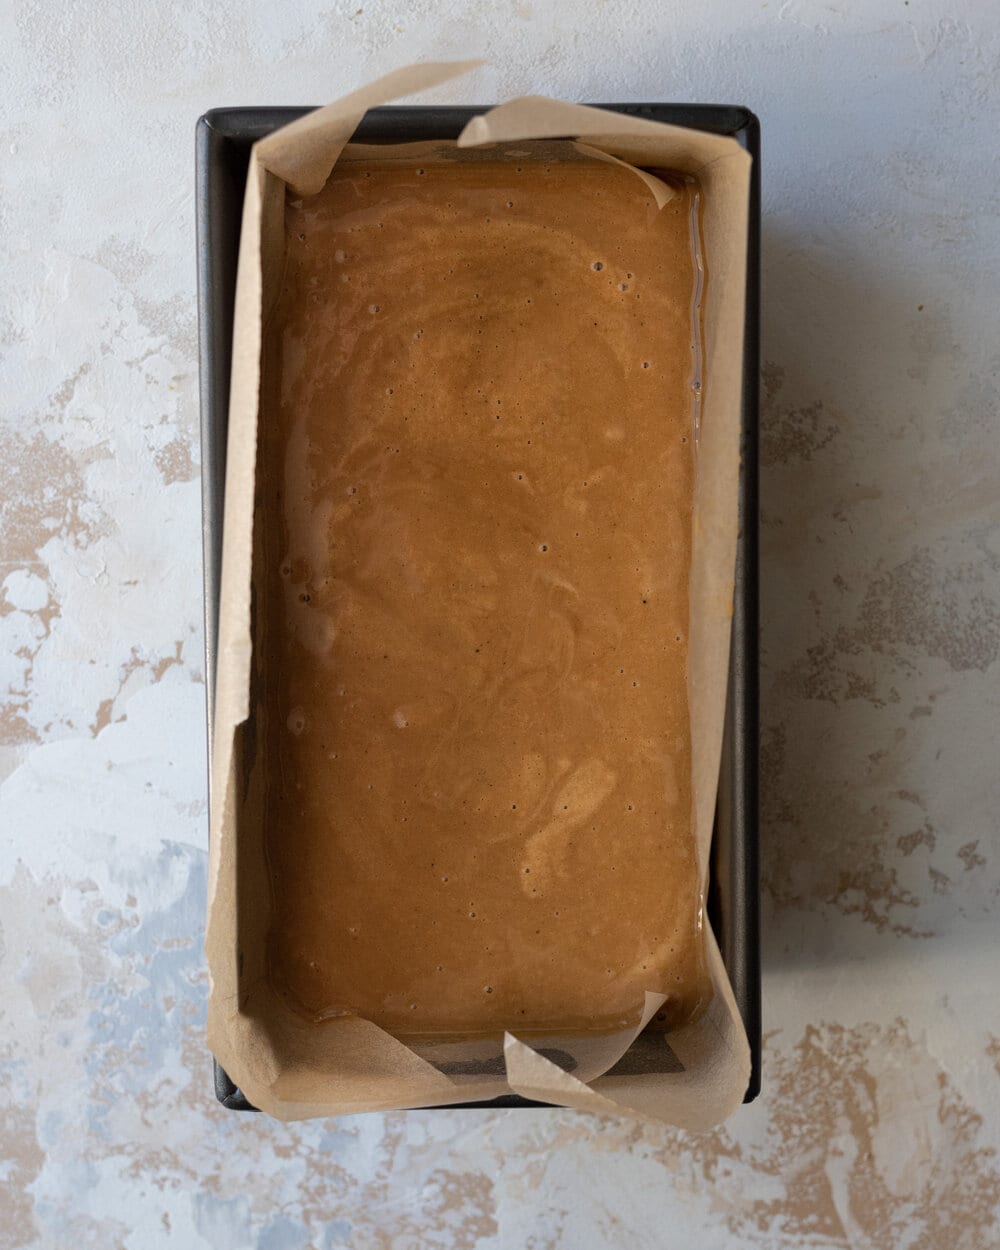
Pour the cake batter into a lined loaf pan.
Bake at 350F for 50-55 minutes, or until a toothpick inserted in the top sides of the cake comes out mostly clean with a few moist crumbs.
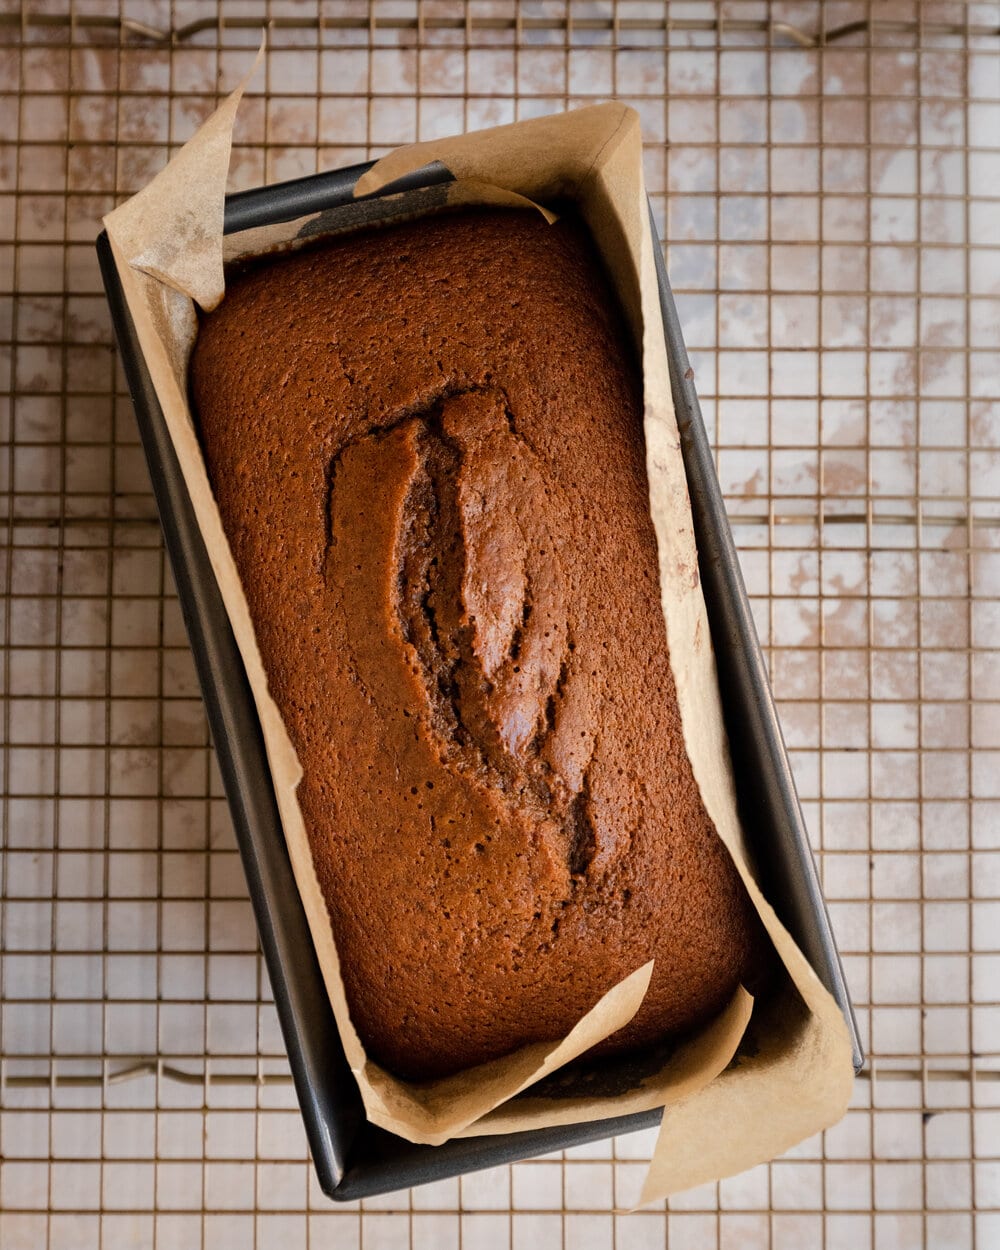
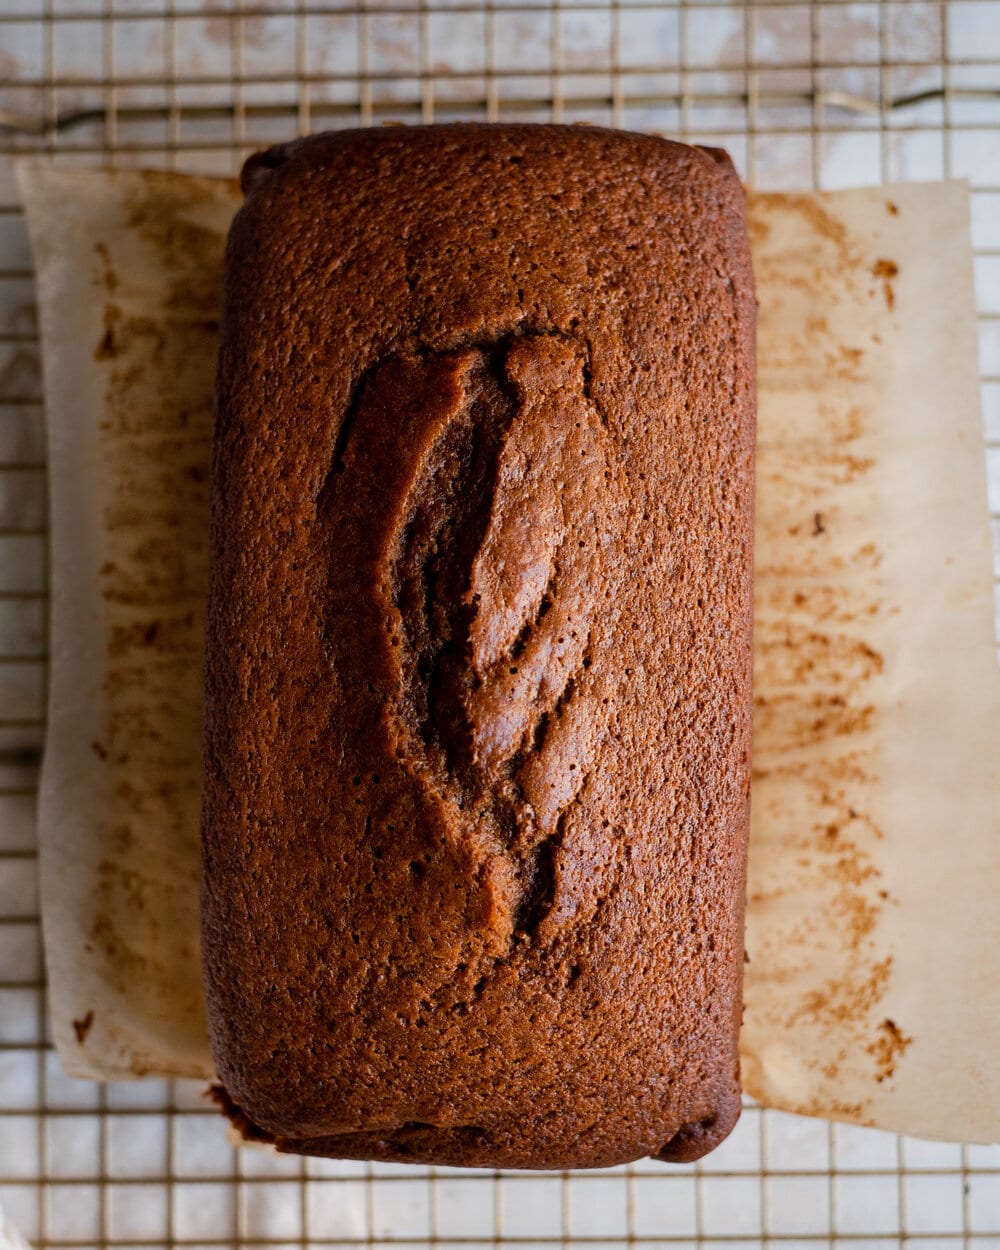
Cool the cake on a wire rack, then lift the loaf out of the pan to cool completely.
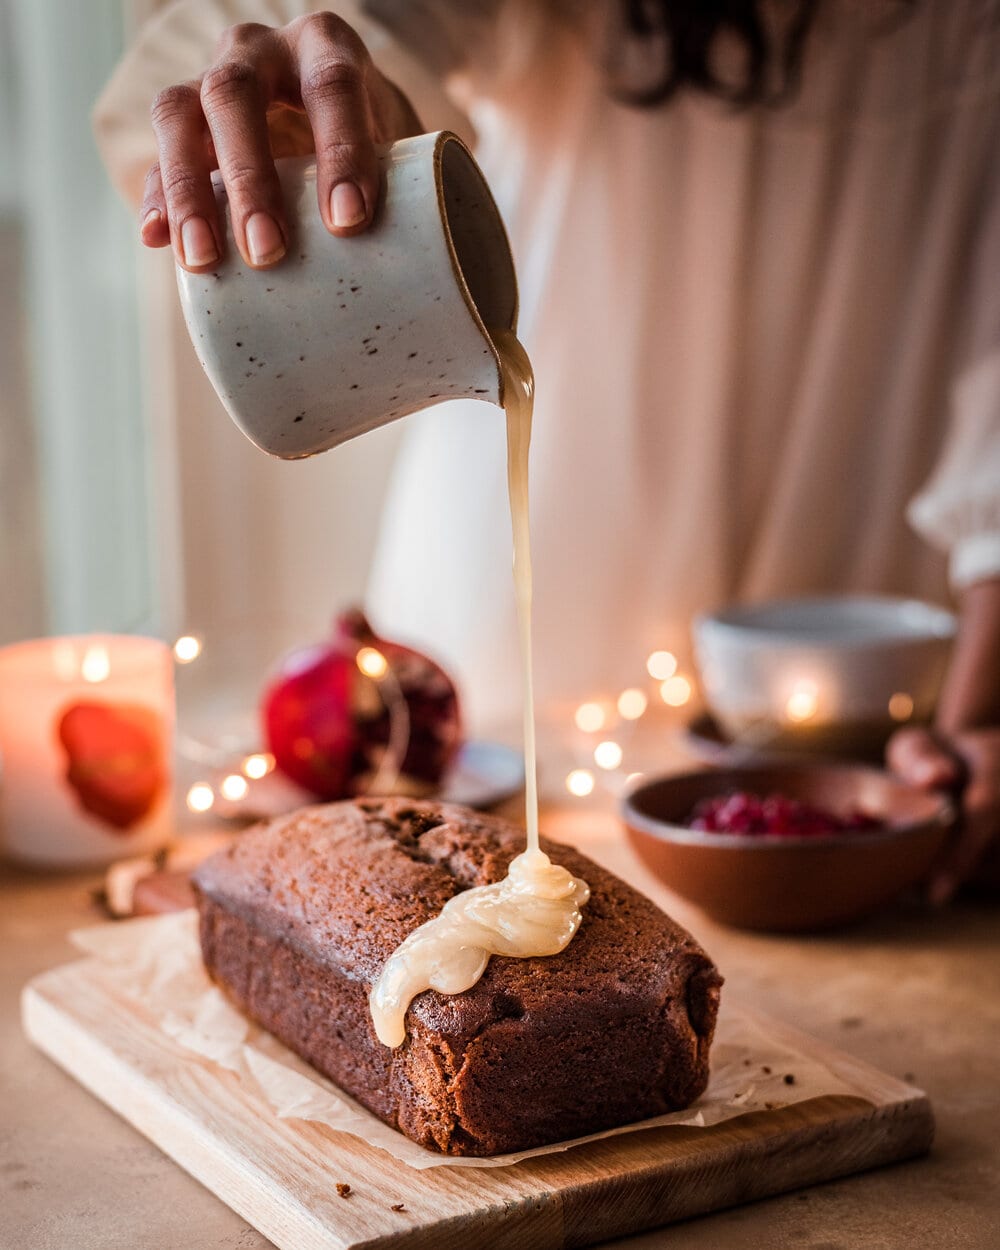
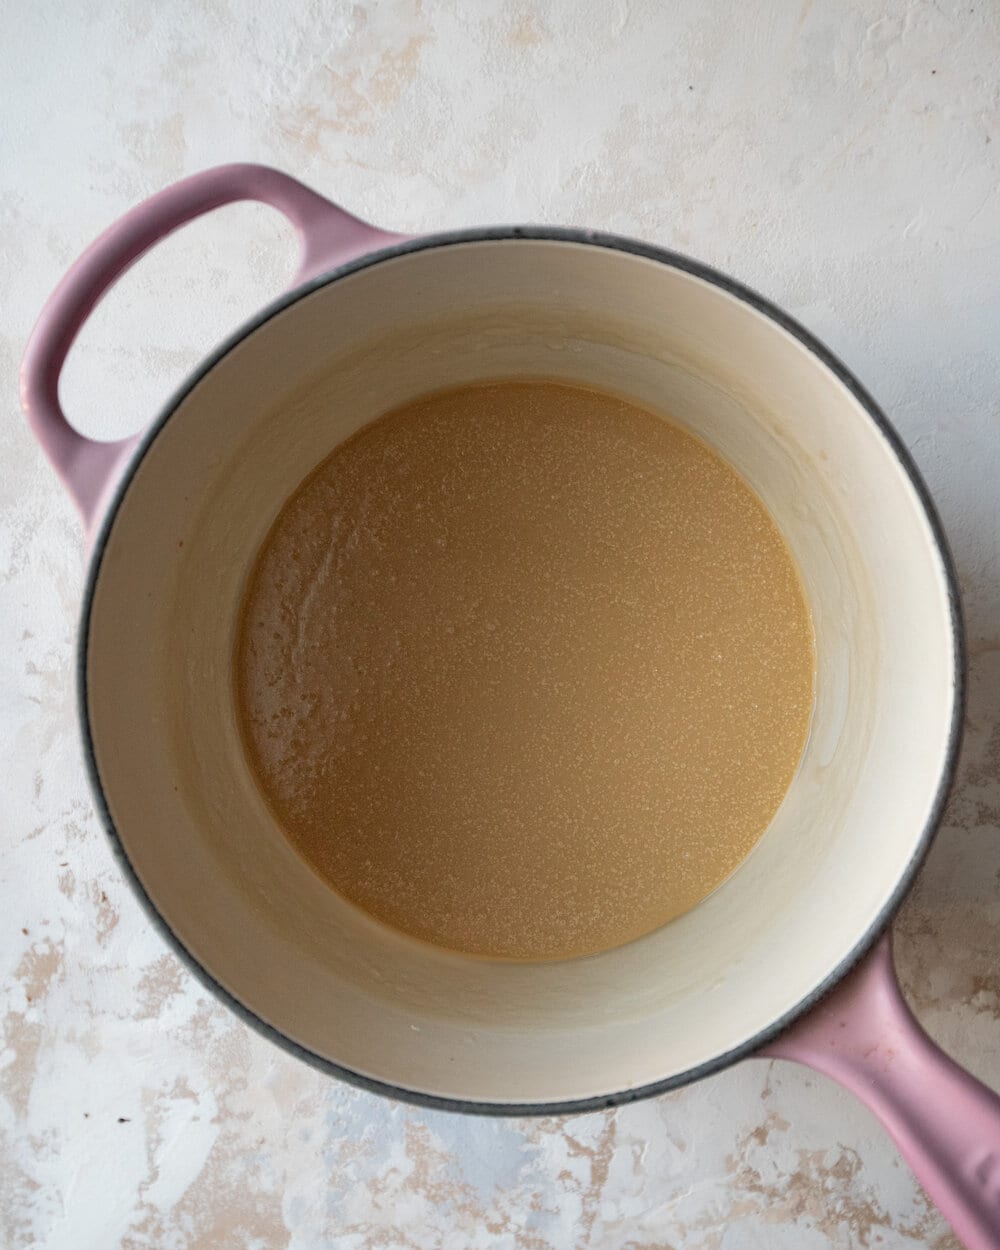
While the cake is cooling, make the Vanilla Cream Sauce. Add the powdered sugar, vegan butter, and coconut cream to a small saucepan. Cook until the butter melts, then bring to a boil and boil, whisking frequently, for 3 minutes.
Off the heat, stir in the salt and vanilla.
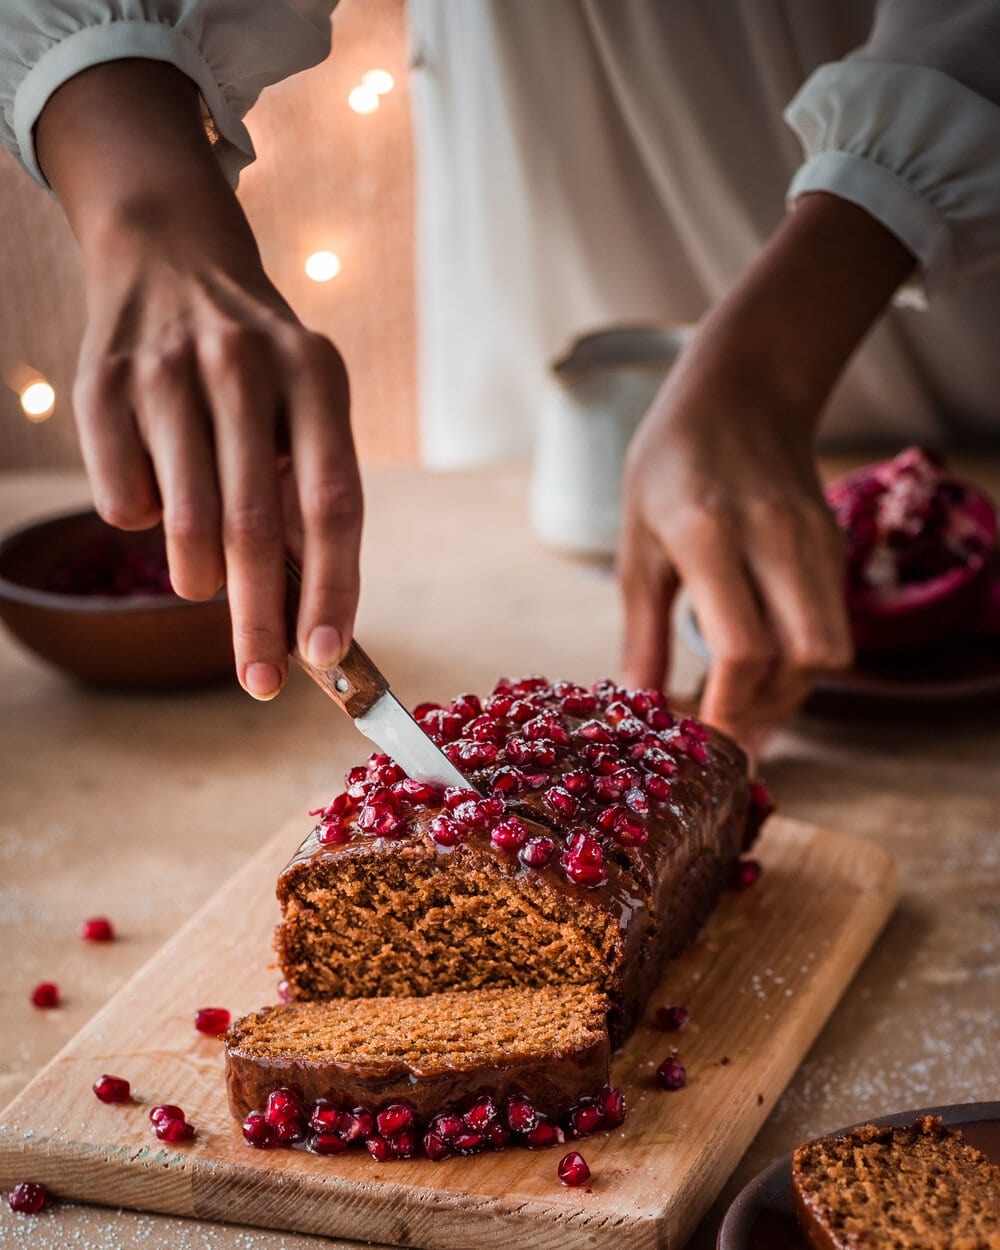
Drizzle the cake with the vanilla cream sauce.
Recipe video
Tips for making this recipe
I recommend using unsulphured molasses, not blackstrap molasses (it’s bitter). See the “ingredient notes” section above for more notes.
I recommend using freshly grated nutmeg instead of ground. It makes a noticeable difference in baked goods. It’s sweeter, spicier, and more potent in flavor. Many readers have made one of my pumpkin desserts and have reported that the fresh nutmeg really does make a difference.
Use a digital scale and/or measure your flour properly. I am a strong proponent of using a digital scale for all baking purposes, as it yields the most exact results.
But if you don’t have a digital scale, please do not scoop the flour straight out of the bag or container. This always results in getting too much flour in your measuring cup, and too much flour = dry baked goods.
Typically, when you scoop 1 cup of flour straight out of the bag/jar, you’re actually scooping closer to 1 1/4 cups in grams. In this recipe, that means, instead of using 2 cups of flour, you’re getting 2 1/2 cups of flour (not an insignificant difference).
Instead, use the spoon and level method. Spoon your flour out of the bag/jar into the measuring cup until almost full, then use a butter knife to level it off.
No overmixing! Once the wet and dry ingredients are just incorporated, stop mixing. The batter doesn’t need to be (and shouldn’t be) smooth. Lumps are okay because loaf cakes are rustic! Overmixing is one of the most common baking mistakes, and it can cause the gluten to overdevelop. This can result in cakes that are dry, tough, dense, or gummy.
I use a standard 9×5-inch loaf pan (23×13 cm), but if your pan is slightly smaller (e.g., 8×4-inch), you might need to add an extra five minutes to the bake time.
Get an oven thermometer and allow adequate time to preheat! Every oven is different, and if yours hasn’t been calibrated, chances are it’s a bit off. Plus, most home ovens don’t reach the stated temperature when the preheat cycle is over.
Use a toothpick for doneness. To test whether a loaf cake is done, insert a toothpick in the top sides of the cake (insert the toothpick at an angle, not straight down). This angled position is a much more reliable indicator of whether a loaf cake is baked through. If there are just a few moist crumbs, the cake is done.
I like to check the cake at 45 minutes and insert a toothpick in. If the toothpick reveals batter that is still a bit gooey, return the pan to the oven for 5-10 more minutes. If you’re worried about the top overbrowning, you can loosely tent the pan with aluminum foil.
Every oven is different, but I’ve found that 50-55 minutes is the sweet spot for me.

Frequently Asked Questions
Yes. The first time I made this recipe, I didn’t use aquafaba, and the batter was so much denser, so it really does make a world of a difference! You’ll have a significantly different cake without the aquafaba. And I can’t vouch for the results.
Yes, and no. You do need to thin out the molasses. Otherwise, it’s a bit too thick and gloopy for a light and tender cake texture. But if you don’t have coffee, you can substitute with hot water. You won’t get the same rich flavor from the coffee, but the texture will be the same.
If you don’t consume caffeine or are caffeine sensitive, I recommend using decaf coffee instead of hot water for more flavor.
If you can tolerate gluten (i.e., you’re not allergic or seriously intolerant), make this recipe recipe as written with all-purpose flour! The texture will be significantly better and your taste buds will thank you.
If you are allergic to gluten and still want to make this, here’s what I’ve heard from readers: (1) use an all-purpose 1:1 gluten-free flour [I like King Arthur’s measure-for-measure flour the best (affiliate link)] or (2) use 50% all-purpose gluten-free flour and 50% almond flour.
I haven’t tried this vegan gingerbread cake with coconut sugar, but coconut sugar is usually a pretty good 1:1 substitute for brown sugar. The cake will be slightly less moist but still good.
If you’re trying to be healthyish, only make half the amount and drizzle just a small amount on top of the cake. Or you can omit it entirely.
That said, this vanilla cream sauce is really freakin good and makes this a true holiday treat.
You can store leftovers, tightly wrapped, on your counter for 2 days, or in the fridge in an airtight container for 4-5 days.
If you give this Fluffy Vegan Gingerbread Cake recipe a try, be sure to tag me on Instagram with your recreations and please comment with your feedback below!

Introducing
Big Vegan Flavor
Techniques and 150 recipes to master vegan cooking.
Fluffy Vegan Gingerbread Cake
Ingredients
Gingerbread Cake
- 2 cups (240g) all-purpose flour, spooned and leveled or weighed (see “tips section”)
- 1 teaspoon baking soda
- 1/4 teaspoon fine sea salt
Gingerbread Spice
- 1 1/2 teaspoons ground ginger
- 1 teaspoon ground cinnamon
- 1/2 teaspoon freshly grated nutmeg
- Heaping 1/4 teaspoon allspice
- Heaping 1/4 teaspoon ground cloves
- 6 tablespoons (90 mL) aquafaba (the liquid from a can of chickpeas)
- 1/2 cup (120 mL) oat milk (or other unsweetened plant-based milk)
- 7 tablespoons (105 mL) sunflower oil (or any neutral-flavored oil)
- 2/3 cup packed (125g) organic brown sugar
- 1 teaspoon pure vanilla extract
- 1/3 cup + 1 tablespoon (95 mL) unsulphured molasses (not blackstrap molasses)
- 1/3 cup (80 ml) strongly brewed hot coffee
For serving
- Vanilla Cream Sauce (recipe below)
- Pomegranate seeds (optional)
Vanilla Cream Sauce
- 1/2 cup (60g) organic powdered sugar
- 4 tablespoons (56g) vegan butter
- 1/2 cup (110g) coconut cream*
- 1/2 teaspoon pure vanilla extract
- 1 pinch sea salt
Instructions
Gingerbread Cake Directions
- Preheat the oven to 350°F/176°C. Arrange a rack in the bottom third or middle of the oven. Line a 9×5-inch (23×13 cm) loaf pan with parchment paper, letting the excess hang over the long sides to form a sling.
- In a large bowl, combine the flour, baking soda, salt, ginger, cinnamon, nutmeg, allspice, and cloves. Whisk well to ensure the baking soda is evenly mixed in.
- Pour the aquafaba into a small bowl. Using a handheld electric mixer or stand mixer, whip the aquafaba on medium speed for 45-60 seconds, or until uniformly foamy.
- Make a well in the center of the dry ingredients. Add the whipped aquafaba, oat milk sunflower oil, brown sugar, and vanilla.
- Wipe out the bowl used for the aquafaba. Pour the molasses and hot coffee into the bowl, and whisk until well combined. Pour into the well with the liquid ingredients.
- Using your electric mixer on slow speed, combine the dry and wet ingredients just until combined, scraping down the sides of the bowl with a rubber spatula. Stop mixing as soon as the batter comes together – do not overmix. It’s okay if there are some lumps.
- Pour the cake batter into the lined loaf pan and smooth the surface with a rubber spatula. Bake in the preheated oven for 50-55 minutes, until the cake is relatively firm and springs back when touched and a toothpick inserted into the top sides of the cake comes out with a few moist crumbs.
- Transfer the pan to a wire rack and cool for 10-15 minutes. Then, using the parchment paper handles, remove the bread from the pan and cool on the rack for at least 20 minutes before slicing. When ready to serve, drizzle the Vanilla Cream Sauce on top and scatter with pomegranate seeds, if using.
Vanilla Cream Sauce Directions
- Add the powdered sugar, vegan butter and coconut cream to a small or medium saucepan over medium heat. Cook, stirring occasionally, until the butter has melted.
- Bring to boil and keep at a boil for 3 minutes, stirring frequently. Remove from heat and stir in the vanilla and salt.
- Allow to cool for a few minutes before spooning over the cake.
Video
Notes
Nutrition
Nutrition information is automatically calculated, so should only be used as an approximation.


Any thoughts on timing if I bake in two 8 inch round pans?
If anyone is interested 27 minutes worked out well for two 8 inch rounds. Haven’t tasted yet but they rose nicely and look great.
Great recipe! Very tasty and tender cake. Will definately bake this again.
Great to hear, Kevin! Sorry we didn’t get to your question in time.
How did the overall result turn out compared to the loaf recipe as written?
I’ve never baked it in a loaf pan but the 8 inch rounds were perfect both in taste and texture. It was a practice bake for an upcoming birthday. I’ve learned it’s not a good idea, for me at least, to attempt a new scratch cake recipe without practicing first.
Great to hear it worked out well for you, Kevin!
I made this cake yesterday and subbed treacle for molasses (I’m from UK). I also reduced the sugar since treacle is sweeter. It came out AMAZING but still a little too sweet so next time I’ll reduce the sugar even more. I didn’t have a pomegranate handy so didn’t bother with any toppings and it really doesn’t need them, but maybe one day I’ll make the fancy version. Thank you for this awesome recipe.
We’re so happy that the gingerbread cake turned out well for you, _Kat. Thank you for taking the time to leave a comment and for trying out the recipe!
Really good cake, flavorful and super moist. People even got seconds! I think the coffee really brought out the gingerbread flavor. I didn’t make the pomegranate/cream sauce but made an impromptu pear glaze, which went well with it.
Your positive feedback is the best reward for our hard work. Thank you, Kate!
PS- that pear glaze sounds delicious!
The perfect Christmas dessert! Along with your brownies of course!
So flavorful with the creme sauce and pomegranate seeds! Was the perfect dessert!
This recipe turned out 10/10. Made it for christmas eve for a group of non vegans. No one noticed the difference. Thank you for sharing this beautiful recipe! It was so moist and delicious. I went to three different shops and all molasses were sold out, but I used 75% treacle and 25% maple and I felt it was still very yummy.
We’re over the moon to hear everyone enjoyed the recipe, Michelle. Thanks for your kind words!
I’d like to make this to take to a family gathering. Could I put the sauce and pomegranate seeds at home, or is it best to wait until it’s party time?
Hi JLW, for presentation purposes, I would wait because the icing will start to seep into the cake. That said, you can de-seed the pomegranate in advance so assembling at the gathering should take just one minute. Enjoy and happy holidays!
I made an orange glaze for the top so it would be road-trip ready to share with my family. The cake (even with the substitute glaze) was great! I’ve made two more since then for Christmas gatherings. I’ll have to try to sauce one day when I’m not traveling with the cake because it sounds wonderful, but I can report that the cake is easy to make and perfect for winter.
Sounds delicious! 🙂 Thanks for the kind words!
Delicious! These disappeared fast at my Friendsgiving!
Those words are music to our ears, Skye! Thanks for sharing!
Everyone loves this cake!
Those words are music to our ears, Lauren! 🙂
This looks so good! Do you think this would come out okay if I used chia eggs instead of aquafaba? Aquafaba isn’t good for people with IBS. If so, would you recommend using how many ever chia eggs equals six tablespoons? Thanks for the advice!
Hi K L, we don’t use chia eggs very often, so we’re not entirely sure, though we have used flax eggs instead of aquafaba in our similar pumpkin bread recipe. The pumpkin bread made with flax eggs worked fine, but the bread does turn out heavier and denser and that would likely be the case here too (the aquafaba, when lightly whipped, brings a lighter, fluffier texture). 6 tablespoons of aquafaba should be about 2 chia or flax eggs.
I’m still in the thrall of aquafaba (for good reason), and finding another fab recipe that incorporates it as a leavening and binding agent is delight.
I am notorious for not reading recipes carefully (my partner always knows I’m baking/cooking something new when, half way through the recipe, he hears me groan “oh shoot, what do you mean it has to rest for 6 hours/needs virginal Angolan salt/requires a sous vide-dehydrator-crock pot for the last step?!?! *#$%!!”… anyways, I did NOT blend the various liquids together correctly (though I did whip the aquafaba), not did I add them in the recipe order. And yet it turned out ridiculously fluffy and tasty.
The only purposeful off-script decision was to make a Whisky (Writer’s Tears) and vanilla icing instead. Pairs beautifully with the gingerbread.
Thanks for a delish recipe!
Hi Corina, thank you for sharing your experience with us. We’re so glad the gingerbread cake turned out lovely!
PS- that whisky vanilla icing sounds dang good!