

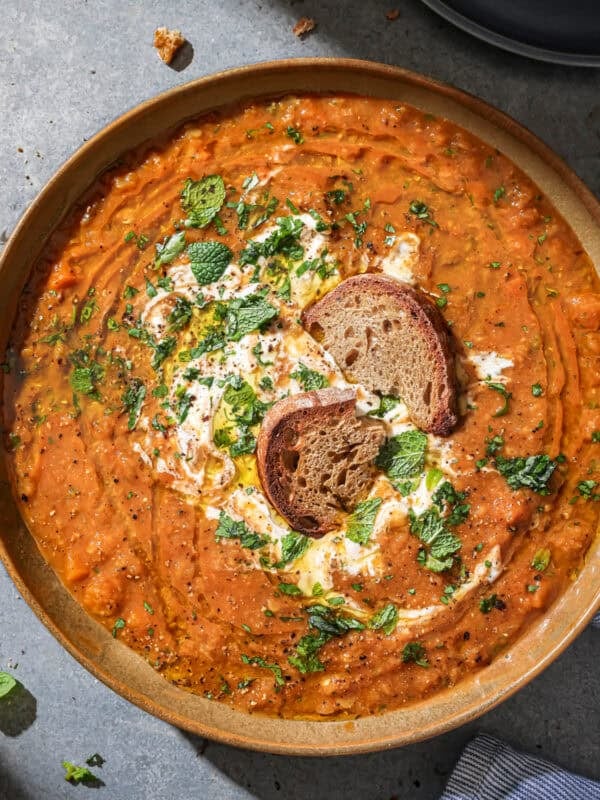
I am a self-proclaimed soup queen and have no shortage of soup recipes. But this Lemon Chickpea Soup might just be my favorite-ever soup because it’s made with mostly pantry staples yet is deceptively delicious.
The trick: half the chickpeas get pureed with lemon zest, miso, and nutritional yeast into a creamy base that makes every spoonful rich and savory. A bit of long-grain white rice naturally thickens the broth, and a big hit of fresh dill and lemon juice keeps things bright enough you’ll want to enjoy this soup all year long.
It’s the kind of soup that feels indulgent but is quietly loaded with good stuff; 16g of fiber and 20g of protein per serving, no heavy cream in sight. And it’s a meal prep dream: leftovers keep for 5+ days, and it freezes beautifully.
Table of Contents:
1. Ingredient notes
2. Step-by-step instructions
3. Tips for making this recipe
4. Frequently Asked Questions
5. Recipe card with notes

🎥 Watch the video

With over 1.4 million views on YouTube, this chickpea soup recipe is a huge hit with my community. I hope you love it just as much!
Ingredient notes
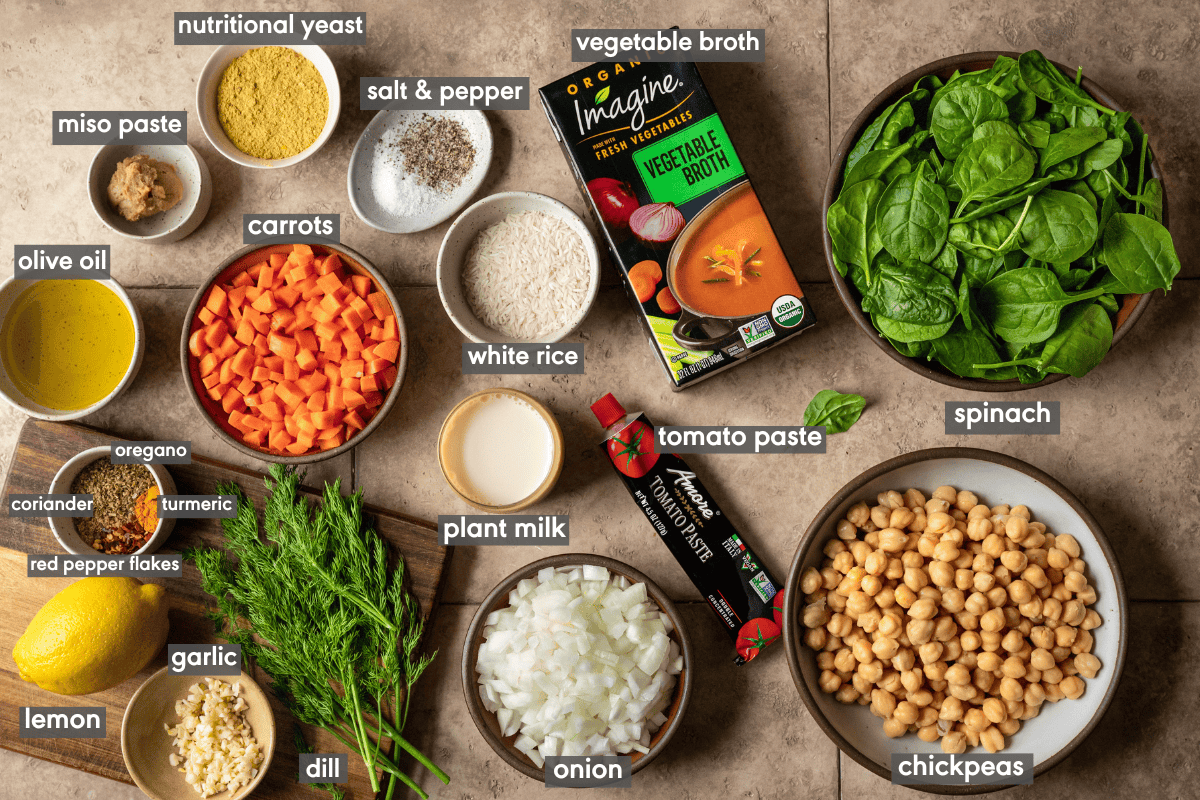
- Chickpeas. Two cans, used two ways: one simmered in the soup, the other pureed with lemon zest, miso, nutritional yeast, and plant milk into a creamy base. That puree is how you get the rich, cheesy body. Freshly cooked chickpeas make it even better if you have time (see the FAQ section for instructions), but canned chickpeas works great here.
- Long-grain white rice. A small amount thickens the soup naturally as it simmers. I’m partial to jasmine rice but any long-grain rice works. Sub: Brown rice works but needs to be pre-boiled separately (see recipe card).
- Lemon. Lots of fresh juice and zest make this soup sing so don’t skimp! A microplane and citrus juicer make quick work of it (and are two of my most-used kitchen tools!).
- Dill. I love the citrusy and grassy flavor of dill against the tart lemon. Sub: Fresh basil, flat-leaf parsley, or a blend of all three. If you end up with leftover dill, use it to whip up a batch of my Vegan Ranch Dressing or this lovely Asparagus Galette.
- Miso + nutritional yeast. The umami duo that makes the soup taste delightfully savory and cheesy so don’t skip these! Use white or mellow miso only, as darker varieties will overwhelm the soup.

Step-by-step instructions
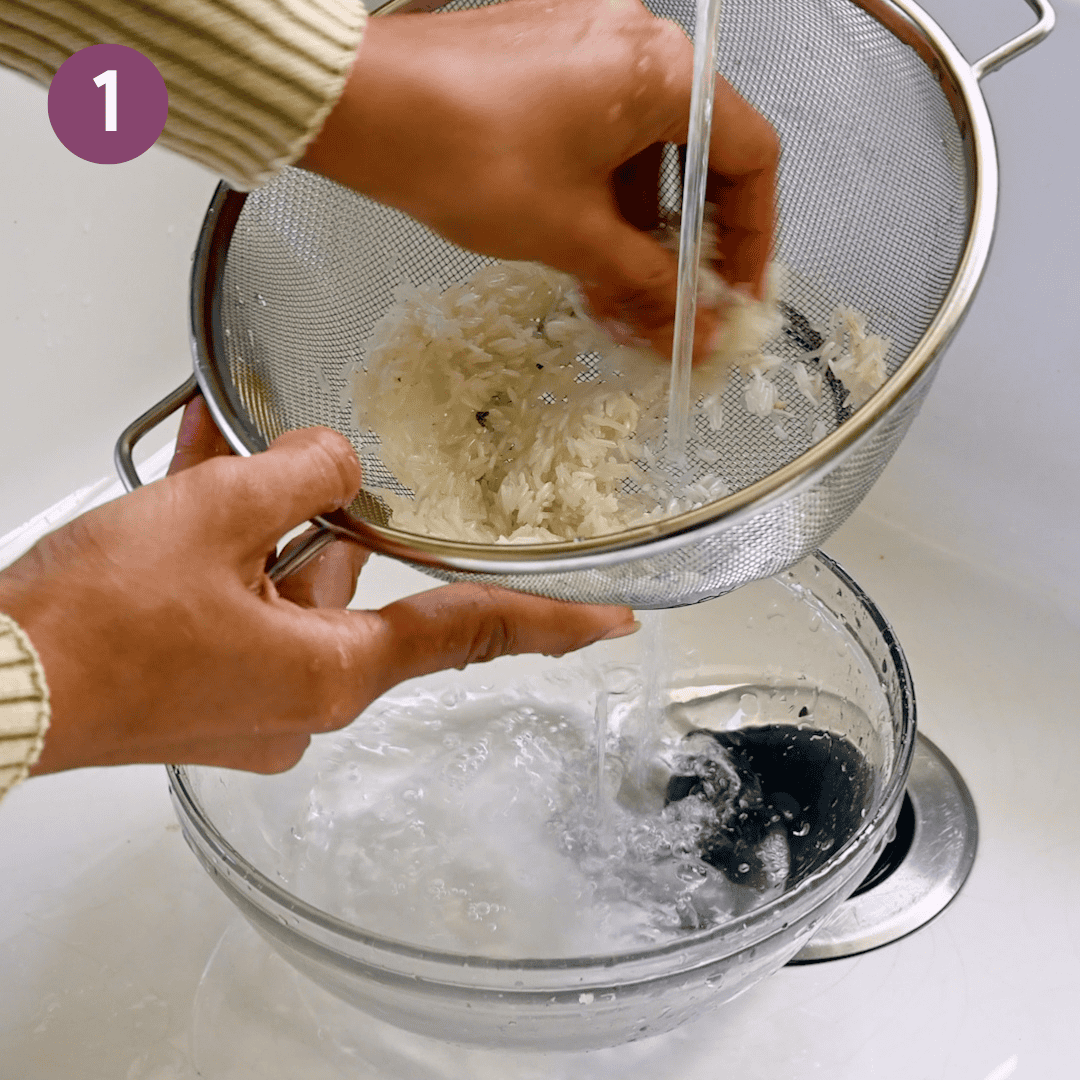
Start by rinsing the rice in a fine-mesh sieve until the water runs clear.
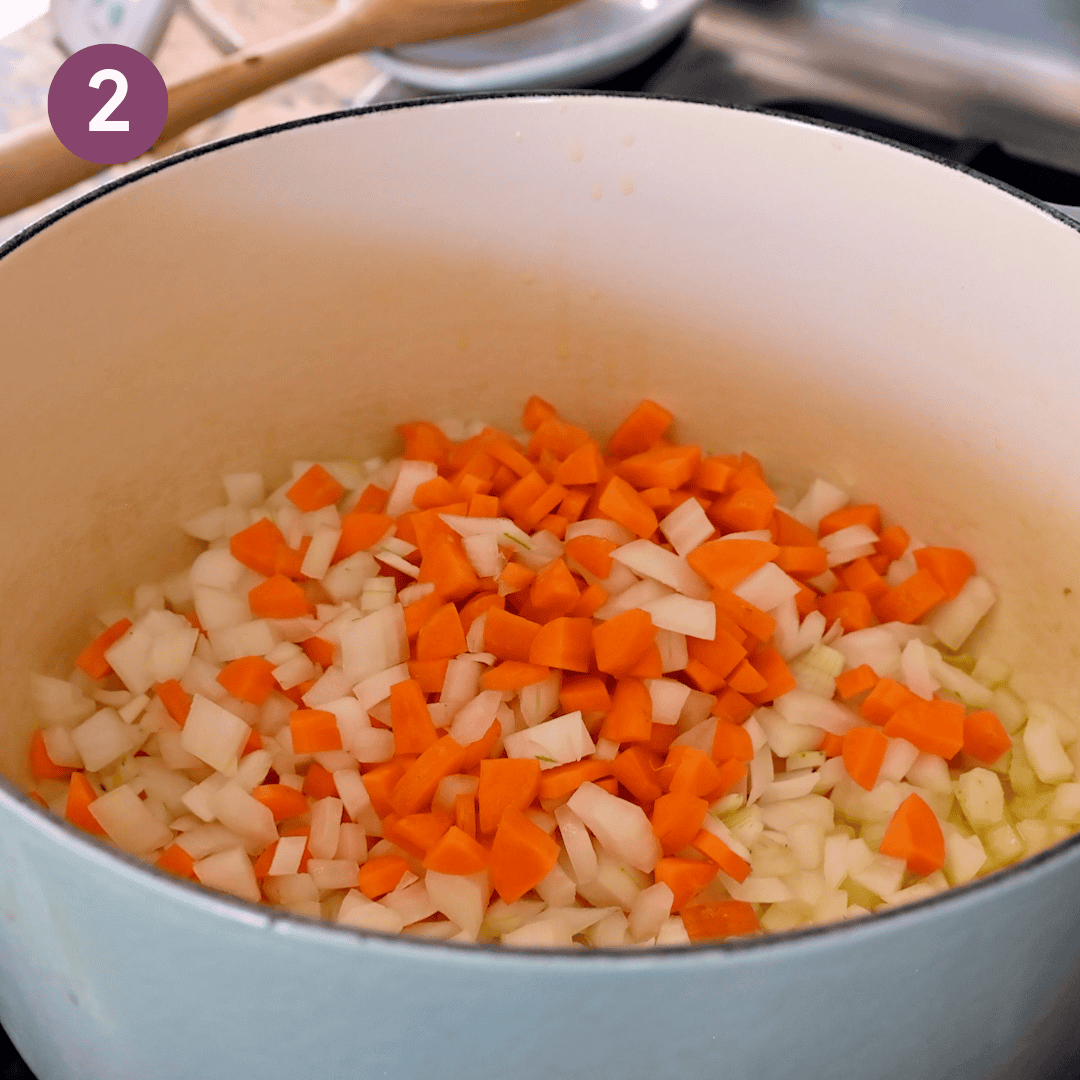
Heat the olive oil in a large saucepan or Dutch oven over medium-high heat. Once hot, add the carrot and onion and cook until they’ve softened, about 10 minutes.
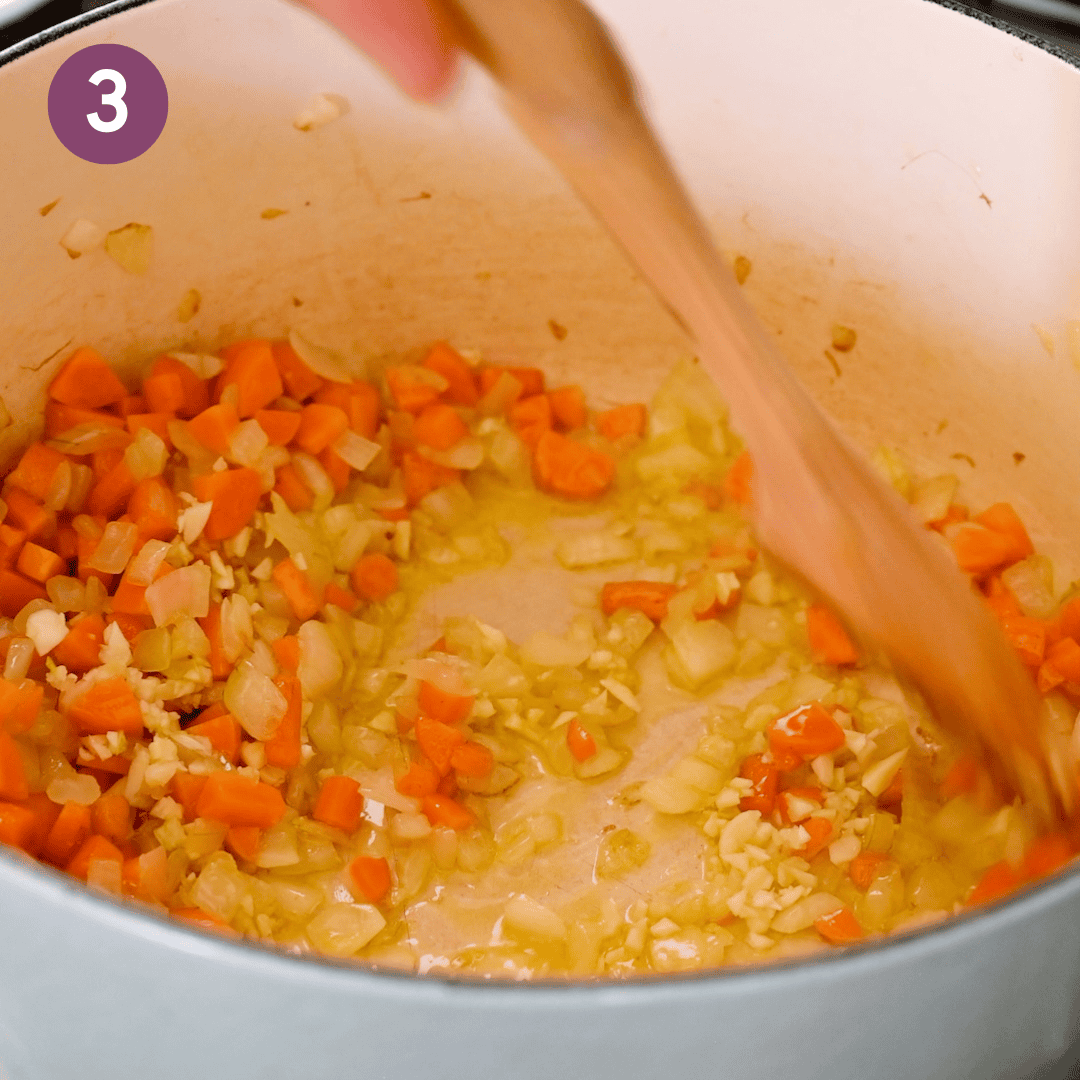
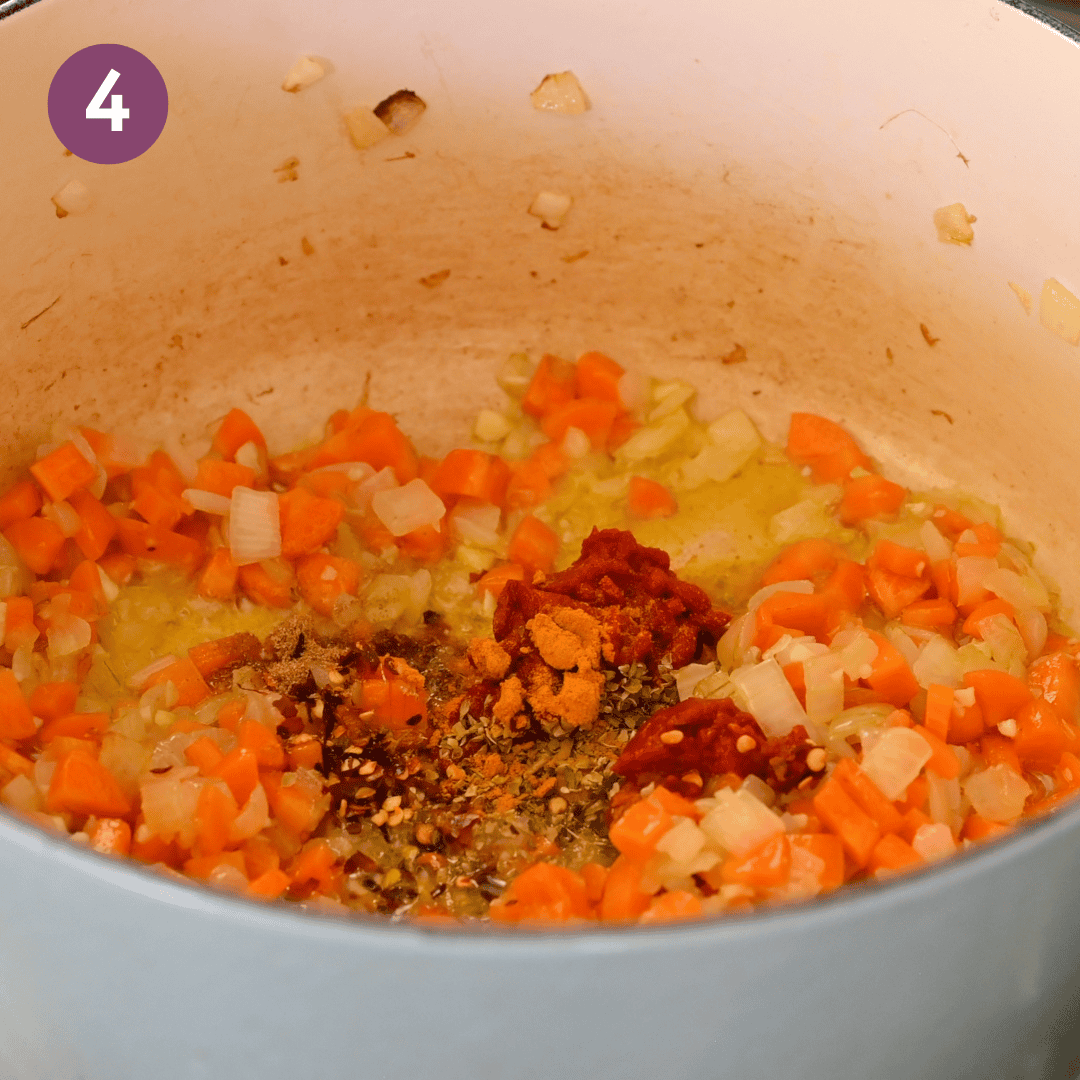
Add the garlic and cook until fragrant, stirring often. Stir in the tomato paste, oregano, coriander, turmeric, and red pepper flakes. If needed, deglaze the pot with a splash of vegetable broth.
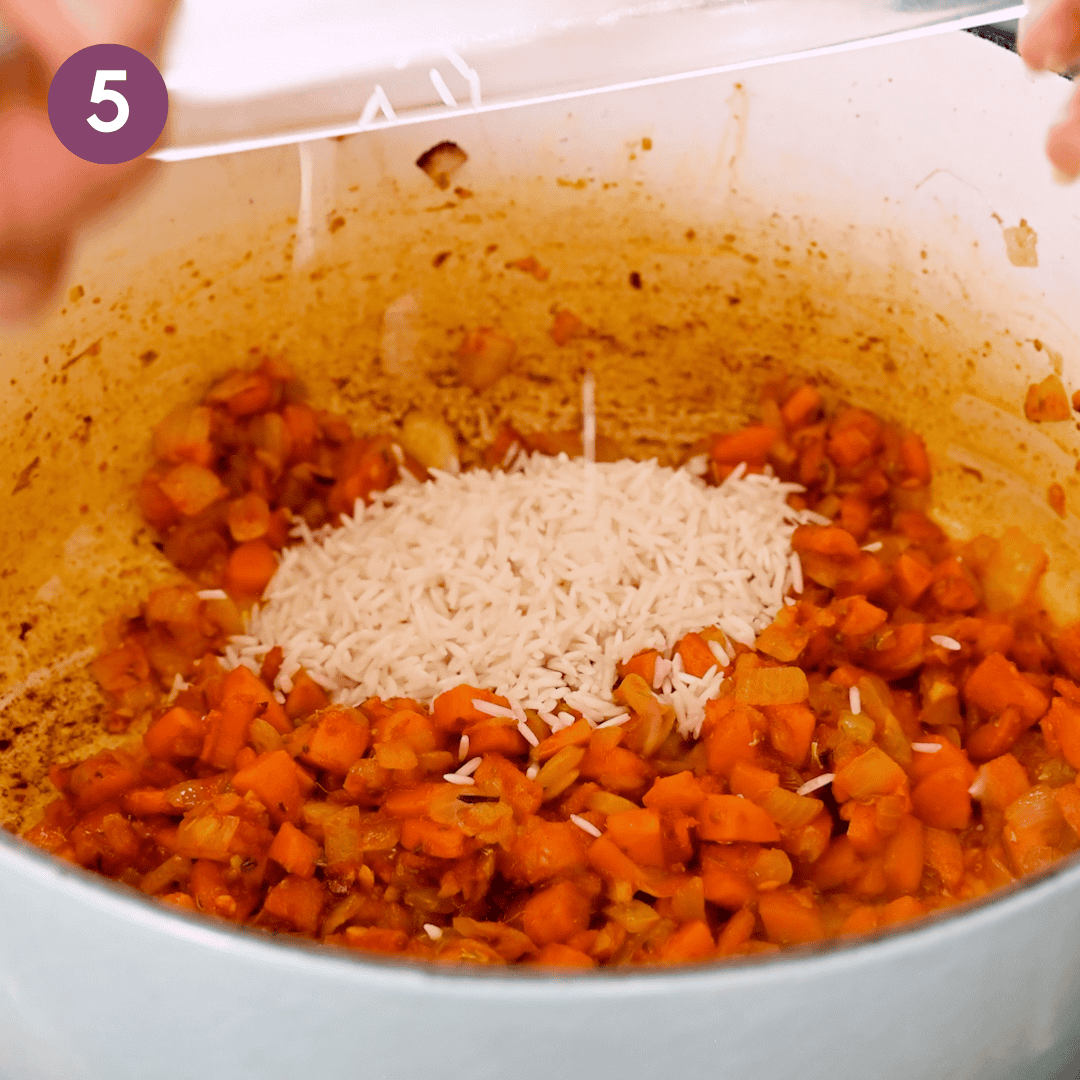
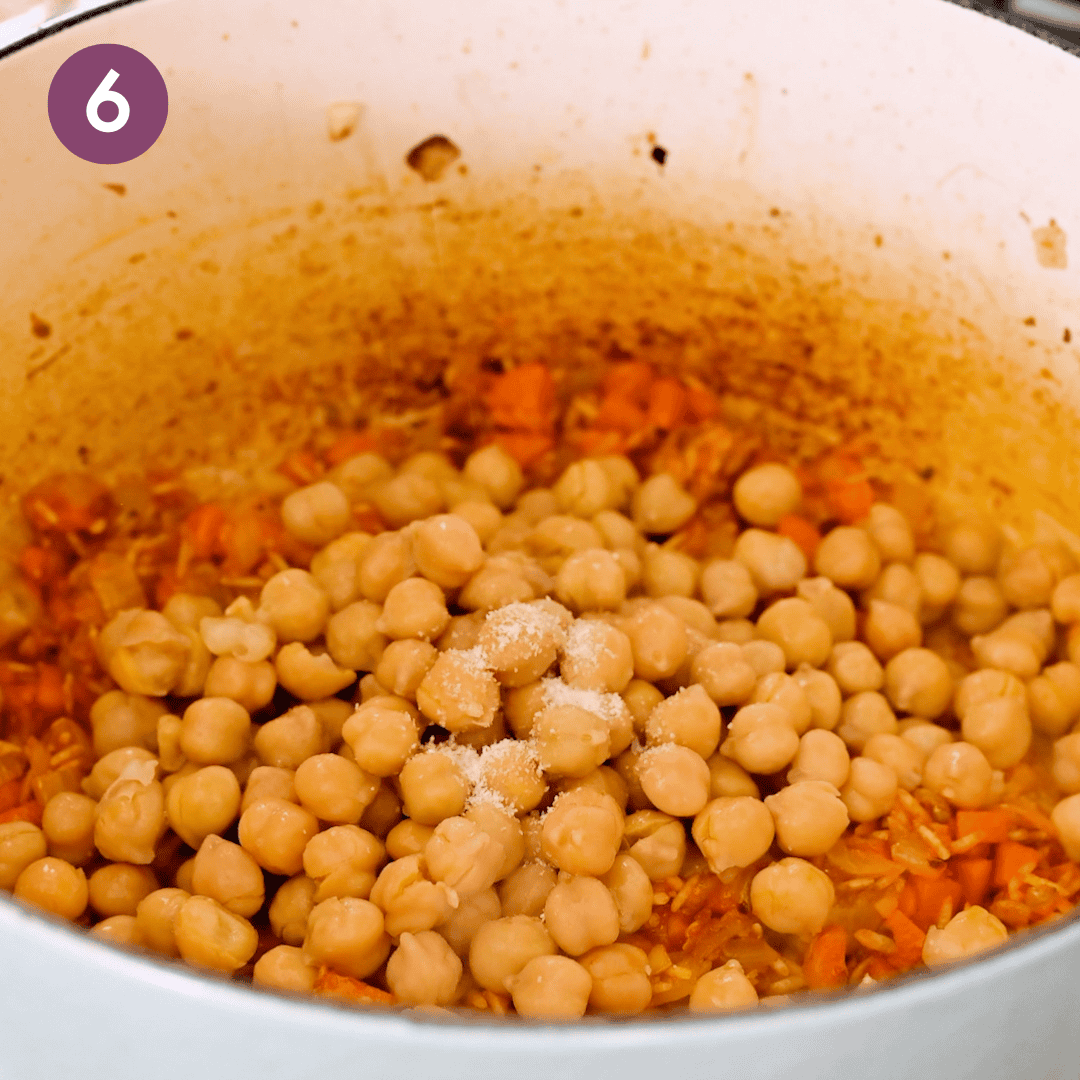
Add the rinsed rice and toss to coat. Next, add one can of chickpeas, along with a pinch of salt and pepper. Toss to coat.
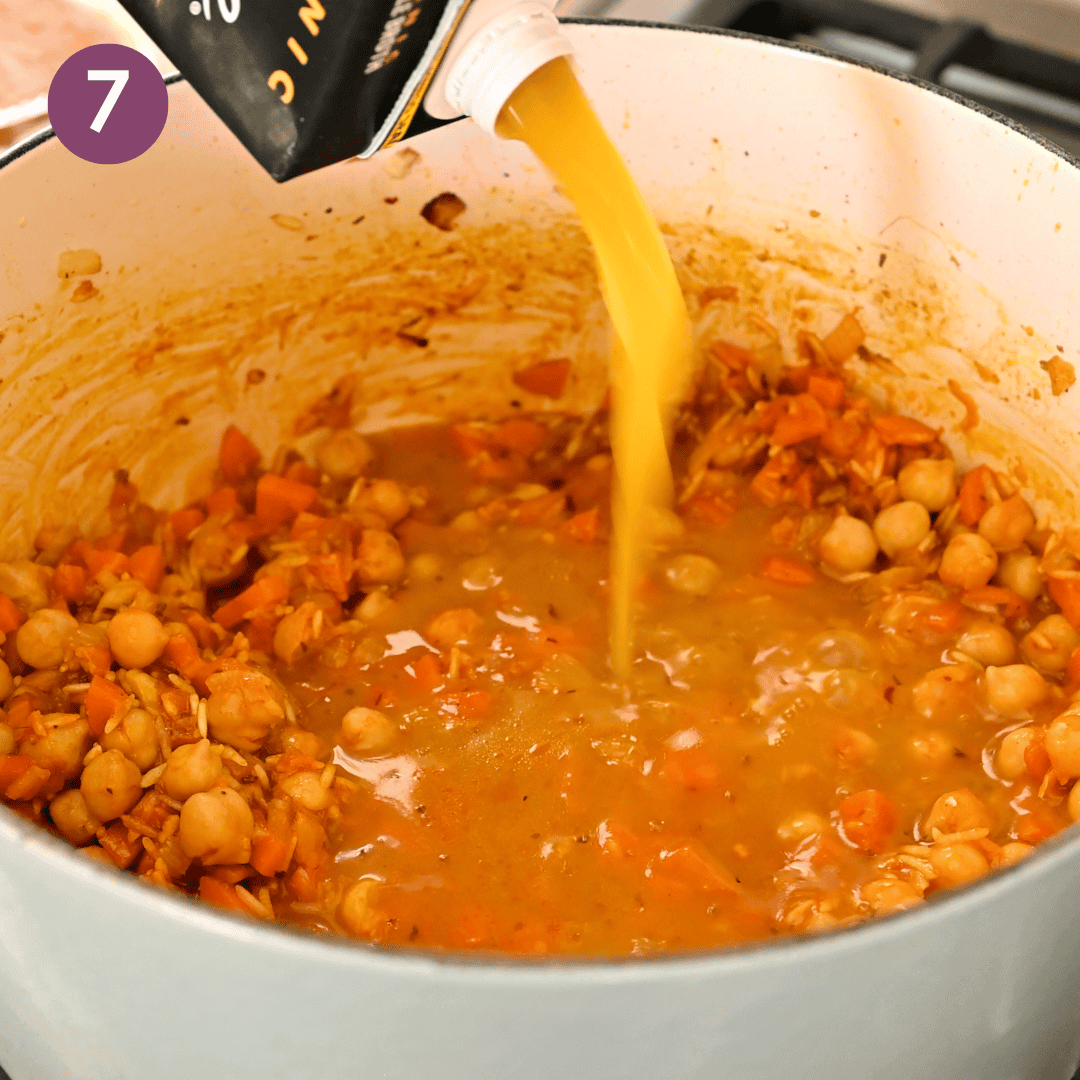
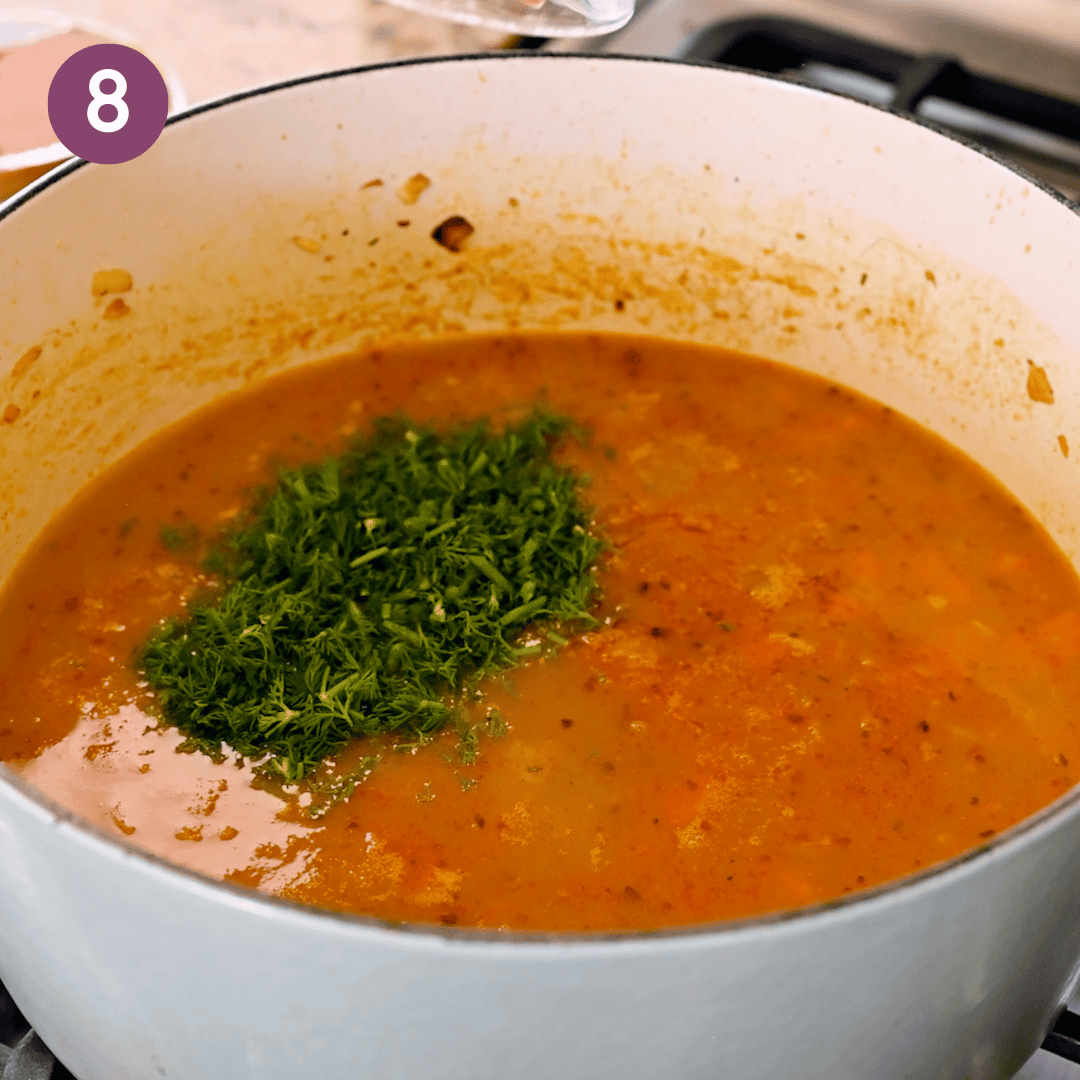
Pour in the vegetable broth and half of the chopped dill. Bring to a boil, then reduce to a simmer.
Simmer, covered, for 15 minutes.
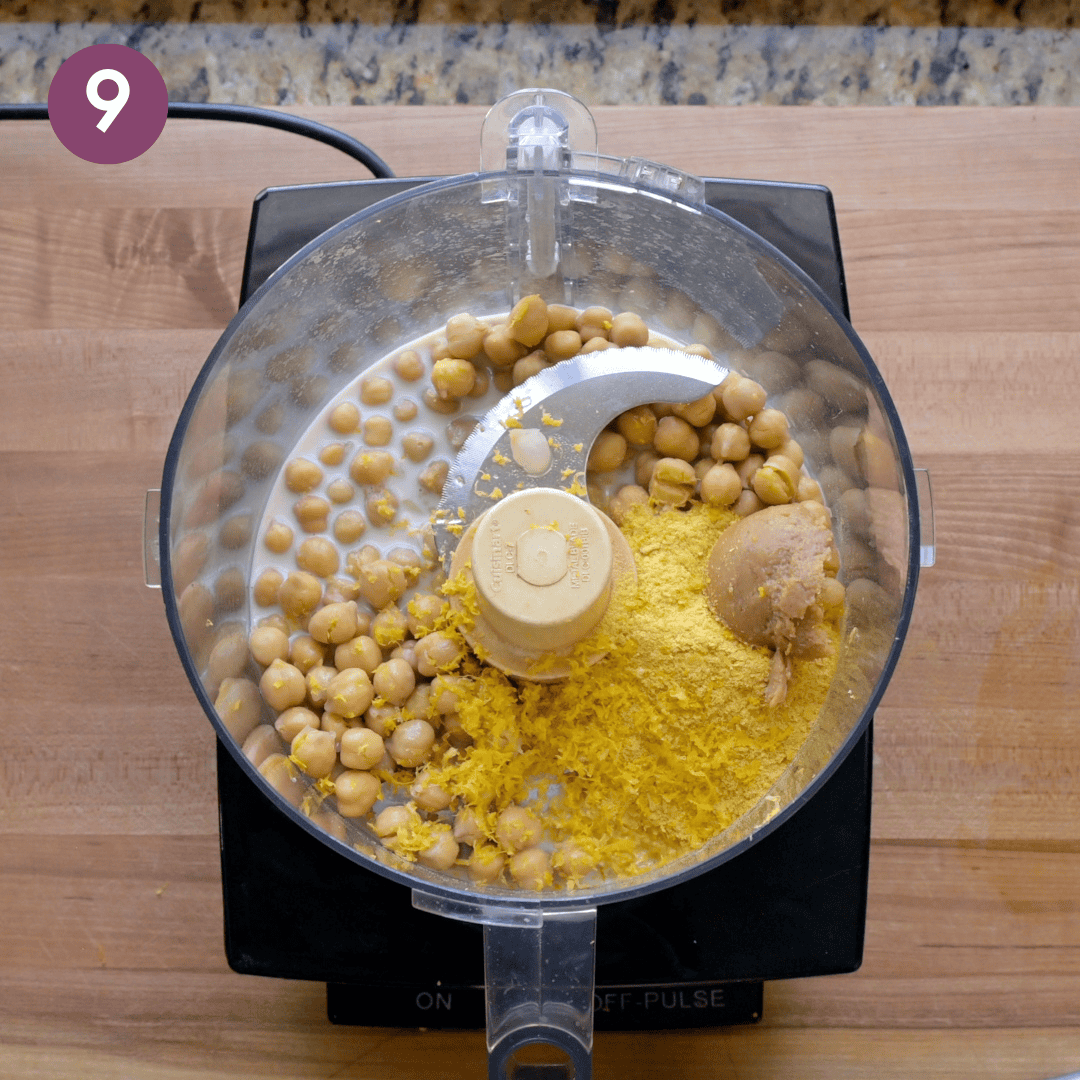
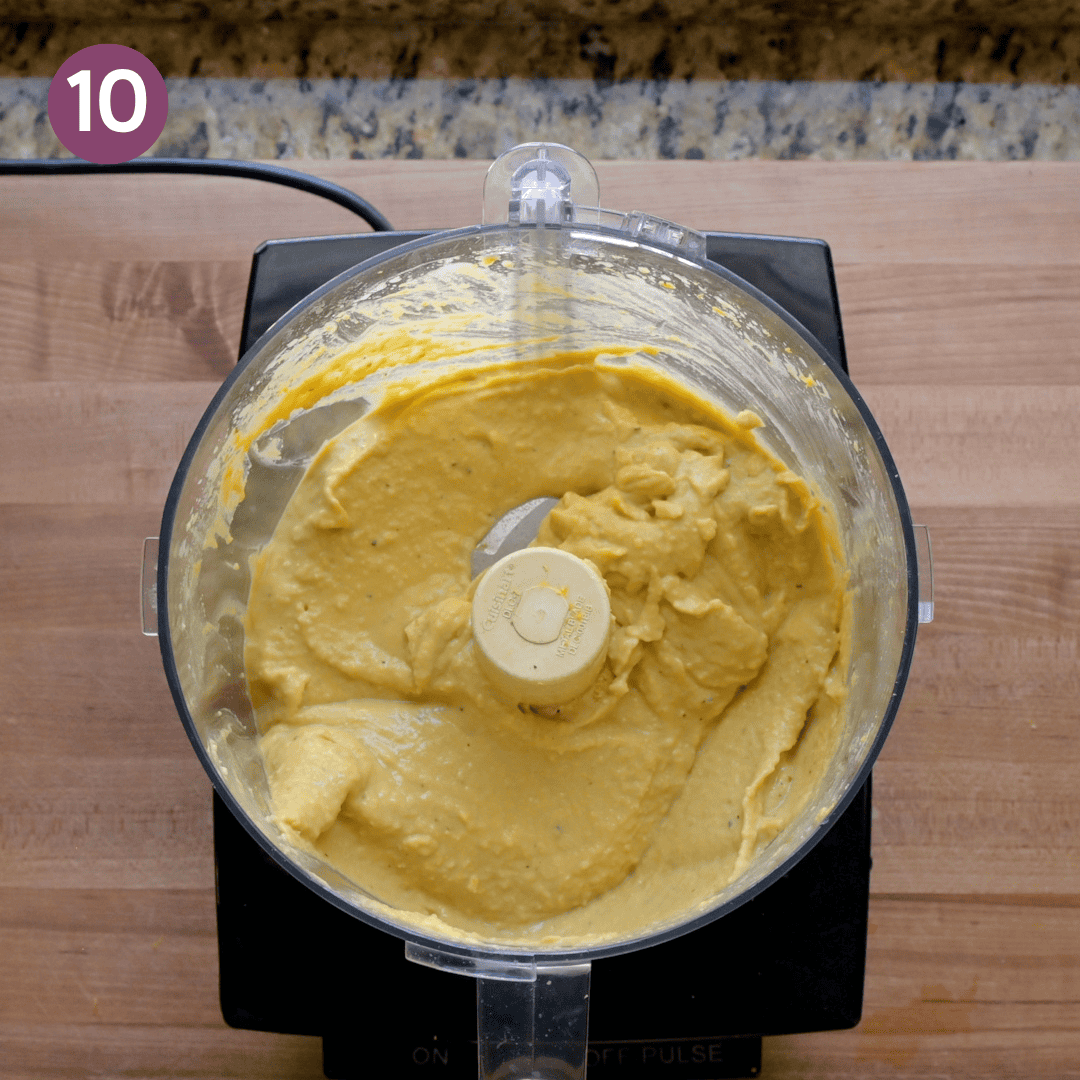
Meanwhile, make the chickpea puree.
In a food processor, blend together until smooth: one can of chickpeas, plant milk, lemon zest, lemon juice, nutritional yeast, miso, salt, and pepper.
Taste and adjust the seasonings as needed.
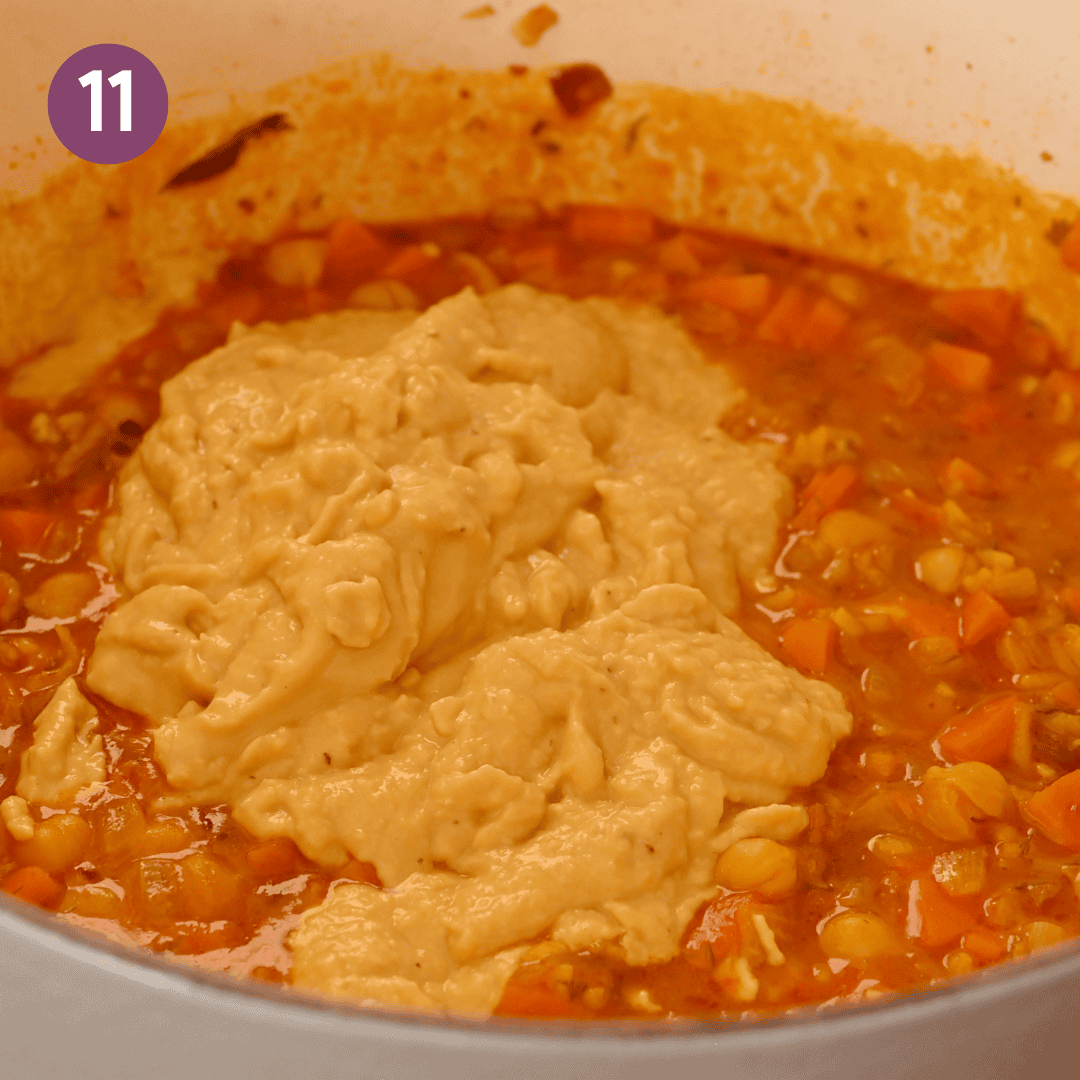
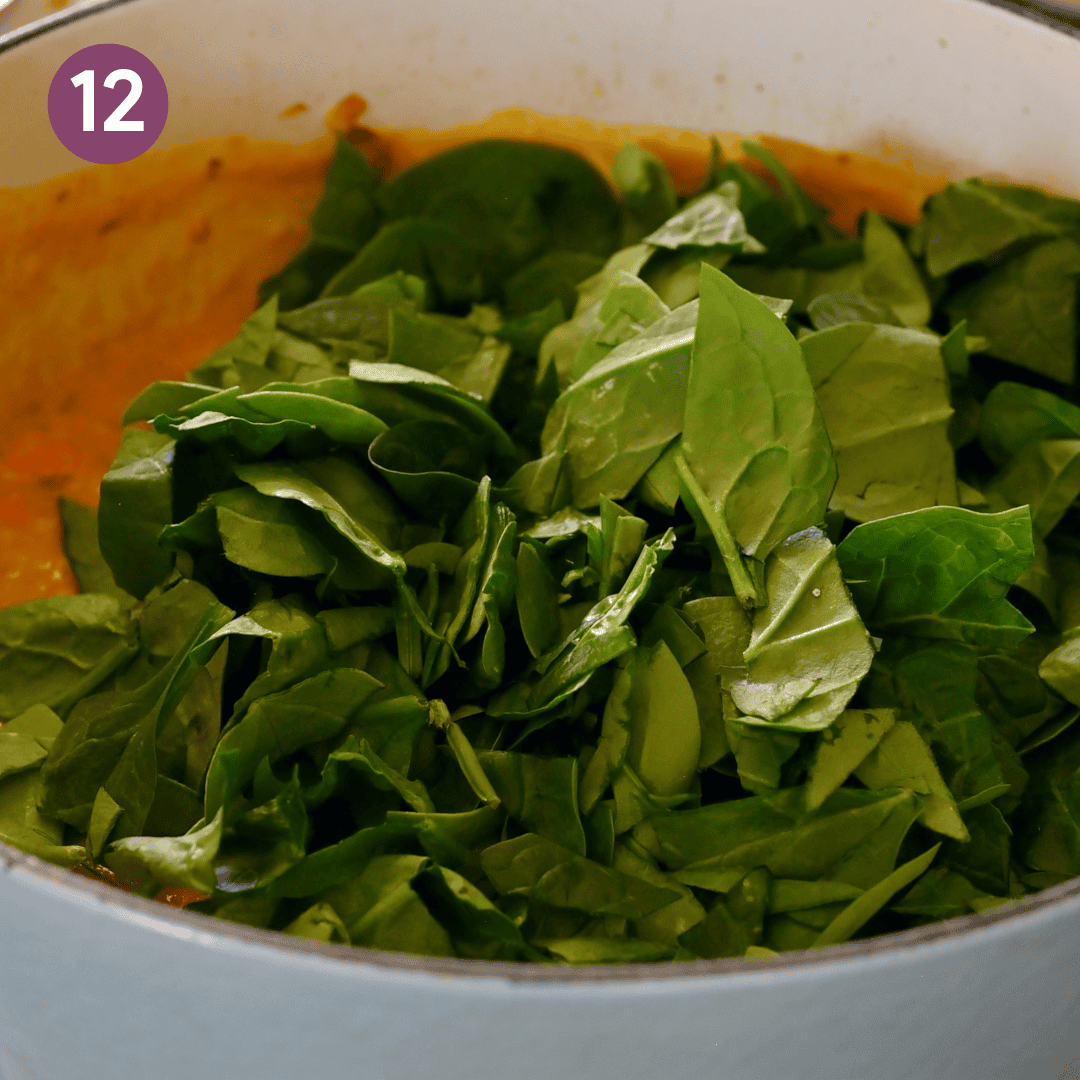
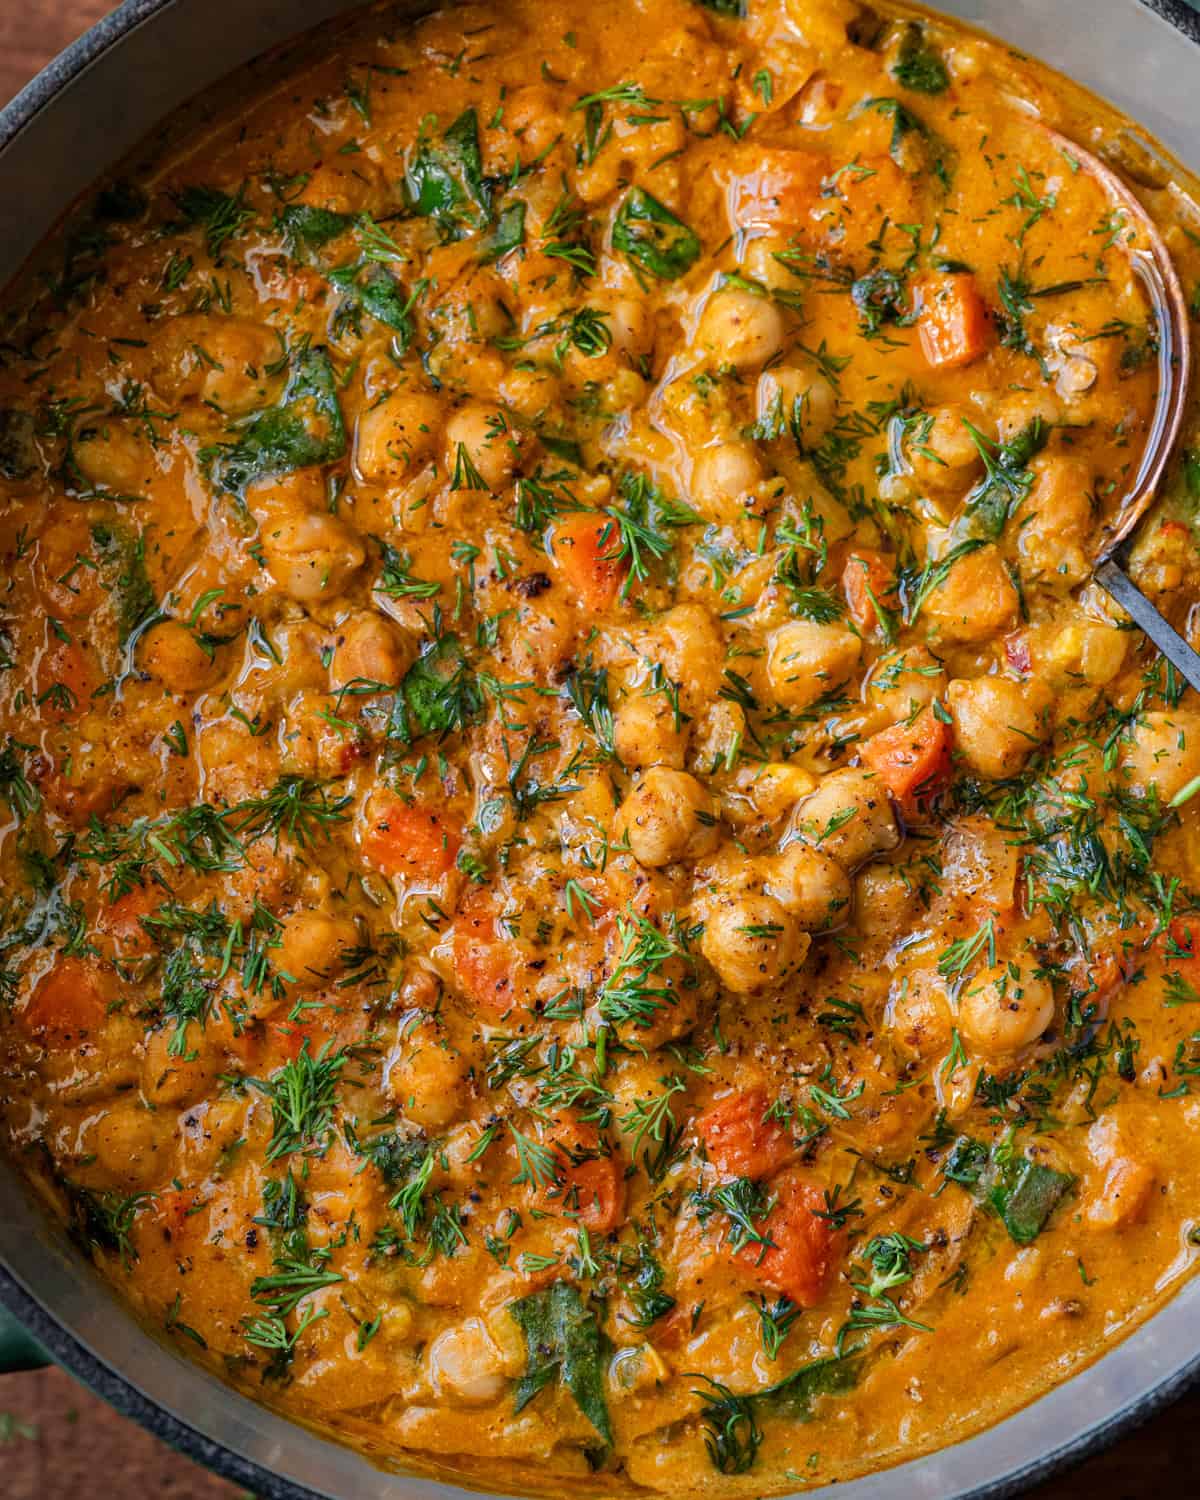
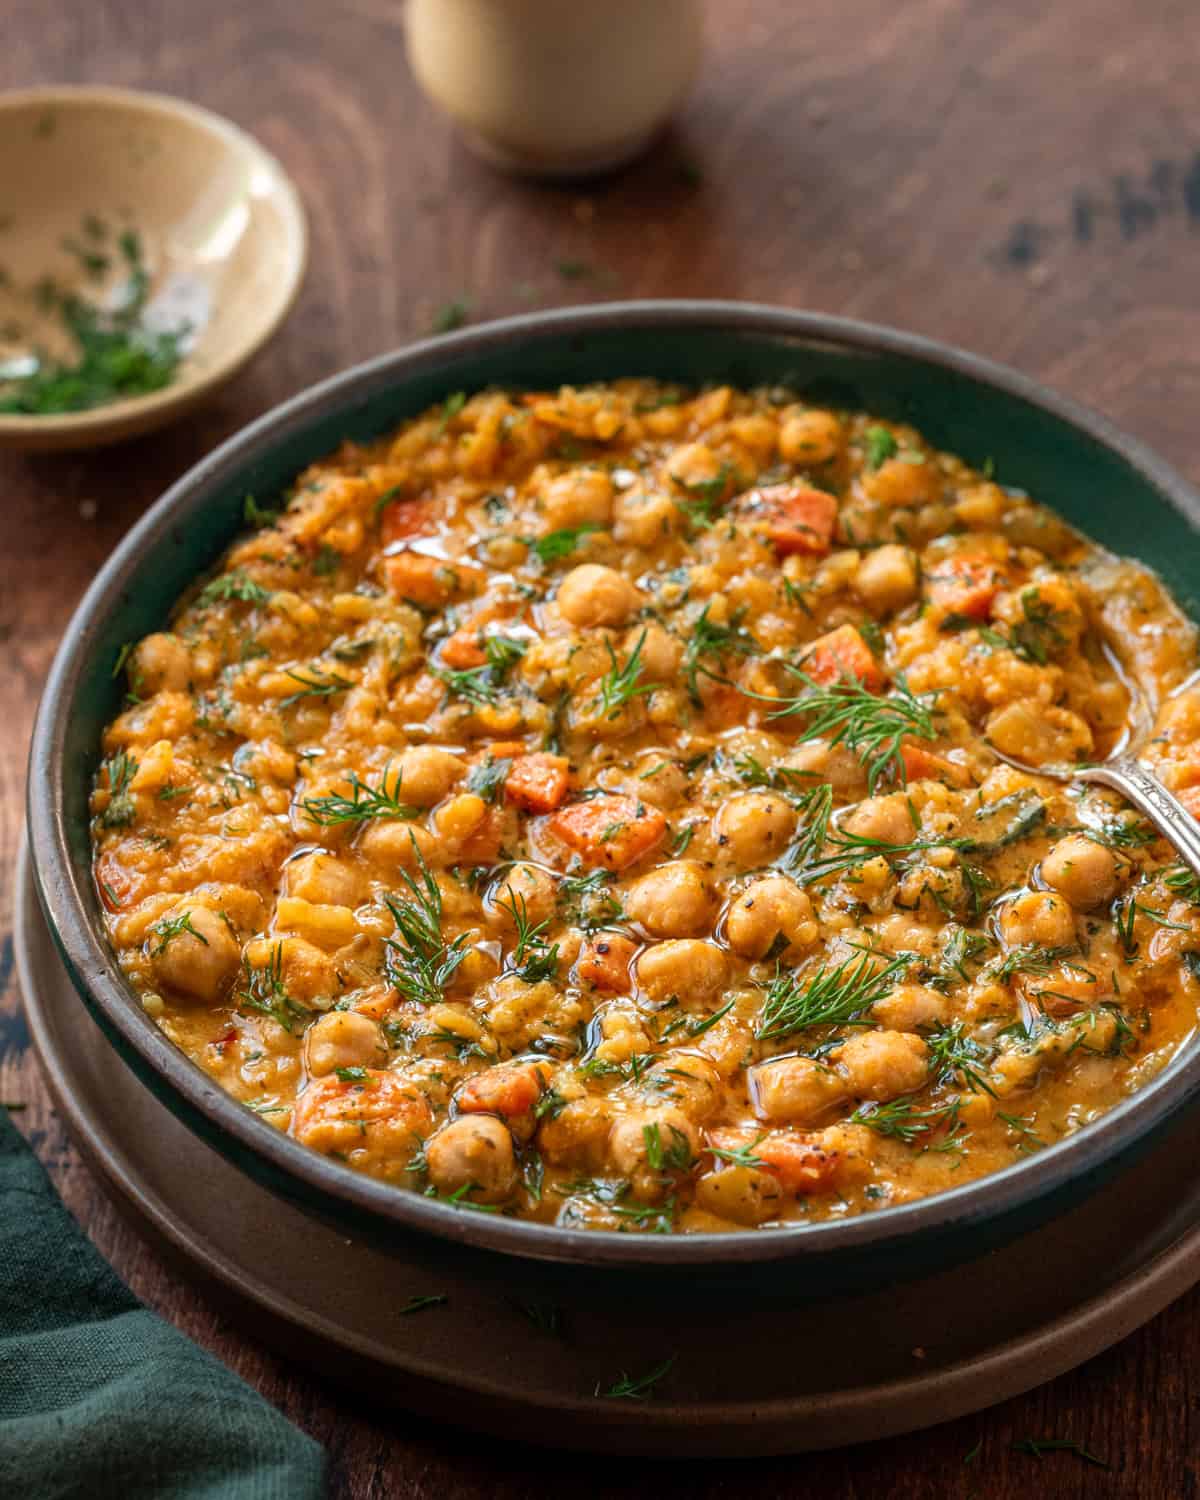
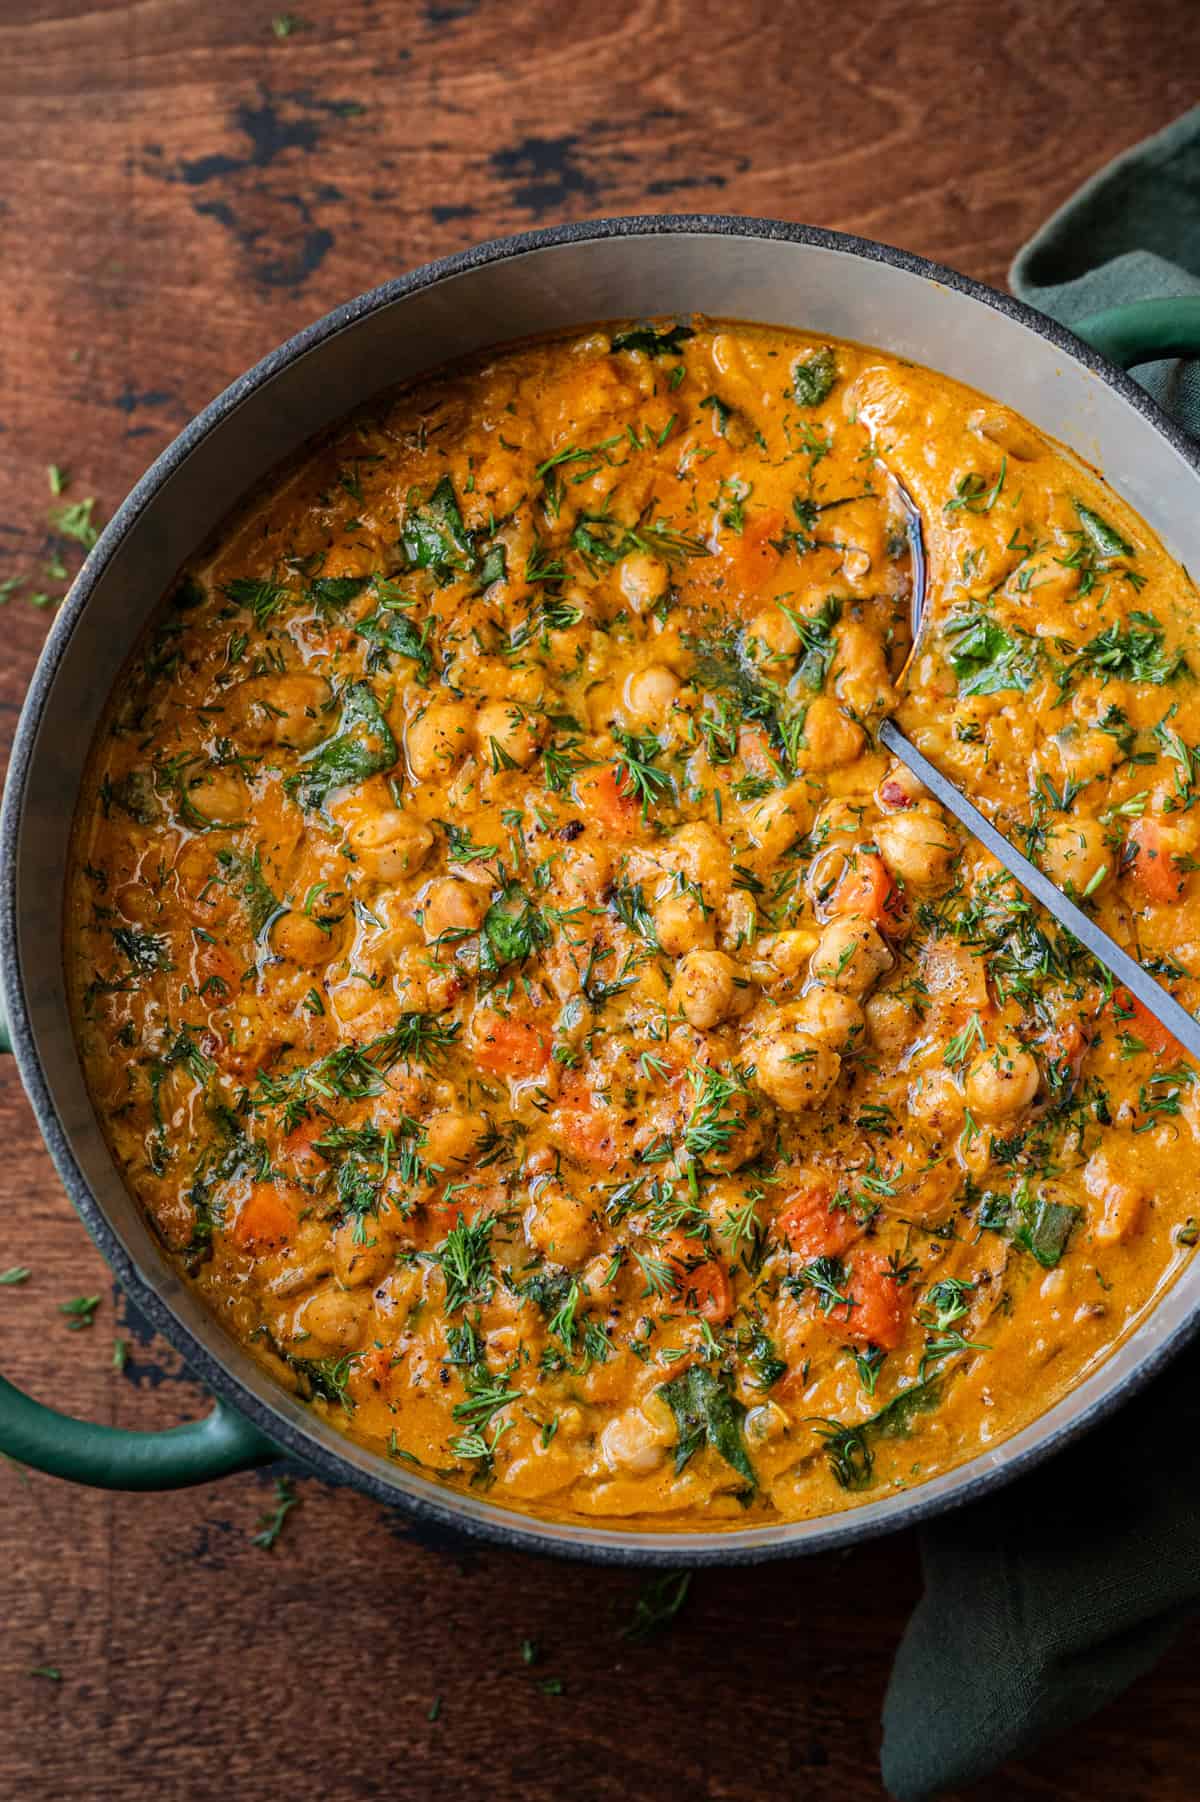
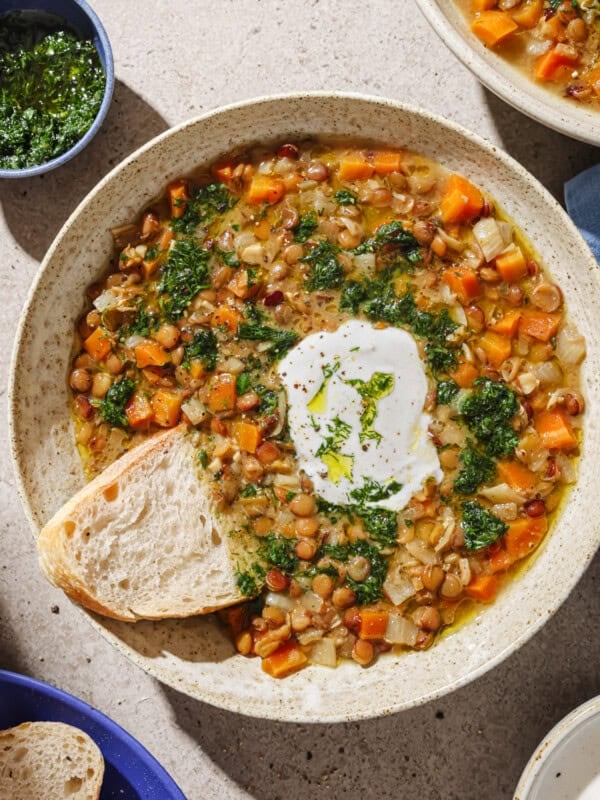
Stir the chickpea puree and chopped spinach into the soup. Simmer until thickened and the spinach is wilted.
Turn off the heat and stir in the lemon juice and remaining dill. Season to taste with salt and pepper, then serve the soup in bowls with crusty bread on the side for dunking. Enjoy!
Tips for making this recipe
Adjust the flavors to your liking
Once the soup is finished simmering, give it a taste and adjust the flavors however you want.
Love big lemony flavor? Add more fresh lemon juice or zest. Want some spice in just about everything? Add an extra pinch of red pepper flakes. There’s always room to sprinkle in more fresh herbs or a dollop of vegan pesto. Or keep it simple, and drizzle every bowl with good-quality olive oil for richness.
Make it your own
While I’d love for you to try the recipe as written the first time, there are so many ways to put your own spin on its flavors, consistency, and textures:
- Swap the chickpeas for white beans for extra creaminess.
- Switch up the herbs. Use flat-leaf parsley or basil instead of dill, or a blend of all three.
- Add more veggies. Toss in sliced celery, shaved fennel, or shredded cabbage after sautéing the onions and carrots, or add a handful of cauliflower florets with the broth.
- More greens. Bump the baby spinach up to 5 ounces (140g).
- Add some crunch. Top your bowl with the crispy lentils from my Butternut Squash Soup, homemade croutons or roasted chickpeas (check out pages 229 and 236 of Big Vegan Flavor, respectively).
Multitask efficiently
To make this chickpea soup recipe come together as efficiently as possible, you’ll want to do a little multitasking. Here’s what I do.
- Since the onions and carrots sauté for about 10 minutes and don’t need to be stirred very often, use that time to chop the garlic and measure out the tomato paste and spices.
- While the soup simmers, make the chickpea puree and chop the baby spinach.
Frequently Asked Questions
While an immersion blender works well when you’re blending soup, here, the blending that happens is with the chickpea puree. It has pretty minimal liquid (just ½ cup milk) so an immersion blender won’t be able to blend things smoothly.
Stick with a food processor or a small-capacity blender cup.
Once you’ve let the soup cool to room temp, transfer the leftovers to an airtight container and store them in the fridge for 5 to 6 days. Reheat your leftovers on the stove over medium or medium-low heat, stirring frequently to prevent the rice from sticking together.
To brighten up the leftovers as needed, top the reheated soup with a pinch of lemon zest, a squeeze of lemon juice, and a drizzle of good-quality extra virgin olive oil for richness.
Although I find this lemon chickpea soup plenty hearty and filling on its own, I never say no to crusty bread for dunking.
Gluten-free? Opt for simple roasted potatoes, or go the fancy (but easy) route with my Crispy Smashed Potatoes!
Absolutely! Freeze the soup in a few airtight containers for 3 to 4 months. We love to freeze soup in these handy Souper Cubes (affiliate link) for single-serve portions that are quick to defrost. Let the leftovers thaw in the fridge overnight before reheating on the stove the next day.
If you love this Lemony Chickpea Soup recipe, please be sure to leave a rating and review below! And tag me on Instagram – I love seeing your photos!

Introducing
Big Vegan Flavor
Techniques and 150 recipes to master vegan cooking.
Lemon Chickpea Soup

Ingredients
- ⅓ cup (65 to 70g) long-grain white rice (see Note 1)
- ¼ cup (56g) extra virgin olive oil
- 4 medium carrots, scrubbed and finely chopped
- 1 large yellow onion finely chopped
- Kosher salt and freshly cracked black pepper
- 2 (15-ounce / 425g) cans chickpeas, divided
- ¾ cup (12g) fresh dill (no thick stems), chopped and divided
- 5 cloves garlic, finely chopped
- 2 tablespoons tomato paste
- 2 teaspoons dried oregano
- ½ teaspoon ground coriander
- ½ teaspoon ground turmeric
- ¼ to ½ teaspoon red pepper flakes (½ tsp for a kick)
- 4 cups (960 mL) vegetable broth
- 3 ounces (85g) baby spinach or baby kale (can add more, see Note 2)
- ½ cup (120 mL) creamy unsweetened plant-based milk, such as full-fat oat milk or canned “lite” coconut milk
- 1 large lemon zested + 3 to 4 tablespoons lemon juice, divided
- ¼ cup (20g) nutritional yeast
- 1 tablespoon white miso
Instructions
- Add the rice to a fine-mesh sieve and rinse a few times until almost clear, then drain.
- Drain and rinse one can of chickpeas and set aside for step 5. Drain and rinse the other can of chickpeas and transfer to a food processor or small-capacity blender for step 8.
- In a large saucepan or Dutch oven, heat the olive oil over medium-high heat. Once shimmering, add the carrots and onion. Season with a few pinches of salt. Stir occasionally, until softened and lightly browned, about 10 minutes.
- Add the garlic and cook for 2 minutes, stirring frequently. Add the tomato paste plus spices (oregano, coriander, turmeric, and red pepper flakes). Stir almost constantly for 1 to 2 minutes until the tomato paste is a darker red brick color. If it sticks or starts to burn, lower the heat and deglaze with a splash of broth.
- Add the rinsed rice and toss to coat in the aromatics and oil for 1 minute. Add one can of drained chickpeas, plus ¼ teaspoon kosher salt and pepper to taste. Toss to coat. Pour in the vegetable broth, followed by half of the chopped dill. Bring to a boil.
- Reduce the heat to low to maintain a simmer and cover the pan. Simmer, covered, for 15 minutes, stirring once or twice, or until the rice is soft.
- While the soup simmers, roughly chop the spinach and make the chickpea puree.
- Chickpea Puree: To the chickpeas in the food processor or blender, add the milk, lemon zest, 2 tablespoons lemon juice, nutritional yeast, miso, 1 teaspoon kosher salt, and pepper to taste. Blend until pureed and creamy, scraping down the sides as needed. Taste for seasonings, adding more salt or lemon juice as needed.
- Stir the Chickpea Puree into the soup to combine, then add the chopped spinach. Simmer for 1 to 2 minutes, or until the soup thickens and greens slightly wilt.
- Off the heat, stir in the remaining dill and 1 tablespoon of lemon juice. Taste, adding salt/pepper or more lemon juice as desired. Transfer to bowls and drizzle each bowl with a bit of good-quality olive oil for richness.
Video
Notes
- If using brown rice, you’ll need to quick-boil it first. Bring a medium saucepan of water to a boil and season with a pinch of salt. Stir in the brown rice and gently boil without stirring for 10 minutes. Drain the rice in a fine mesh sieve and set aside.
- For a nutrition boost, feel free to go up to 5 ounces (140g) of baby spinach (1 standard-sized bag).
Nutrition
Nutrition information is automatically calculated, so should only be used as an approximation.


The combination of flavors was wonderful. I had to substitute a few ingredients so I used caraway instead of coriander, and basil and parsley instead of dill, Parmesan instead of nutritional yeast, and dairy cream instead of plant based milk. It was so good I wanted to stretch it further to have more for later 😂 so I added more broth, spinach, kale, cannolini beans, some chicken, extra of the same seasoning, and mushrooms. Will definitely make again. Thanks for a great recipe.
Thank you for your lovely comment, Janet! It makes us happy to know that you enjoyed the soup.
I passed on the recipe to my sister who’s better at plant based eating than I am. She’s excited to try it and says she already has everything needed. Maybe next time I make this I’ll have all the real recipe ingredients too.
Wow, this soup exceeded my expectations! Absolutely delicious. I used a combo of basil, dill, and parsley and it turned out great. I’ll definitely be making this again.
Hi JF, Thank you so much for such a fantastic review! Appreciate you taking the time!
very very delicious!!!
Hi Anne-Marie, we’re thrilled to hear you enjoyed this recipe! Next time, would you mind leaving a rating alongside your review? Star ratings are big help to readers who are thinking of making the recipe. Thanks!
I made it today and it was INCREDIBLE!!!!! Next time, I might add more rice. The chickpea puree was a genius move! The flavor of that alone could have been eaten as a dip! But it was so fun to have the variety of texture in the soup. This will be in a constant rotation in my kitchen!
Your positive feedback is the best reward for our hard work. Thank you, Lucinda!
This has become my favorite soup. Packed with nutrients, it tastes delicious, and leaves me satisfied.
I was inspired to make this after watching you make it on YouTube. It was delicious.
You are a genius! This recipe is so damn delicious we couldn’t stop eating it. Needless to say it is definitely going on the rotation.
Hi Michelle, Thank you so much for such a fantastic review! Appreciate you taking the time!
So good!! Even my red meat loving husband loved it!
Amazing, Daisy! Thank you for trying the recipe and leaving a review 🙂
This is one of the best summer soups I have ever tasted and also so practical to make. Going to try it out on some friends but personally I love it 🥰
Thank you for the sweet words, Stuart! We’re thrilled you loved the soup 🙂