

I’ve been making homemade hummus for 10 years, so trust me when I tell you that truly exquisite hummus doesn’t require you to be a world-class chef.
With a handful of quality ingredients and a few choice techniques, anyone can whip up a batch of unparalleled hummus featuring restaurant-quality flavors and a to-die-for texture that puts the grocery store stuff to shame.
In this post:
🎥 Video: How to make the best hummus of your life

I hope you’ll love this hummus recipe as much as our community does. The YouTube video for this recipe has over 4.7M views and 118K likes, making it one of the most popular videos on hummus ever 🤯
It’s time to break up with store-bought hummus
My grievances with store-bought hummus fall into two categories: texture (it’s notoriously stiff and gloopy) and flavor (zero rich nuttiness, sometimes not much flavor at all).
Hummus should be creamy and smooth, not gritty. It should be pliable and swoopable, not stiff. It should taste boldly nutty and undeniably rich, not like air. If you ask me, hummus should be nothing short of exquisite.
I respect hummus deeply, which is why I tested so many different variables, including:
- the type of chickpeas used—canned, dried, different brands of each;
- preparation methods—soaking chickpeas vs. not, whether to simmer canned chickpeas, whether to add baking soda to chickpeas while cooking, whether to peel the chickpeas;
- non-chickpea elements (don’t ask how many brands of tahini I tested 😅).
The result? A foolproof method built on simple ingredients, creating a rich, deeply flavorful final product that puts store-bought versions to shame.
PS: The techniques I use in this recipe are largely influenced by three chefs who really know hummus—Reem Kassis, Yotam Ottolenghi, Sami Tamimi—so check out their cookbooks to learn more about hummus!
Ingredient notes
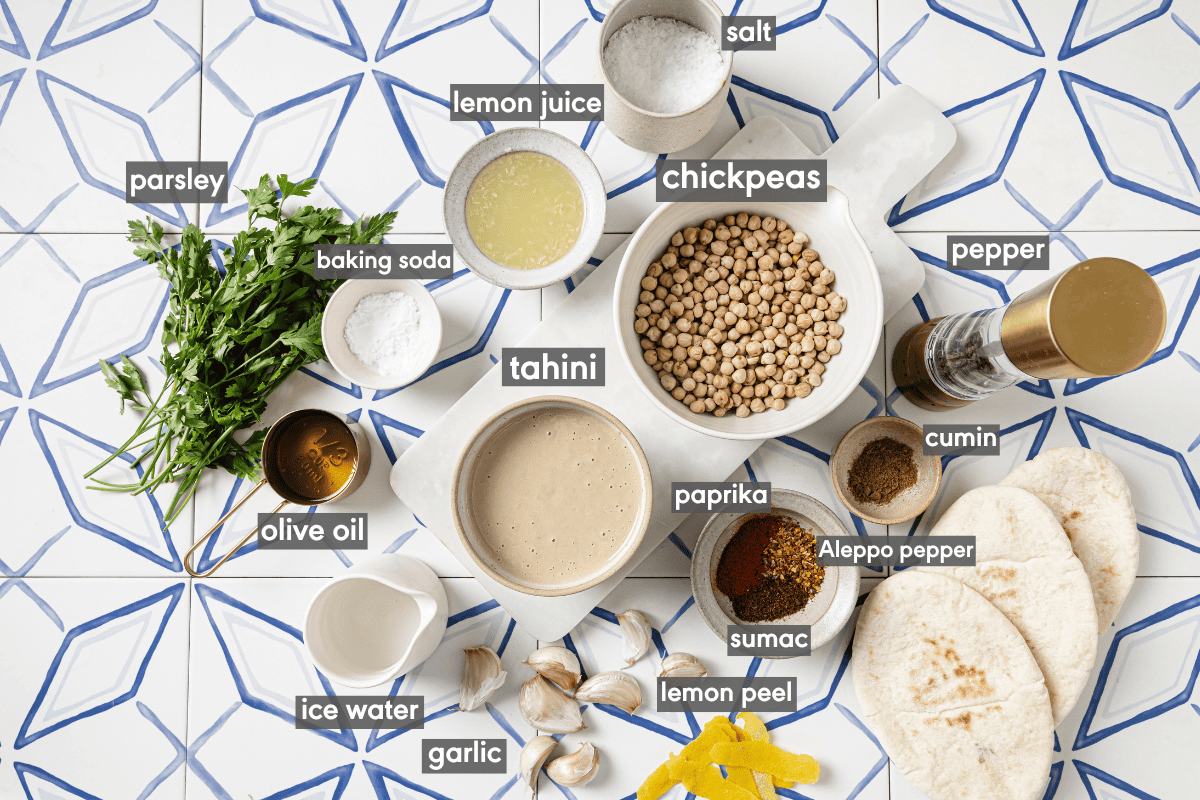
Chickpeas
AKA garbanzo beans. While you may have had sweet potato “hummus” or black bean “hummus,” hummus (or “humus,” “houmous,” “hommus”) is literally the Arabic word for “chickpeas” so we have to use chickpeas!
You can use both canned and dried chickpeas to make hummus…but for the very best hummus, flavor and texture wise, I recommend cooking dried chickpeas.
Canned chickpeas come with a firmer texture, which leaves hummus with a slightly chunky texture.
Don’t have the patience to cook dried chickpeas? You can achieve similar texture results with canned chickpeas if you first simmer the drained chickpeas in a pot of boiling water until very soft. See the FAQ section for more details.
Tahini
Tahini is a smooth and rich paste made with one ingredient: sesame seeds. It’s a primary ingredient in hummus and should never be left out. A good-quality brand of tahini makes a HUGE difference because its flavor is so prominent in every bite.
Tahini Tip
Always use tahini from hulled sesame seeds (unhulled sesame seeds are usually bitter). Check out my suggested tahini brands in the FAQ section below.
Lemon
Freshly squeezed lemon juice brightens up the rich, nutty, and savory flavors. Without it, the hummus would lack its distinctive ‘pop.’ But if you don’t love lemon as much as me, start with less than the recipe calls for.
Garlic
Some people (hi, me!) like their hummus quite garlicky. If you don’t love the sharpness of raw garlic, you can (1) use less garlic (start with 1 clove) or (2) marinate the garlic cloves in the lemon juice for 10 to 15 minutes to cut their raw bite.
Salt
For flavor and to make everything taste like itself!
Substitute: If using sea salt or table salt instead of the kosher salt called for in the recipe, you’ll need to use about half of the amount called for in the recipe, then adjust according to your desired taste.
Ice water
Water brings the hummus together, turning it from stiff to pliable. I learned from chefs Yotam Ottolenghi and Sami Tamimi that ice water, in particular, makes the texture even creamier and gives it an almost fluffy, pillowy, and whipped consistency.
Step-by-step instructions
First, soak and cook the dried chickpeas if you haven’t done so already. Cook until very soft.
If you’re using canned chickpeas, simmer them in a pot of water until very soft.
Drain, then transfer the warm chickpeas to a food processor. Blend the chickpeas until you’re left with a thick paste.
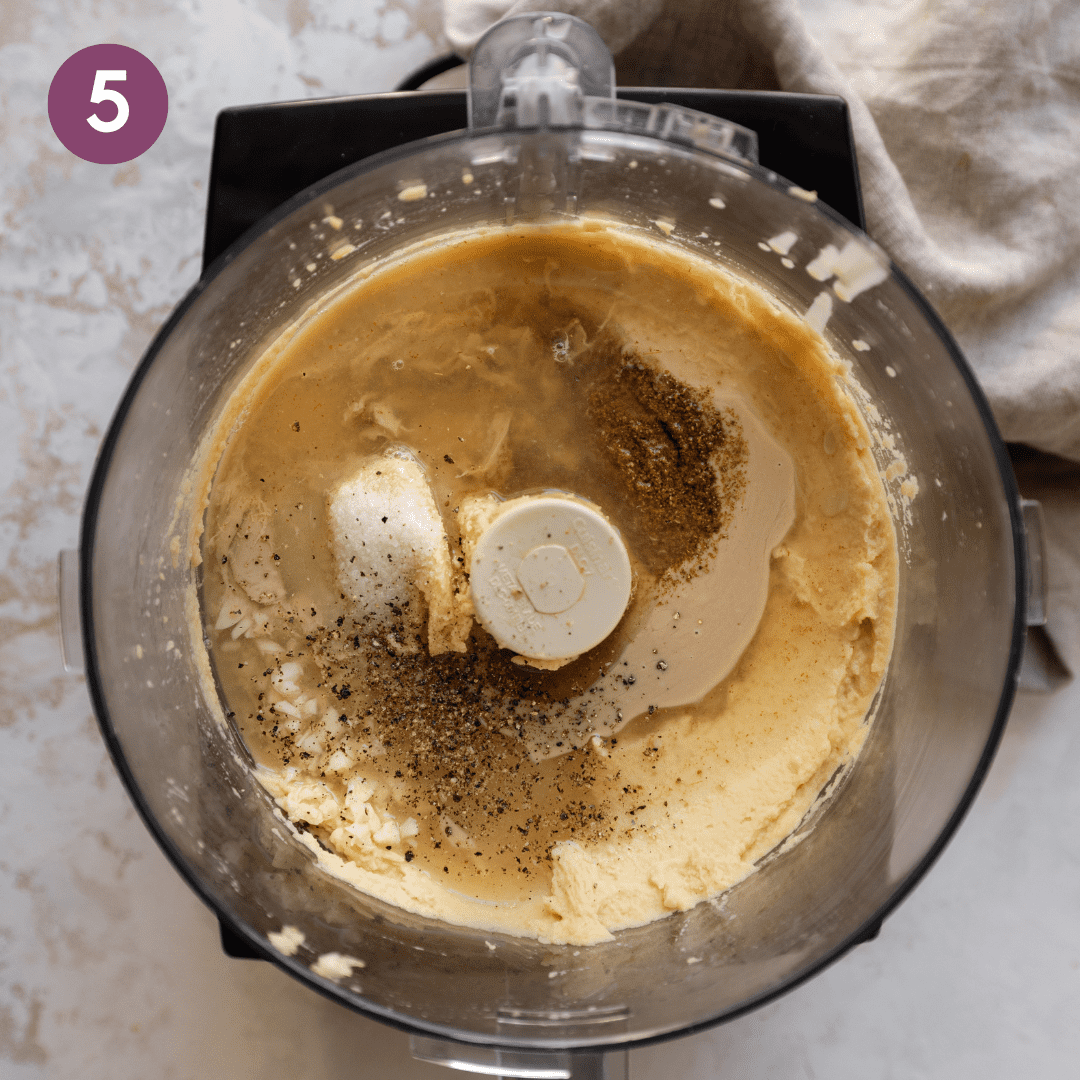
Add the tahini, lemon juice, garlic, cumin, kosher salt, and pepper. Blend again and slowly stream in the ice water as the machine is running.
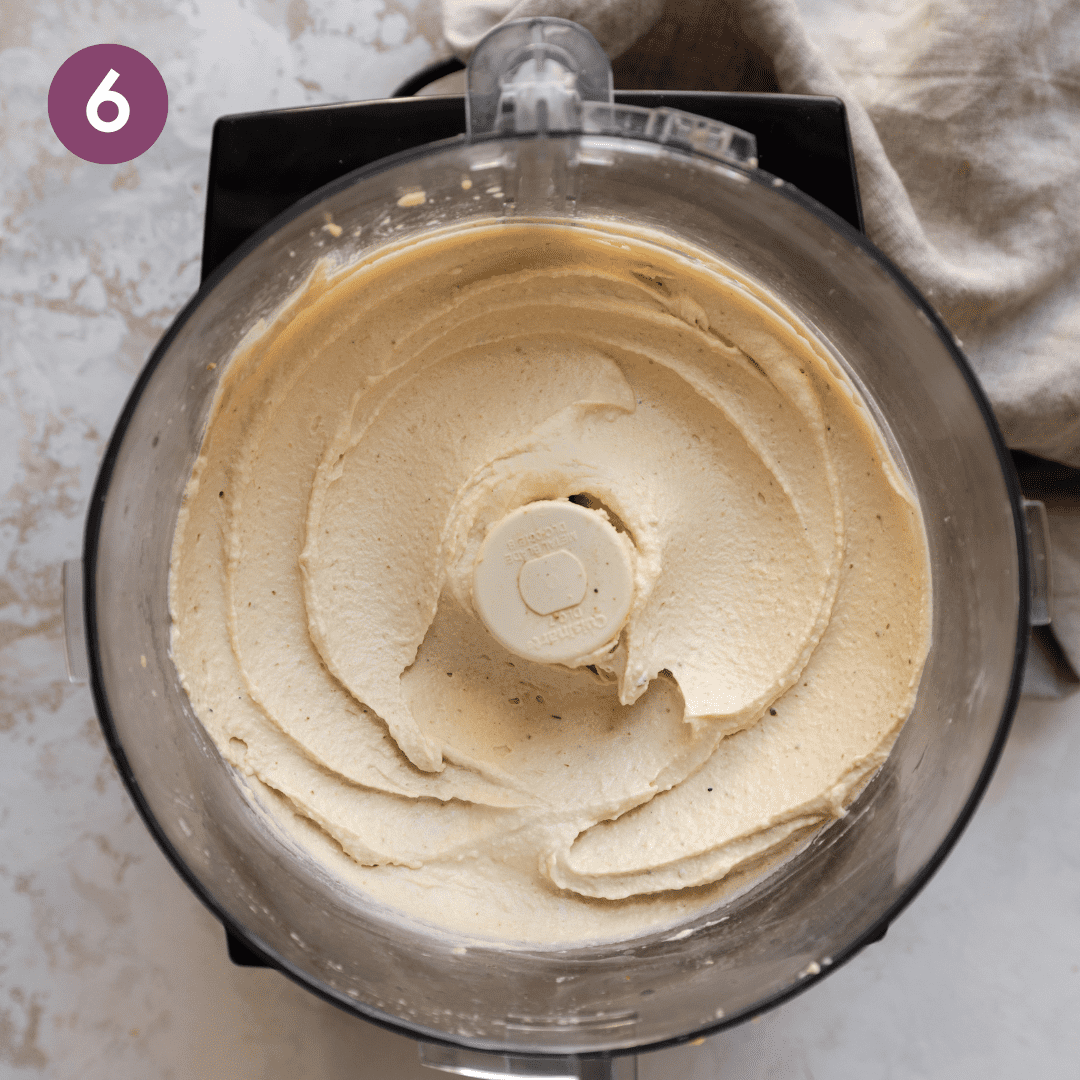
Once it’s smooth and creamy, give the hummus a taste and add more seasonings or lemon juice as needed. Add more ice water for a looser consistency.
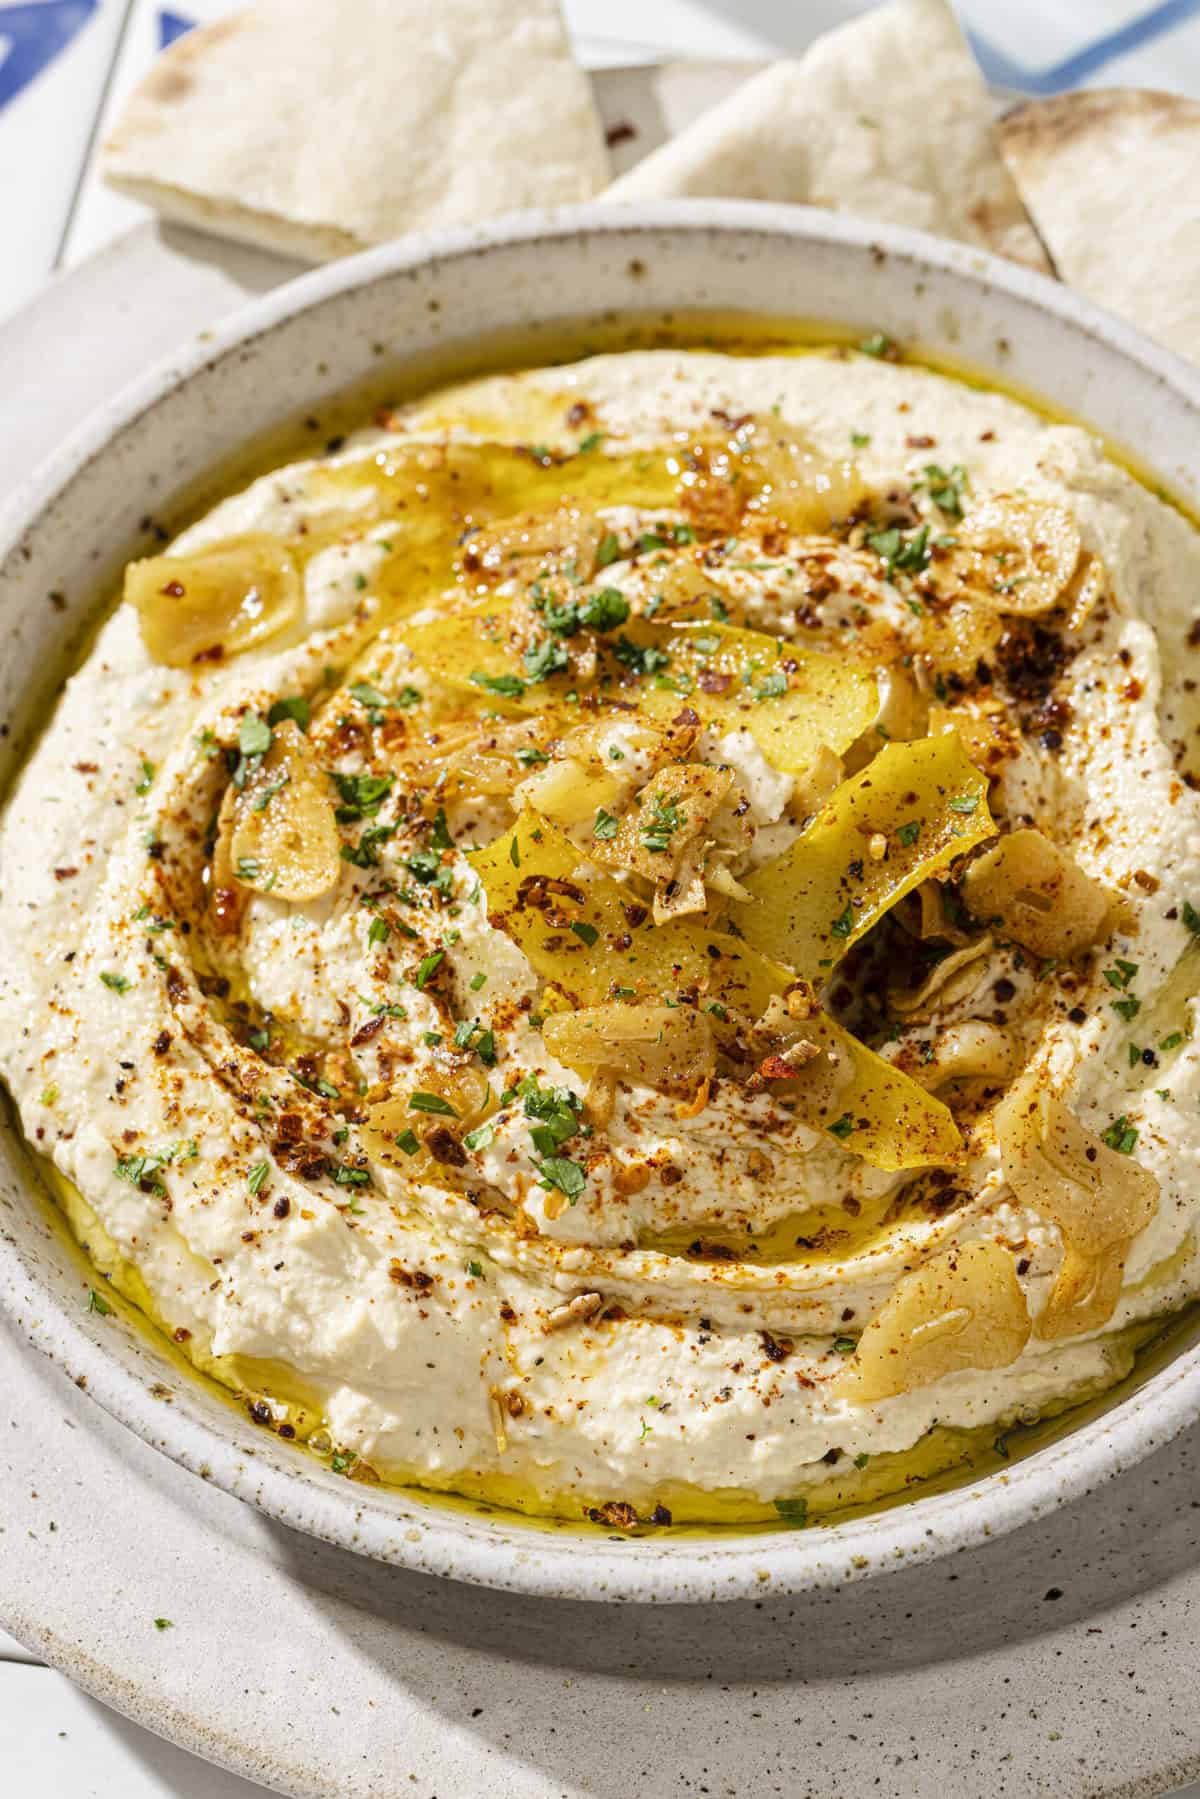
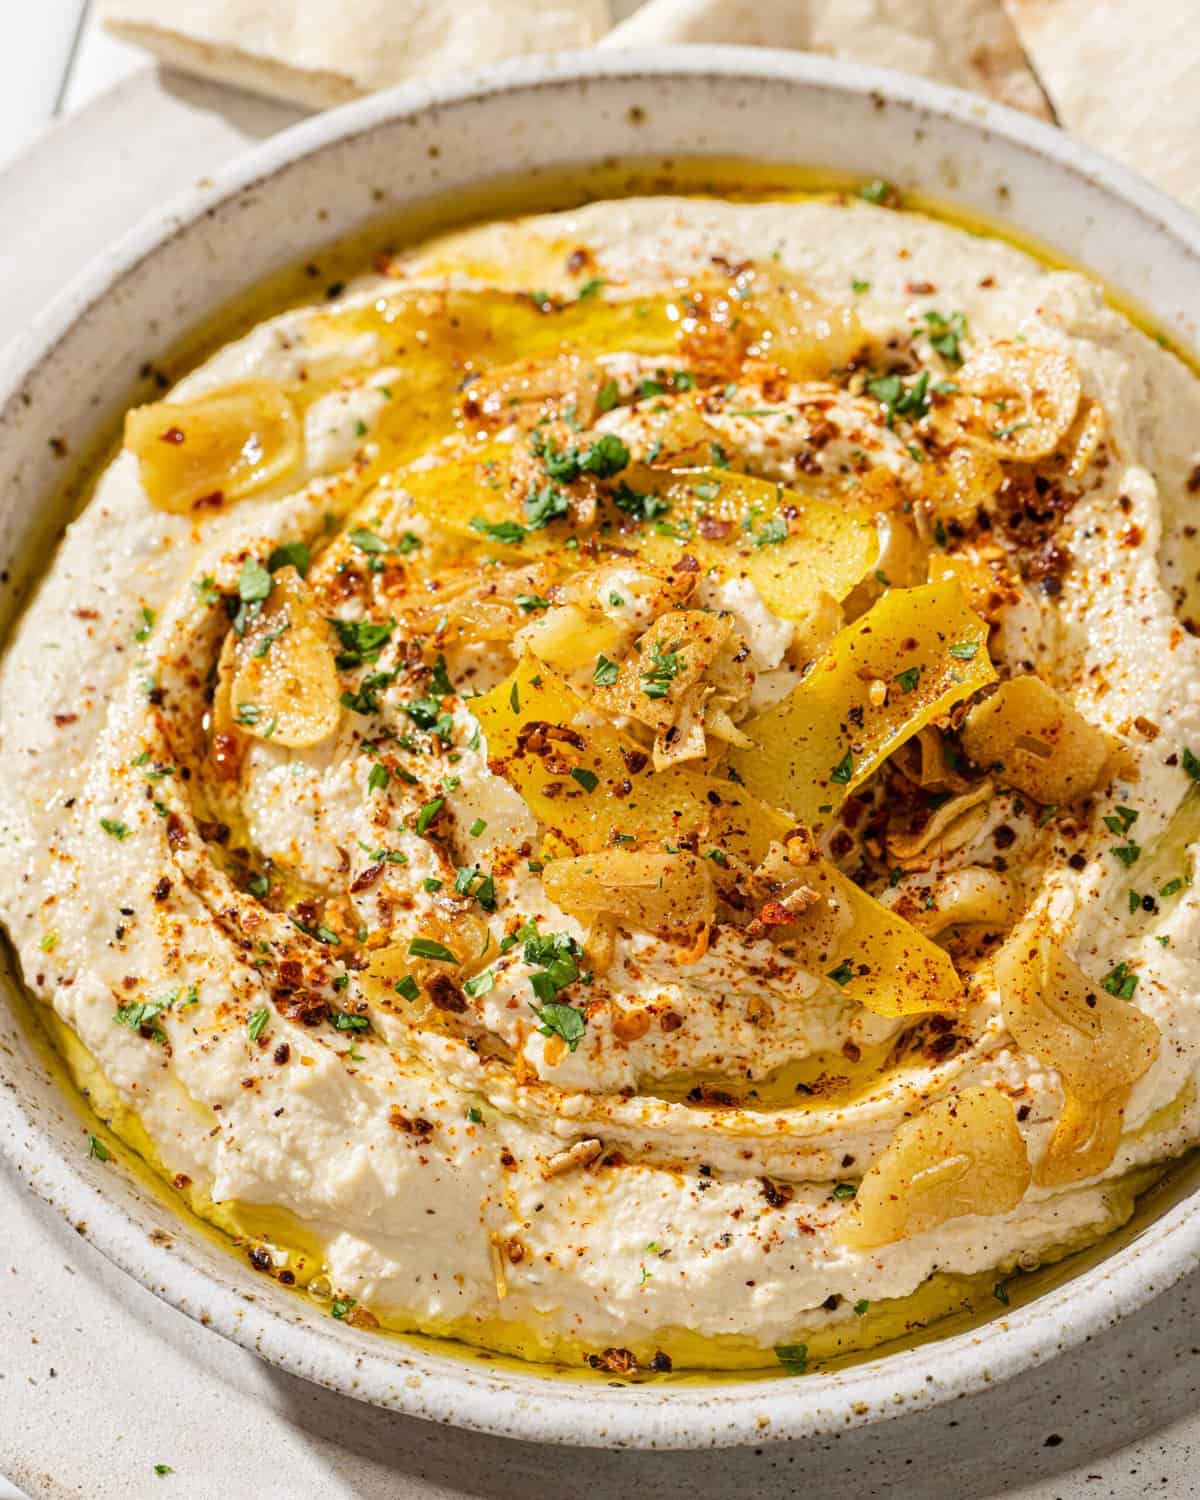
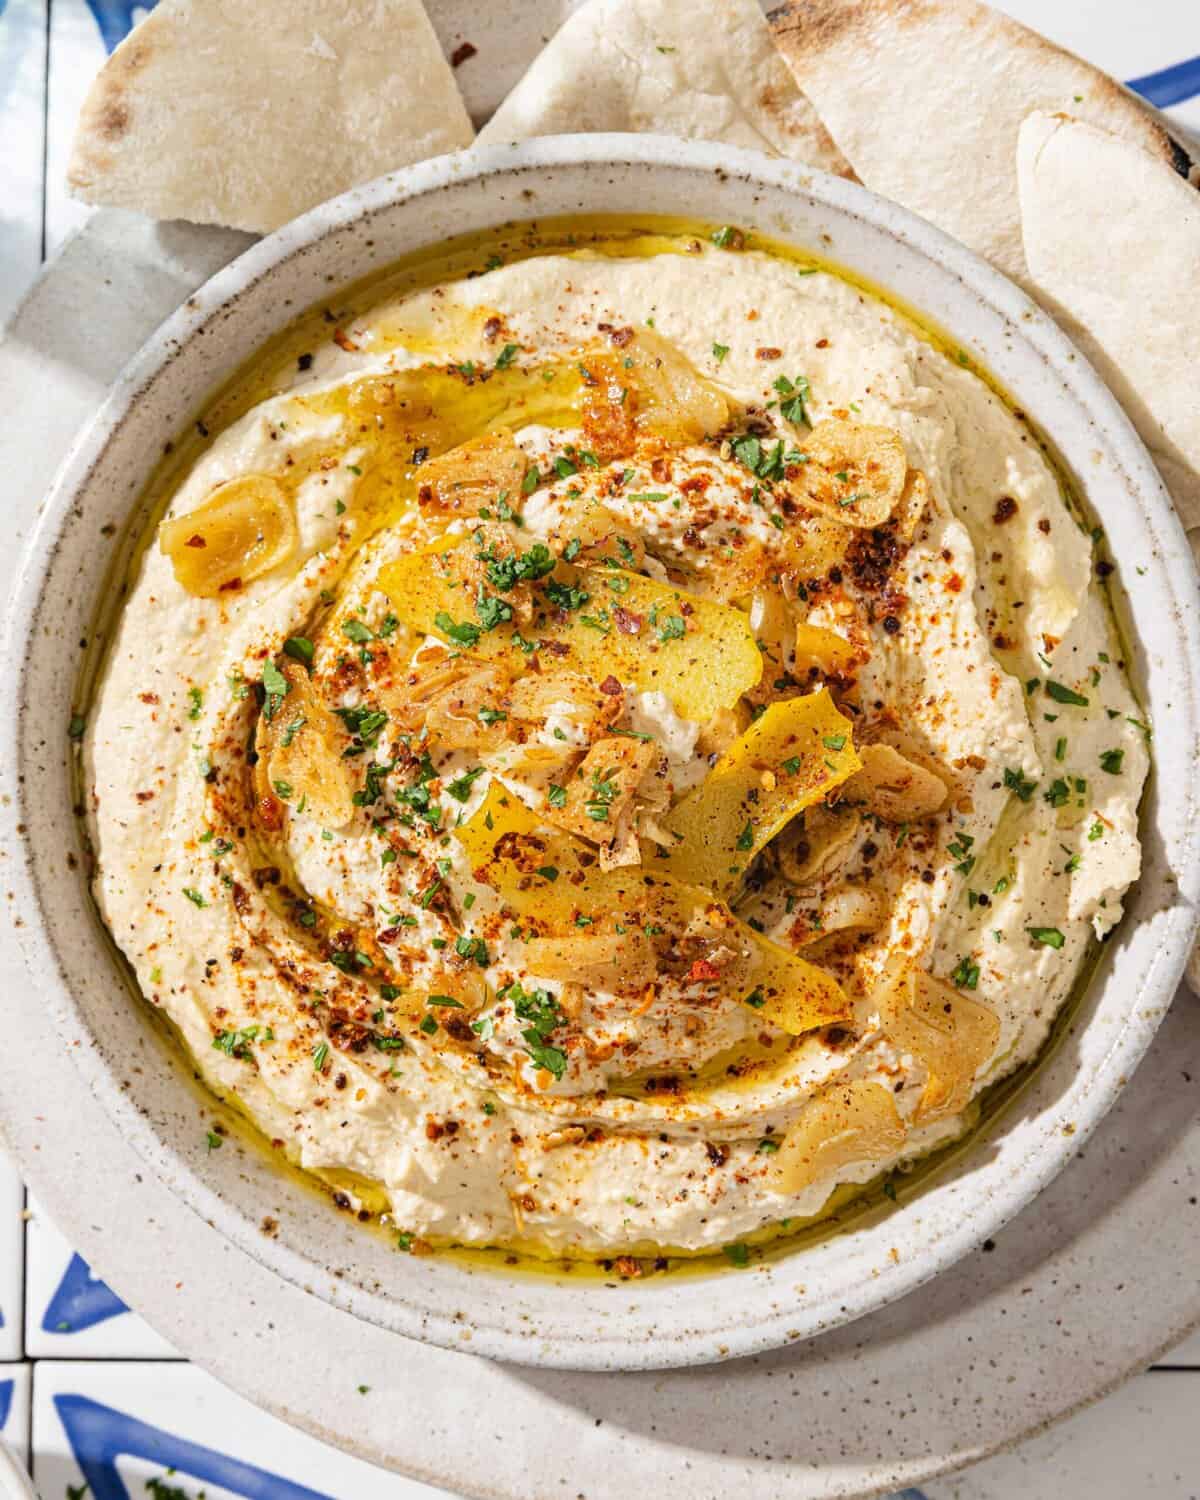
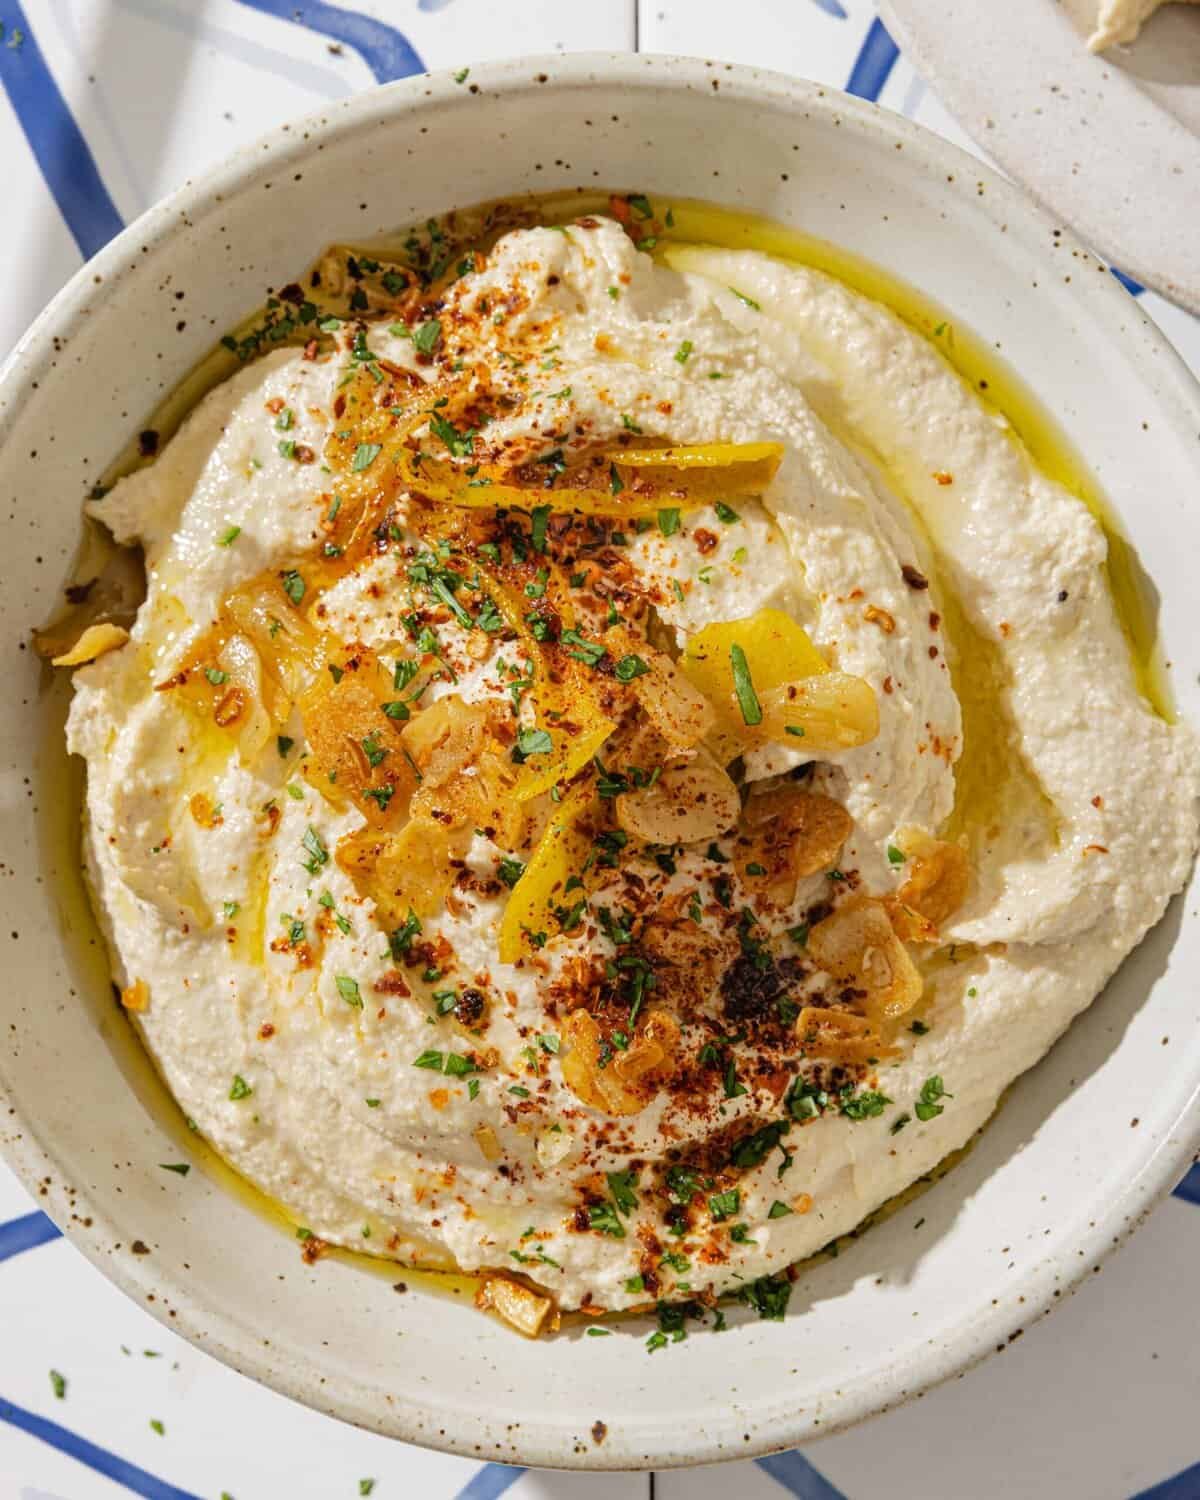
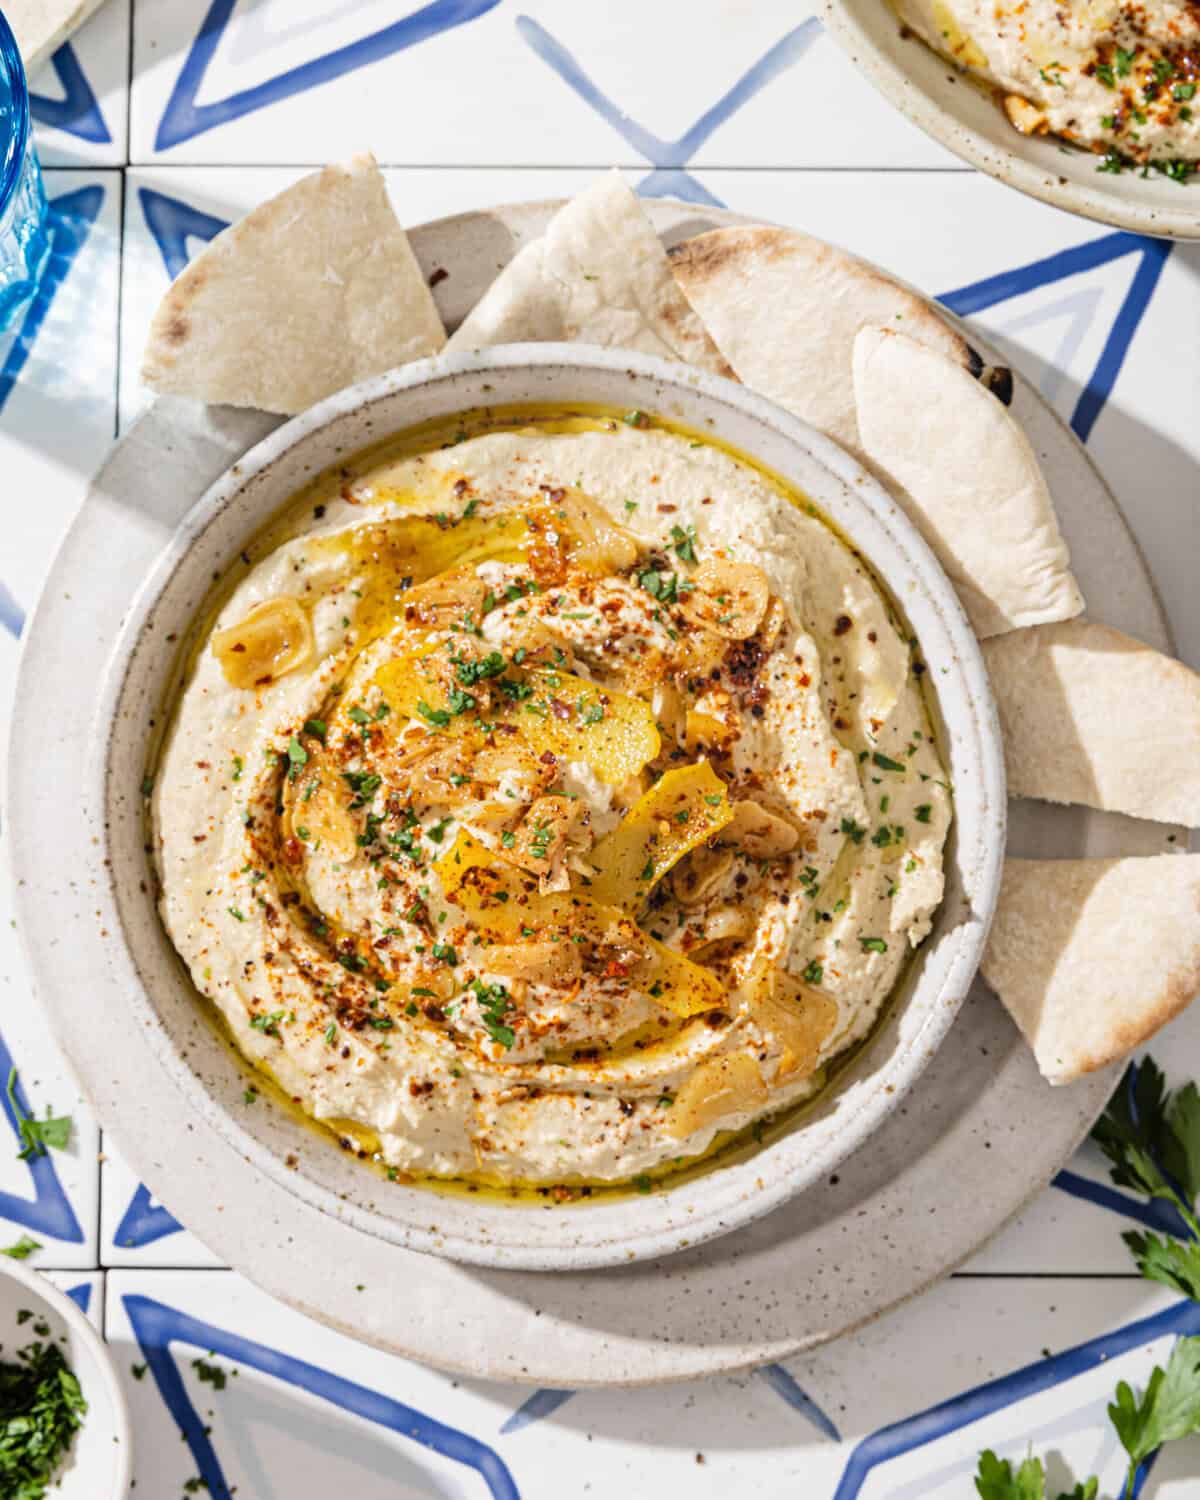
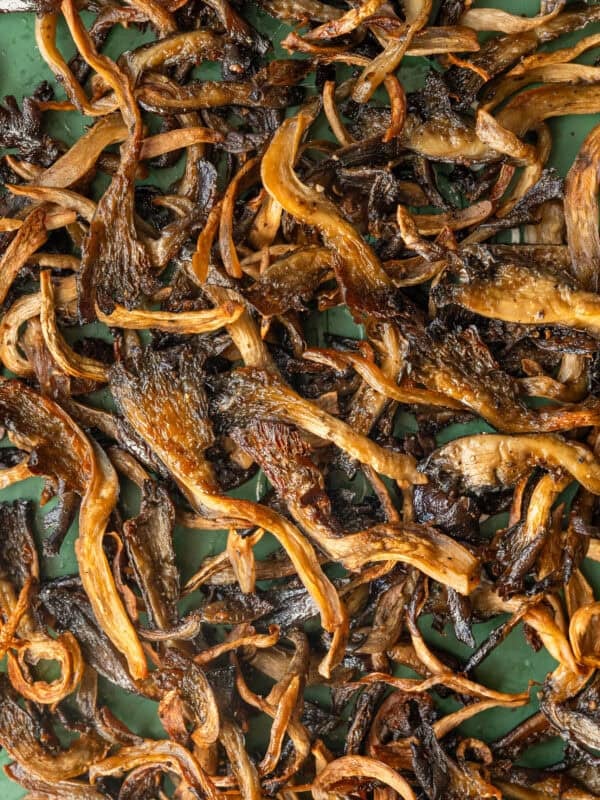
Make the lemon-garlic topping before serving the hummus. Heat the olive oil in a skillet over medium heat until warm but not, then add the sliced garlic and cook until golden but not brown. Add the lemon peel and cook for another 30 seconds, stirring occasionally almost constantly.
Transfer the lemon peel and garlic to a plate (reserving the oil) and add a sprinkle of salt on top.
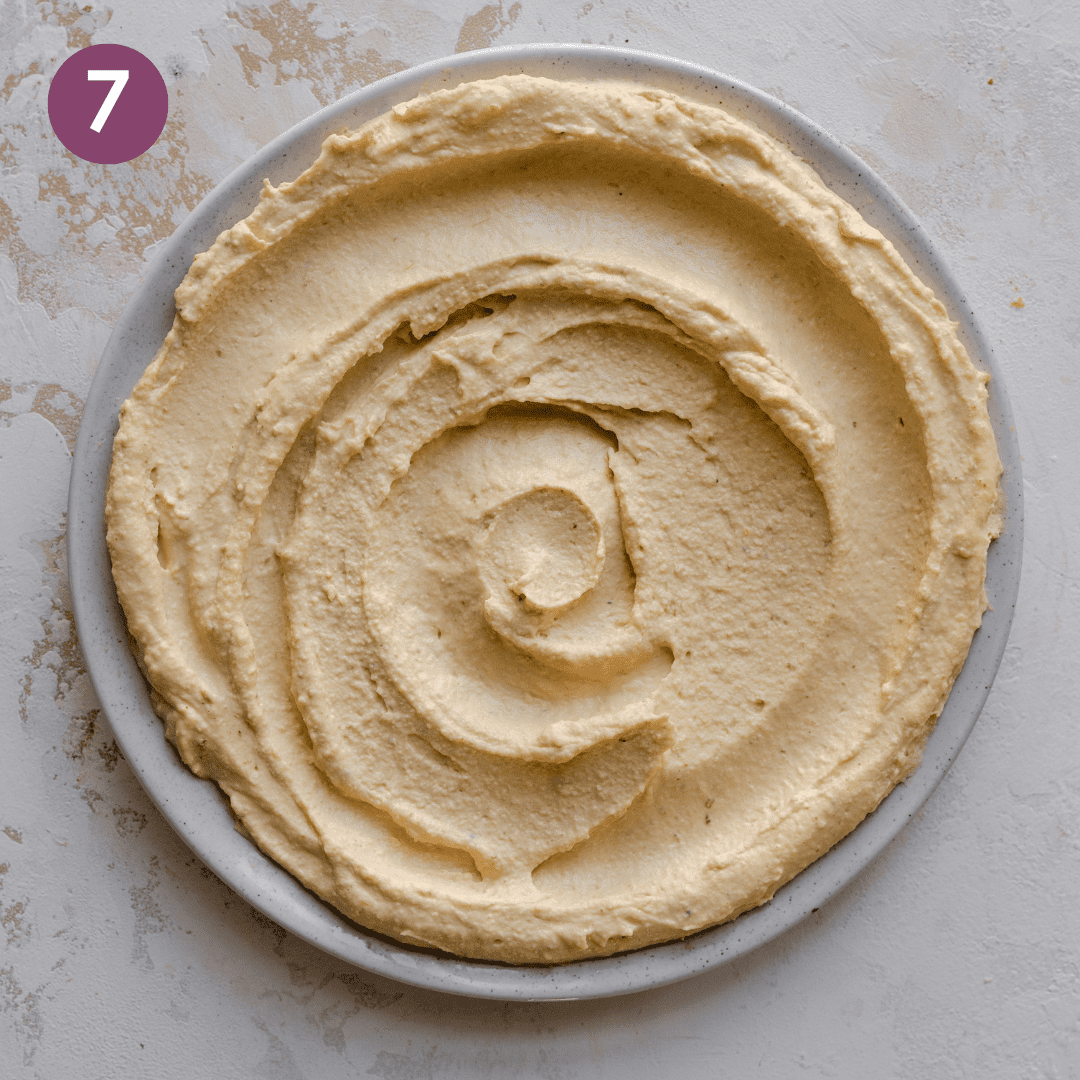
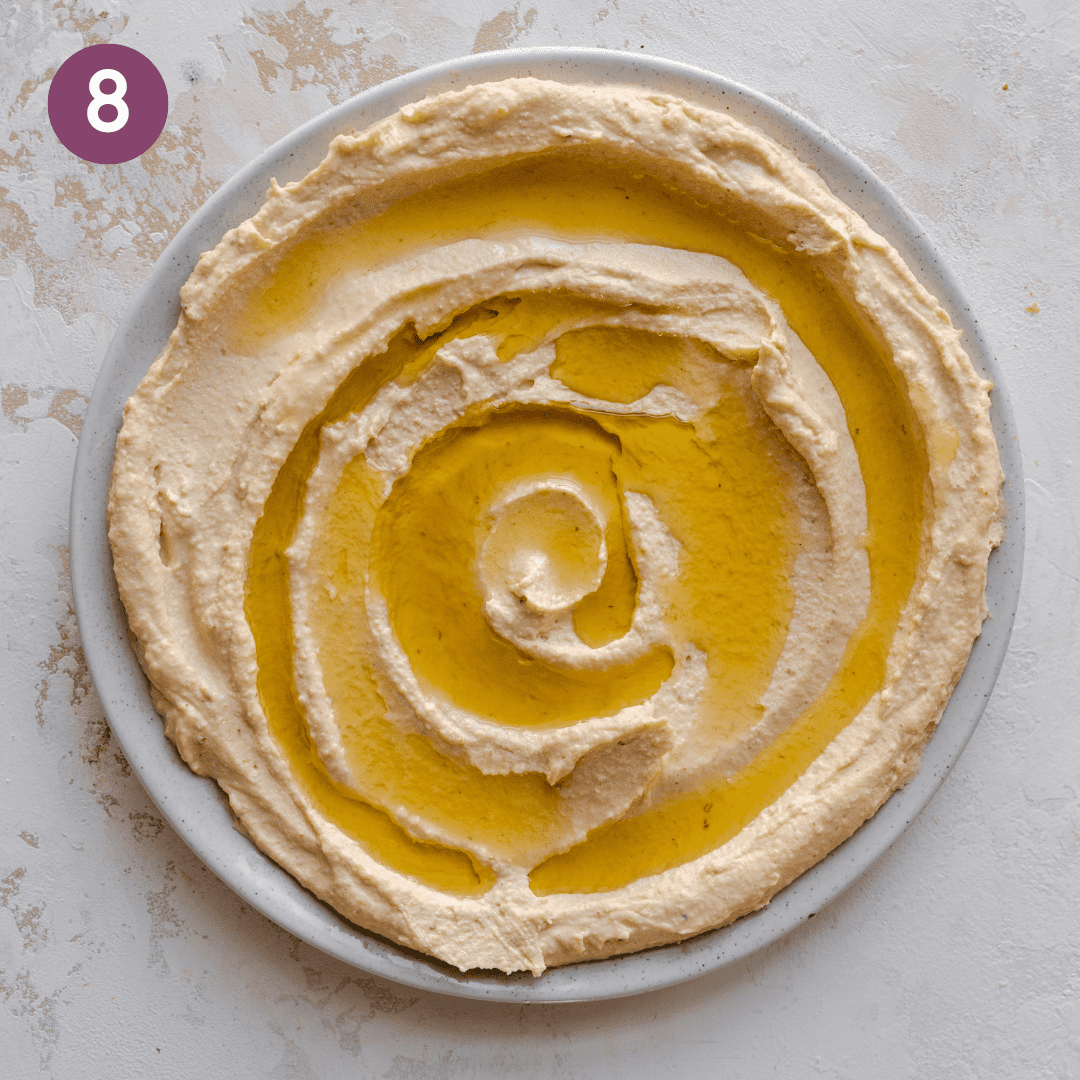
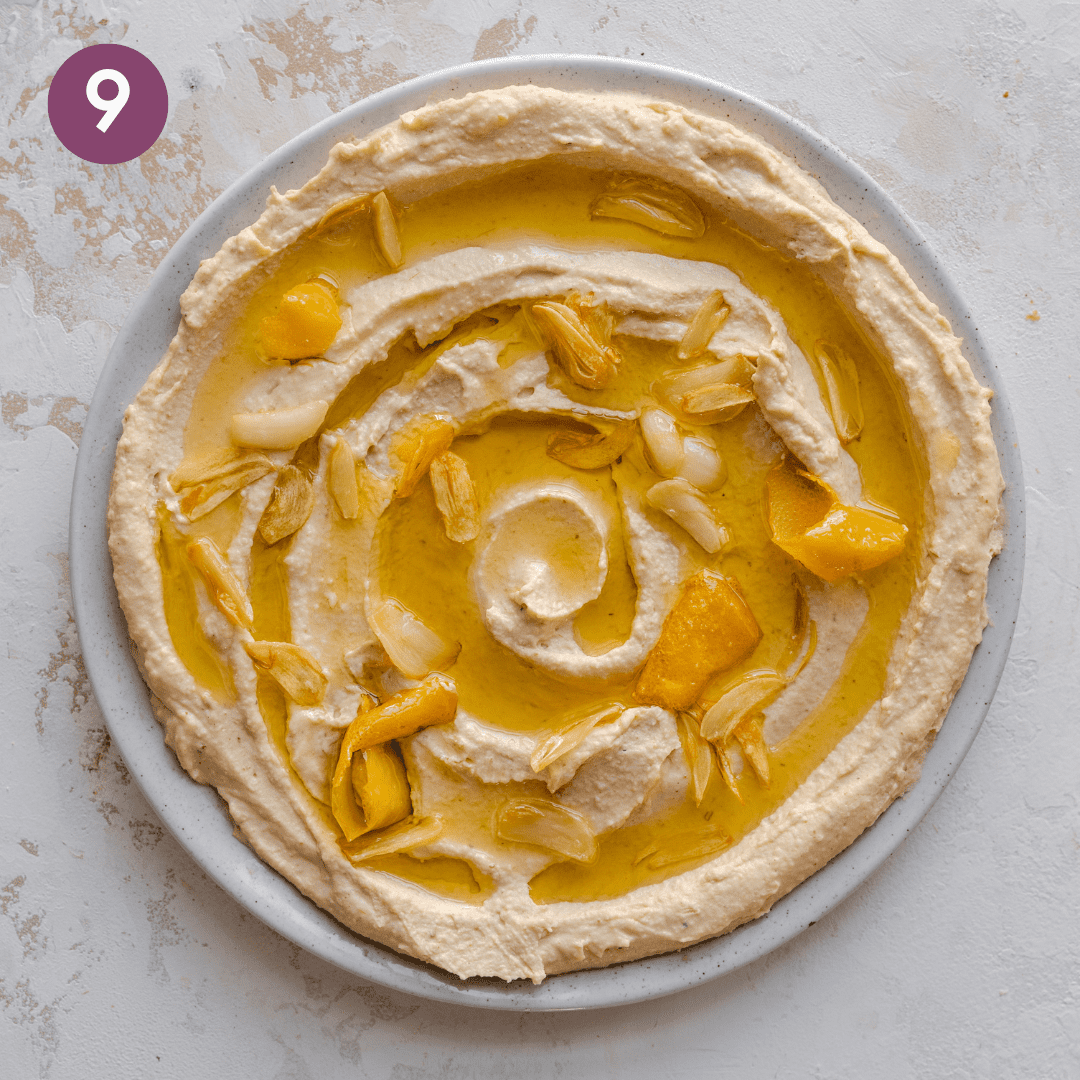
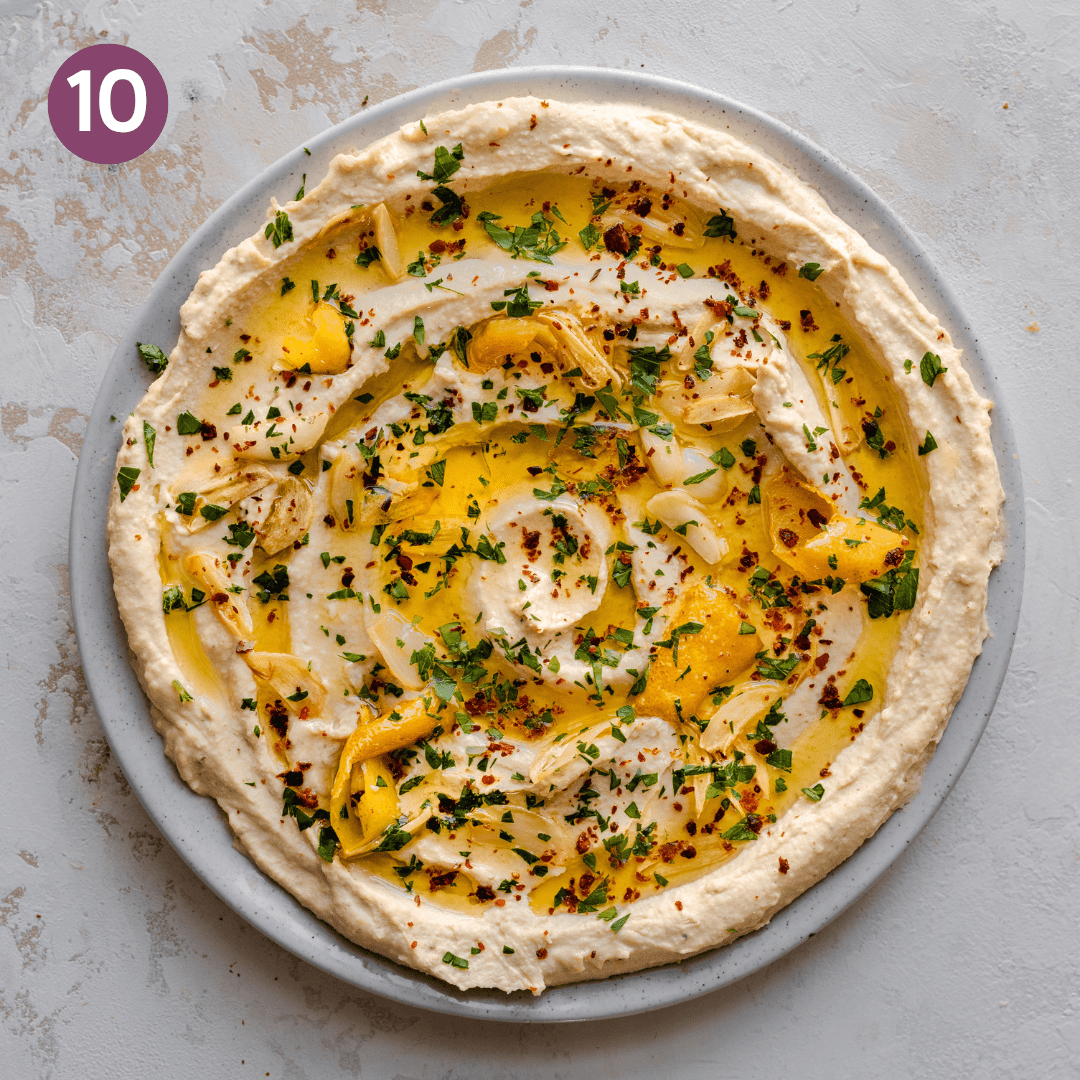
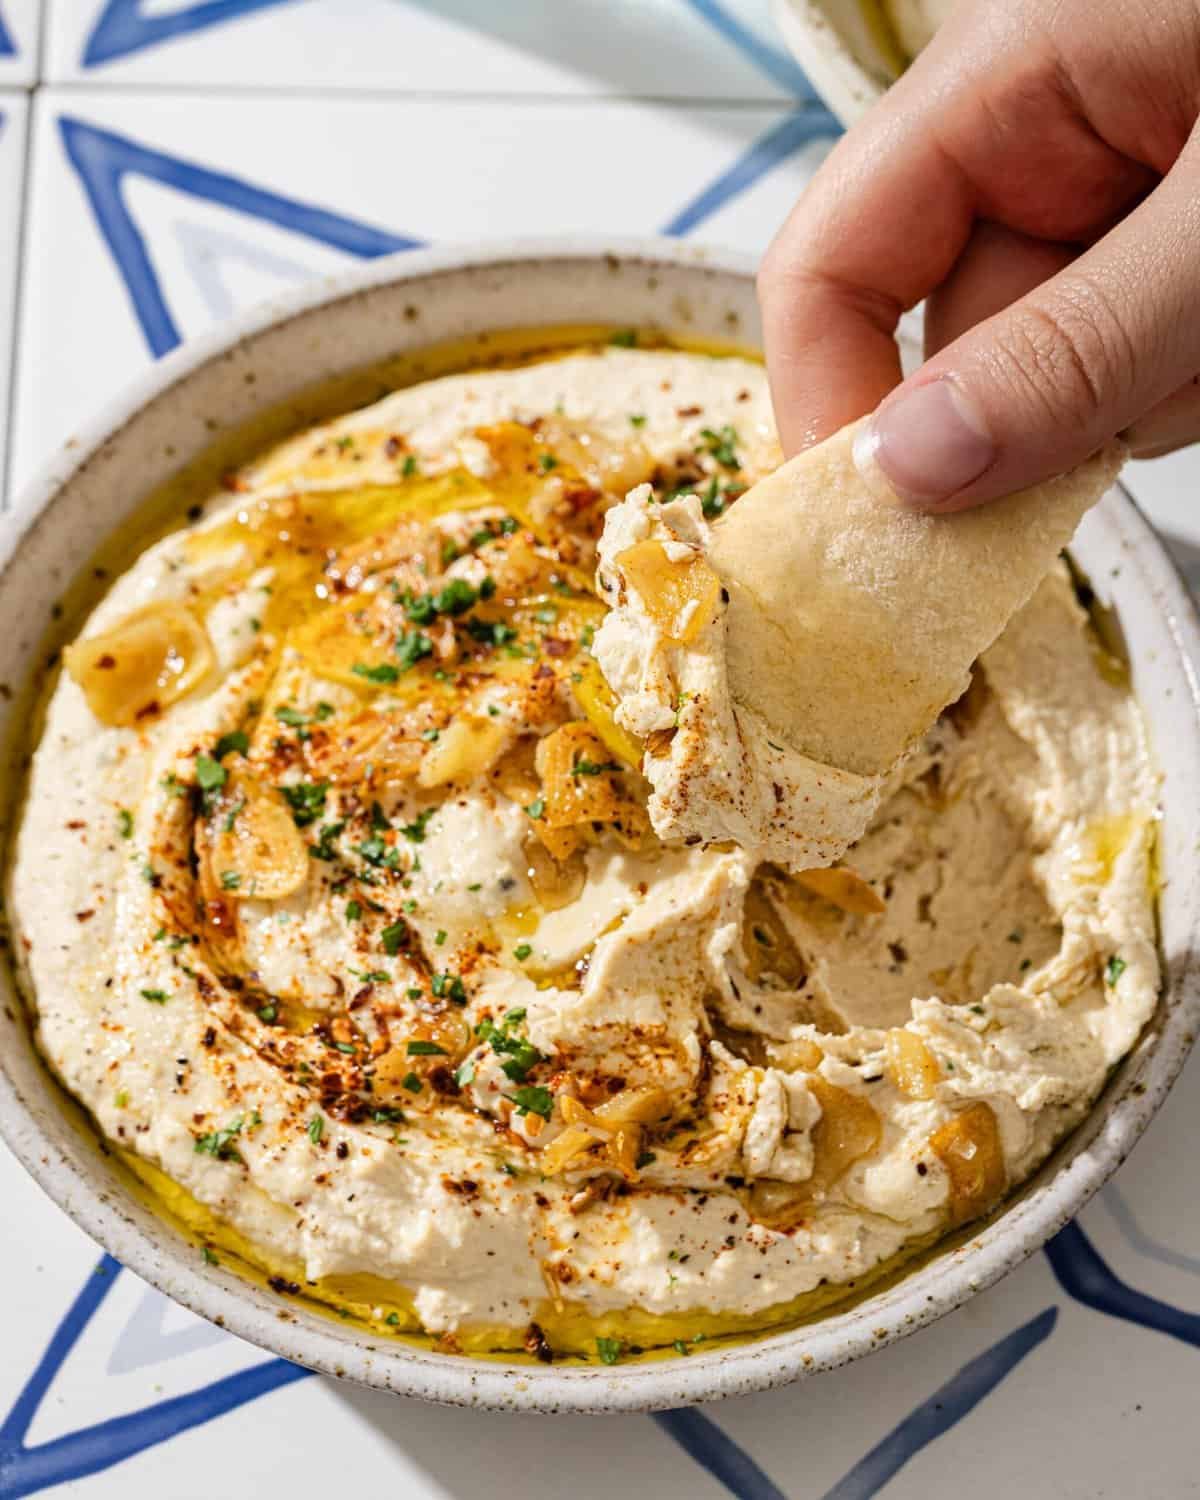
Dress and serve the hummus. Spoon the hummus onto a large serving plate. Use the back of the spoon to make waves or a well in the center. Add the garlic-lemon topping drizzle on the reserved oil, chopped parsley, and paprika or Aleppo pepper. Enjoy!
Tips for making the best hummus
To peel or not to peel?
You will achieve the absolute dreamiest texture if you peel the chickpea skins before blending, but you can still get wonderful results without it.
When you cook the chickpeas with baking soda, it softens them up more, so a lot of chickpea skins actually start to come off naturally. Just discard any loose skins before blending.
If you do want to peel the chickpeas for next-level results, you can speed up the process by laying out the cooked chickpeas on a paper towel; use a second paper towel to rub them vigorously to help loosen the skins.
The chickpeas should be soft
Unlike a salad where you want semi-firm chickpeas, you’re looking for very soft chickpeas that can be easily squashed when pressed with a spoon or pressed between your fingers.
If using canned chickpeas, it’s important to simmer them first so the hummus gets super smooth. Don’t skip this step!
Serve hummus at room temperature (or warm)
In general, you typically can’t taste flavors as deeply in cold food as you can with room temperature or warm food, and hummus is one of the clearest examples of this principle.
Plus, serving hummus warm allows you to experience hummus the way it’s typically served across the Middle East—a luxuriously smooth, warm dip that’s often served with warm pita, or even as the base for vegetables or proteins.
When I make hummus, I blend the chickpeas while still warm, so the freshly made hummus is already warm. However, if you’ve pre-cooked and refrigerated your chickpeas, consider warming the chickpeas up in the microwave first.
For re-warming instructions, check out the FAQ!
Serving suggestions
One of the most popular ways to serve hummus in the West is as an appetizer or snack.
- Make it a part of a grazing board, surrounded with pita bread or homemade naan, fresh-cut veggies, crackers, or pita chips for dipping.
In the Middle East, you’ll find hummus included as part of the main or side dishes during breakfast, lunch, and dinner.
- Hummus is great on a mezze platter with falafel, tabbouleh, and tzatziki
- You can use hummus as the base layer on a plate, then top with cooked beans and roasted veggies (similar to my Broccoli and Za’atar Chickpeas with Yogurt Sauce); or enjoy it with your favorite vegan protein, like Grilled Tofu Skewers.
- Try adding a dollop to my Crispy Tofu Shawarma for a next-level meal (recipe for NYT Cooking, gift link!).
Hummus is also great as a sandwich spread or bowl topper.
- Slather it onto a sandwich or in a stuffed pita with crumbled vegan feta, arugula or kale, cucumber, and pickled red onions.
- Hummus is always a fantastic addition to Mediterranean grain bowls and can even be thinned out with water, lemon juice, or vinegar for an easy salad dressing.
How to jazz up your hummus with toppings
This recipe includes a truly divine fried garlic and lemon topping but, because I can’t stop thinking about ways I’d love to serve this hummus, here are a few more topping ideas:
- Drizzle of EVOO and paprika or Aleppo pepper or sumac plus chopped parsley (and maybe toasted pine nuts!
- Best-quality EVOO and za’atar (see my homemade za’atar on p. 179 of Big Vegan Flavor)
- Best-quality EVOO and Dukkah (p. 219 of Big Vegan Flavor)
- Fried capers (p. 167 of Big Vegan Flavor) and parsley with flaky sea salt and lemon zest
- Best-quality EVOO and roasted chickpeas (p. 236 of Big Vegan Flavor) plus Aleppo pepper and smoked paprika
- Best-quality EVOO and minced preserved lemon with parsley/basil and toasted pine nuts
- Salad greens dressed in best-quality EVOO and vinegar
- Crispy spiced garlic (p. 226 of Big Vegan Flavor)
And while I obviously recommend making hummus from scratch—this whole post is about making hummus from scratch—you can use these topping ideas to jazz up store-bought hummus in a pinch.
Flavor variations
While this classic hummus recipe is my all-time favorite, you can blend lots of fun ingredients to make a flavored version.
- Roasted red pepper hummus: smoky and sweet
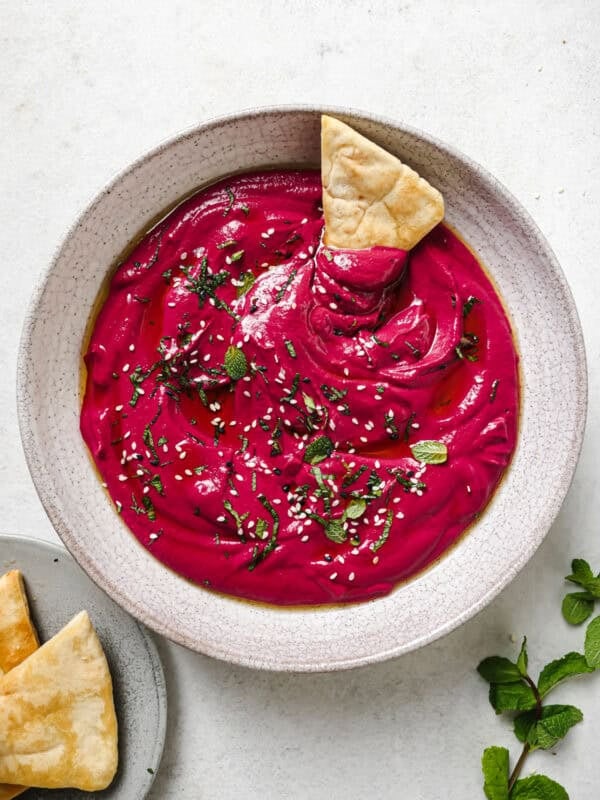
- Beet hummus: breathtakingly beautiful
- Cilantro-jalapeño: Fold in 1 ½ cups of fresh cilantro and 2 to 4 chopped jalapeño peppers
- Tomato-basil: Fold in an ounce or two of sundried tomatoes and blend; garnish with basil and chopped green olives
- Harissa: Fold in 2 to 4 tablespoons of harissa and blend; top with fresh mint.
Frequently Asked Questions
The results won’t be quite as smooth or as flavorful, but you can definitely make hummus with canned chickpeas.
In this recipe, substitute the dried chickpeas with 2 (15-ounce/425g) drained and rinsed cans.
Chickpeas right out of the can will yield a hummus that’s slightly chunky because canned chickpeas are semi-firm.
To remedy that, simmer the canned chickpeas to soften them! Add them to a saucepan, cover with an inch or two of water, and add ½ teaspoon baking soda. Bring to a boil over high heat, then reduce the heat to maintain a rapid simmer for 20 minutes, or until the chickpeas start falling apart. Continue making the recipe as per the instructions at step 3 (draining the chickpeas and adding them to the food processor.
Always use tahini made from hulled sesame seeds, as tahini made with unhulled sesame seeds tends to be bitter.
My favorite tahini brand is Al Kanater, which is available online.
For a grocery store option, the Whole Foods 365 brand is pretty decent. Al Arz and Soom Foods also make very good tahini.
Yes. A high-powered blender with a baton is best and will make the hummus super smooth. However, it’s pretty important to use a small-capacity blender, as there is very little liquid in the recipe. If you use a 64-ounce container, for instance, you’ll have trouble getting it to blend.
It will stay fresh and creamy for up to 1 week in the fridge (but it’s best within 4 days). You can prevent it from drying out by storing it in an airtight container with a light layer of extra virgin olive oil on top.
Allow it to come to room temperature, or warm it up. Warming it up loosens the texture, making it smoother. Simply add the amount of hummus you’d like to reheat to a saucepan, add a couple teaspoons of water, and stir constantly for a few minutes until warmed through. Or, heat it in the microwave in 10-second increments, stirring after each round.
Yes, you can technically freeze hummus, though you’ll lose some of that irresistible texture. To freeze, transfer the hummus to an airtight container but leave some room at the top to allow for expansion. Thaw it in the fridge the day before consuming.

Introducing
Big Vegan Flavor
Techniques and 150 recipes to master vegan cooking.
The Best Homemade Hummus

Equipment
- Food processor
Ingredients
- 8 ounces (227) dried chickpeas (1 cup + 2 tbsp)(See Note 1)
- 1 teaspoon baking soda, divided
- A generous ¾ cup (~185g) good-quality tahini
- 6 tablespoons freshly squeezed lemon juice, plus more to taste
- 3 cloves garlic, chopped (See Note 2)
- 1 teaspoon ground cumin, plus more to taste
- Diamond Crystal kosher salt (see Note 3)
- Freshly cracked black pepper
- 6 to 10 tablespoons (90 to 150 mL) ice water
Fried Garlic-Lemon Topping (Optional but Recommended)
- ⅓ cup (75g) good-quality extra virgin olive oil
- 5 large cloves garlic, thinly sliced
- 4 to 6 strips of lemon peel, about 2 inches long (don't peel too deeply to avoid the white pith)
- Flaky sea salt or kosher salt
For serving (See Note 4)
- 1 handful of flat-leaf parsley, chopped
- Paprika or Aleppo pepper (or sumac)
- Warm pita or lavash bread for dipping
Instructions
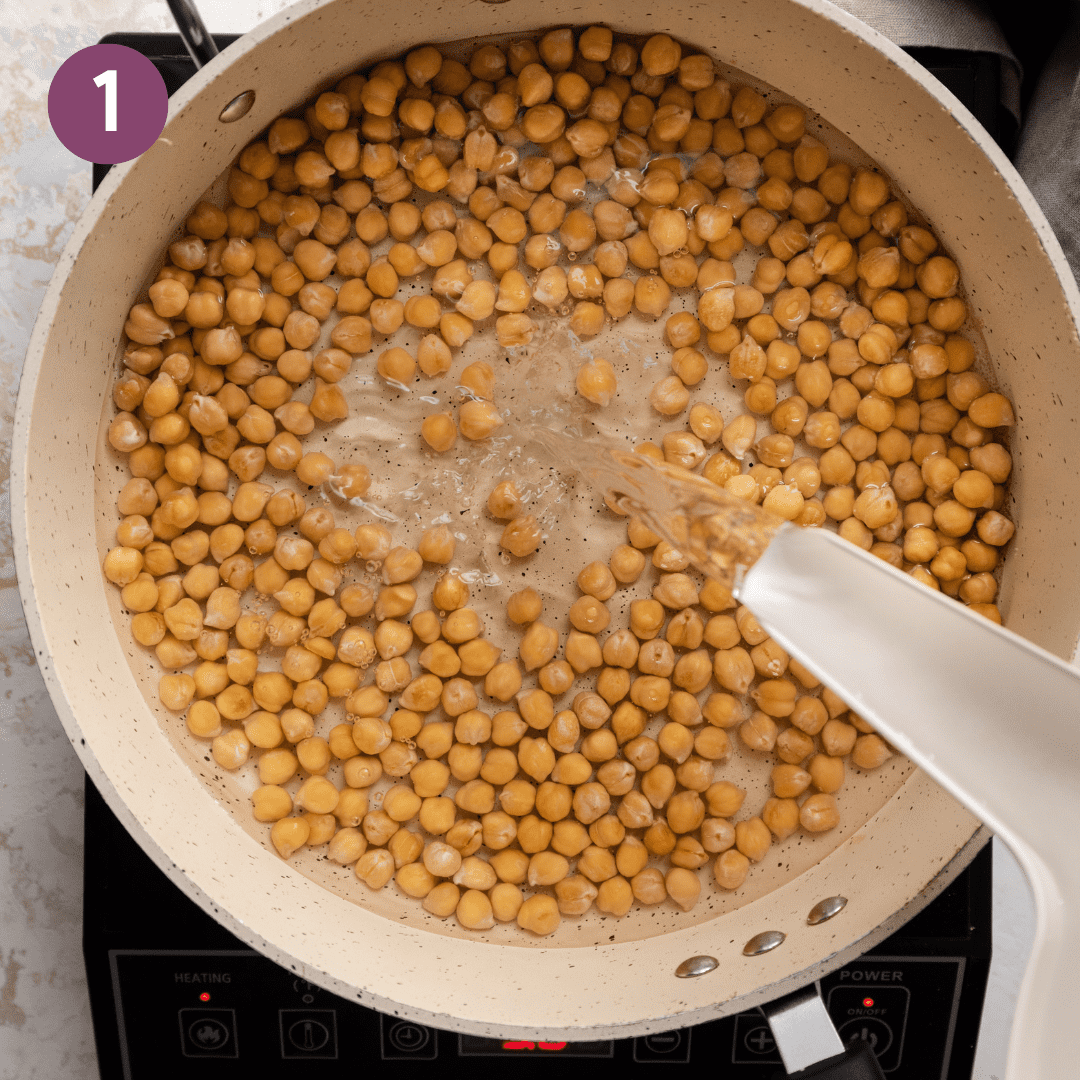
- Soak the chickpeas. Add the chickpeas to a large bowl. Cover with cold water and ½ teaspoon baking soda. Soak for 8 hours or overnight. Drain and rinse.
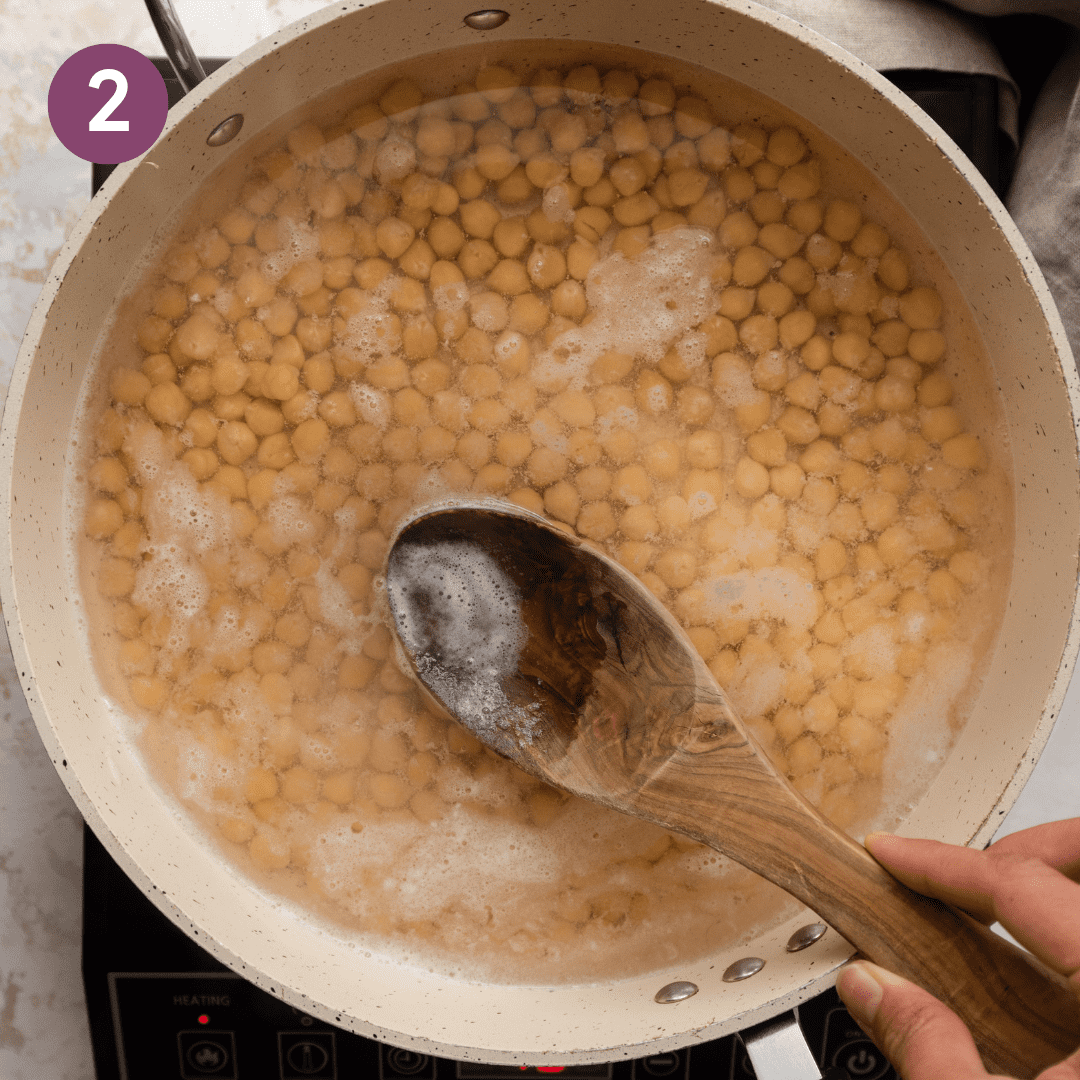
- Cook the chickpeas. Add the drained chickpeas to a medium saucepan with ½ teaspoon baking soda and 6 cups (1.4 L) water. Bring to a boil over medium-high heat. Cover the pot, and reduce the heat as needed to maintain a rapid simmer and cook for 30 minutes.Uncover the pot and add 1 teaspoon of kosher salt. Continue cooking for 10 to 15 minutes, or until the chickpeas are very soft and smush when pressed with a spoon/fork or pressed between your fingers. Drain well.
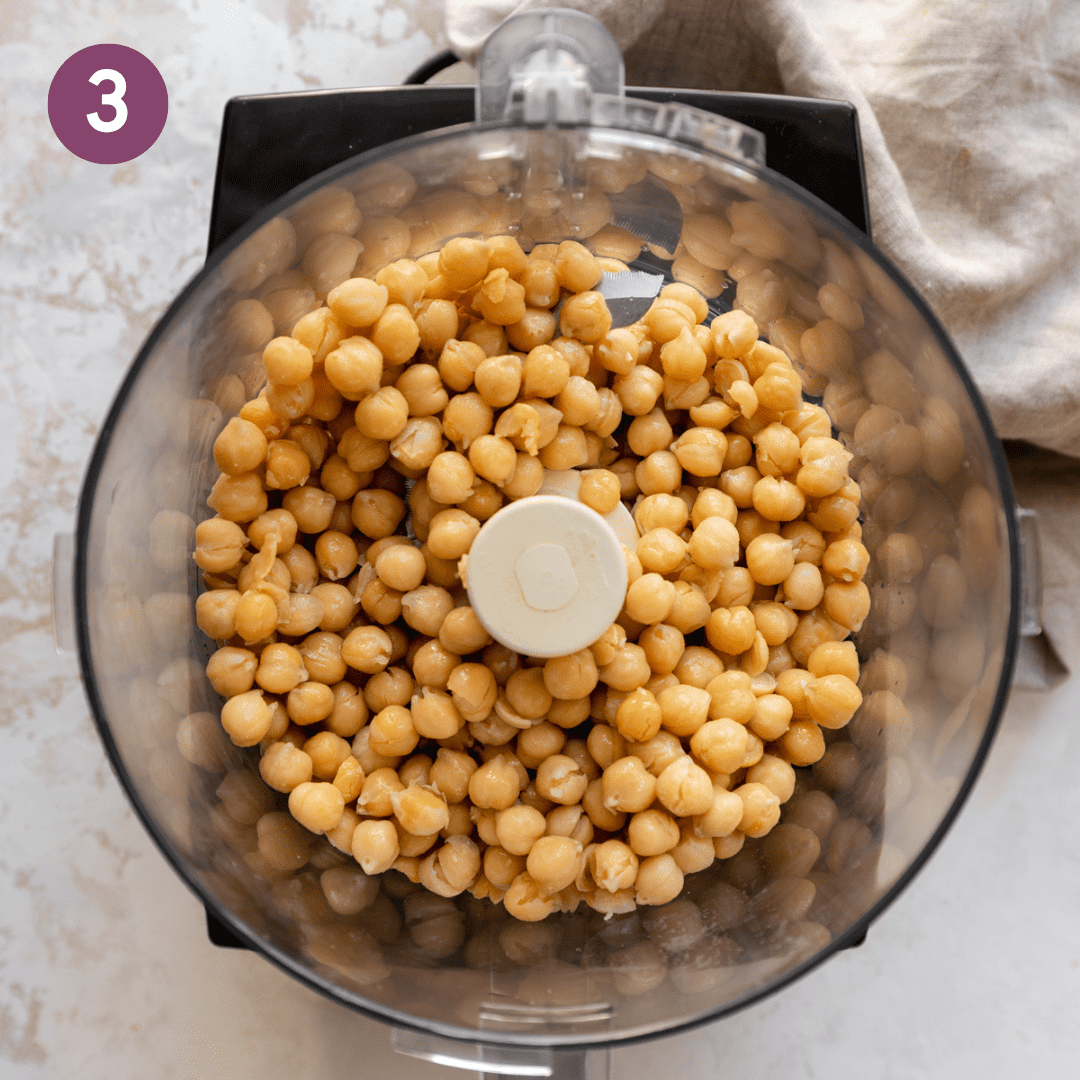
- Drain the chickpeas, then transfer to a food processor. Blend for 1-2 minutes until you have a smooth puree, scraping down the sides as you go.
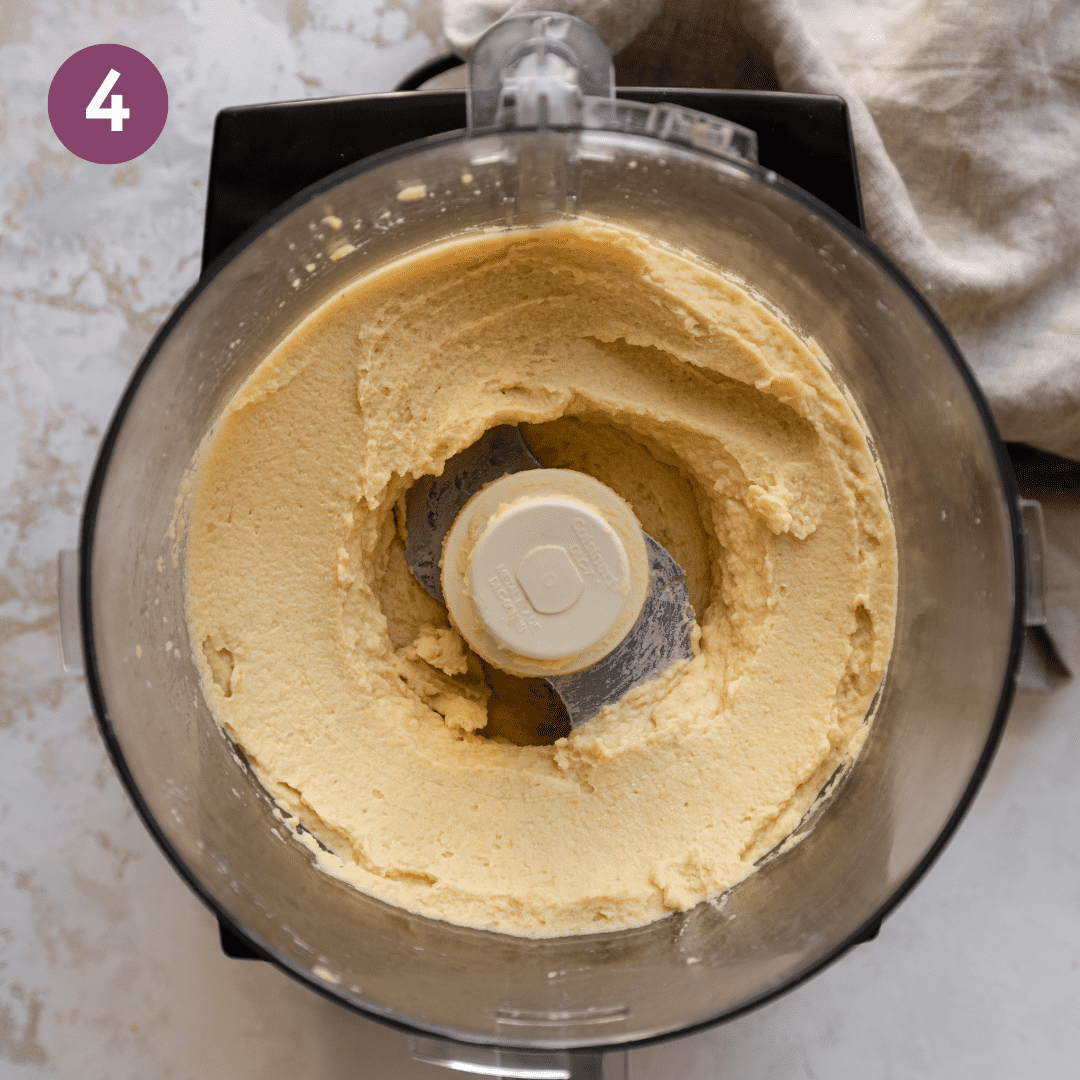
- To the food processor, add the tahini, lemon juice, garlic, cumin, 1 heaping teaspoon kosher salt, and black pepper to taste. Blend, and with the motor running, stream in the ice water, 1 tablespoon at a time.After 6 tablespoons of ice water, evaluate the texture. If it’s still stiff or you want it to be looser, stream in more water, and continue blending until smooth and creamy. Once you reach your desired texture, taste for seasonings, adding more salt, garlic, cumin, or lemon juice as needed.
- Make the Fried Lemon-Garlic Topping. Fit a fine-mesh sieve over a bowl. Add the olive oil to a medium frying pan and turn to medium heat. Once the oil is warm (but not too hot), add the thinly sliced garlic and cook, swirling the pan or stirring frequently, for 2 to 2 ½ minutes, until the garlic just turns golden (don't wait until it browns—it will turn bitter).Add the lemon peel strips and cook for another 30 seconds, stirring almost constantly. Remove from the heat and pour the mixture into the strainer, reserving the oil in the bowl.Transfer the garlic and lemon zest to a plate and sprinkle them with a bit of flaky sea salt.
- Transfer the hummus to a shallow bowl or plate with a lip. Use the back of a spoon to make waves or a well in the center. Spoon the reserved oil into the ridges or into the well. Top with the fried garlic and lemon zest mixture. Top with chopped parsley and a few shakes of paprika or Aleppo pepper. Dig in with warm pita!
Video
Notes
- If using canned chickpeas, see the FAQ question titled “Can I use canned chickpeas to make hummus?”
- If you’re not a huge garlic person, start with 1 clove. After blending, taste and add more garlic as desired.
- If using sea salt or table salt (or Morton’s kosher salt), start with half of the amounts listed, then taste the hummus and add more as desired.
- For more topping options, read the “How to jazz up your hummus with toppings” section.
Nutrition
Nutrition information is automatically calculated, so should only be used as an approximation.


My favourite hummus recipe! Make this weekly. Thank you so much!
Awesome, Danielle. Thanks for your comment and for taking the time to review!
This was so yummy! We recently got a food processor and the first thing I wanted to make with it was hummus! I came across this recipe on YouTube and thought I’d give it a go! I did boil the canned chickpeas for about 20 minutes and sorta skimmed the skins off the top (they kind of floated to the top). It was really creamy and my boyfriend and I really loved it. Thanks! 🙂
That’s so great to hear, Kenzie! Next time, would you mind leaving a rating alongside your review? Star ratings are big help to readers who are thinking of making the recipe. Thanks!
Terrific! Definitely the best hummus I ever tasted, and far better than store-bought. I didn’t have any high-quality tahini, but it was great anyway. And I forgot to remove the loose chickpea skins, but it was still very smooth. Thanks! This recipe is a keeper.
Thanks for the lovely feedback, Deb!
I am at loss of words to describe how much I enjoyed this hummus. It is perfectly creamy, lemony and garlicky. My husband who is Arab also complimented me on this and said that now there is no need to buy hummus anymore😄
Thanks a thousand times for sharing this recipe!
Awesome, Kim. Thanks for your comment and for taking the time to review!
Thank you Nisha for this recipe, I made it using dried chick peas and it is absolutely delicious and so easy. The texture is excellent, taking the skins of the peas really makes a huge difference and not really a big deal. I know I will make this many more times and I will look for the tahini’s you suggested (thank you for that reference)
Awesome, Tracy. Thanks for your comment and for taking the time to review!
This recipe produced by far the best hummus I’ve ever made. Amazing with or without the topping!
So glad to hear it! Thanks for trying the recipe 🙂
This is easily the best hummus recipe I have every used. Using dried chickpeas is 100% worth the slight bit of extra work. I just made another batch about 10 min ago and threw in about 3/4 a bulb of roasted garlic and the hummus is absolutely heavenly. Thanks!
Ooof, the roasted garlic addition sounds so tasty! Glad you loved it!
Never have I ever made hummus before.. WOW!!!! Best hummus I’ve ever had!!!! Store bought is literally crap compared to the flavor and texture in this recipe! Thank you for helping this new vegan try something new!!!
P.S. I also made the flatbread recipe you gave in another video… YUM!!!!
Moraima, So glad to hear you loved this recipe!
Hello Nisha!
I loved this recipe and the zest topping adds that extra flavor that you really can’t replicate in the store bought hummus!
I was curious however when I cooked the chickpeas and add it to the blender, do I only add 1 cup & 2 tablespoons of the cooked chickpeas? When soaking overnight the chickpeas expand in size and therefore I felt like adding all of the chickpeas to the blender was over the 1 cup listed in the recipe.
Thank you so much for being responsive to our cooking needs/questions as well!
Hi Seila, you add all of the chickpeas you soaked! No need to measure after soaking 🙂 And of course! I hope you enjoy the hummus!
Best HUMMUS ever! Topping adds special zest . Thank you fo sharing great recipe !
Hi Oksana, we’re thrilled to hear you enjoyed this recipe! Next time, would you mind leaving a rating alongside your review? Star ratings are big help to readers who are thinking of making the recipe. Thanks!